Friday, August 28, 2015

How To Install Notepadqq 0.50.2 on Ubuntu And Arch Linux

http://linuxg.net/install-notepadqq-on-ubuntu-and-arch-linux/
As you may know, Notepadqq is an open-source clone of Notepad++, written in QT. Among other features of Notepadqq, its worth writing about its syntax highlighing for the most popular programming languages, search-find-replace through regular expressions, split-screen, bookmarks, code folding, et cetera.
The latest version available is Notepadqq 0.50.2, which has been recently released, coming only with fixes.
http://i.imgur.com/MLMRGbd.png

Installation instructions:

For Ubuntu 15.04 Vivid Vervet, Ubuntu 14.10 Utopic Unicorn, Ubuntu 14.04 Trusty Tahr and derivative systems like Linux Mint 17.2 Rafaela, Linux Mint 17.1 Rebecca, Linux Mint 17 Qiana, Pinguy OS 14.04, Elementary OS 0.3 Freya, Deepin 2014, Peppermint 6, Peppermint 5, LXLE 14.04 and Linux Lite 2, the latest notepadqq builds are available via some third party PPA, so installing the software should not be to difficult. Just add the PPA to your system, update the local repository index and install the notepadqq package:
$ sudo add-apt-repository ppa:notepadqq-team/notepadqq
$ sudo apt-get update
$ sudo apt-get install notepadqq
Optional, to remove notepadqq, do:
$ sudo apt-get remove notepadqq
For Arch Linux, Manjaro and other Arch-based notepadqq is available the AUR repository, so it can be easily installed via yaourt:
$ sudo pacman -Sy yaourt
$ sudo yaourt notepadqq
Optional, to remove Notepadqq on Arch Linux, Manjaro and derivative systems, do:


$ sudo yaourt -Rsn notepadqq

Wednesday, August 26, 2015

How to Manage System Logs (Configure, Rotate and Import Into Database)

http://www.tecmint.com/manage-linux-system-logs-using-rsyslogd-and-logrotate

In order to keep your RHEL 7 systems secure, you need to know how to monitor all of the activities that take place on such systems by examining log files. Thus, you will be able to detect any unusual or potentially malicious activity and perform system troubleshooting or take another appropriate action.

In RHEL 7, the rsyslogd daemon is responsible for system logging and reads its configuration from/etc/rsyslog.conf (this file specifies the default location for all system logs) and from files inside /etc/rsyslog.d, if any.

Rsyslogd Configuration

A quick inspection of the rsyslog.conf will be helpful to start. This file is divided into 3 main sections: Modules(since rsyslog follows a modular design), Global directives (used to set global properties of the rsyslogd daemon), and Rules. As you will probably guess, this last section indicates what gets logged or shown (also known as the selector) and where, and will be our focus throughout this article.
A typical line in rsyslog.conf is as follows:
Rsyslogd Configuration
In the image above, we can see that a selector consists of one or more pairs Facility:Priority separated by semicolons, where Facility describes the type of message (refer to section 4.1.1 in RFC 3164 to see the complete list of facilities available for rsyslog) and Priority indicates its severity, which can be one of the following self-explanatory words:
  1. debug
  2. info
  3. notice
  4. warning
  5. err
  6. crit
  7. alert
  8. emerg
Though not a priority itself, the keyword none means no priority at all of the given facility.
Note: That a given priority indicates that all messages of such priority and above should be logged. Thus, the line in the example above instructs the rsyslogd daemon to log all messages of priority info or higher (regardless of the facility) except those belonging to mailauthpriv, and cron services (no messages coming from this facilities will be taken into account) to /var/log/messages.
You can also group multiple facilities using the colon sign to apply the same priority to all of them. Thus, the line:
*.info;mail.none;authpriv.none;cron.none                /var/log/messages
Could be rewritten as
*.info;mail,authpriv,cron.none                /var/log/messages
In other words, the facilities mailauthpriv, and cron are grouped and the keyword none is applied to the three of them.

Creating a custom log file

To log all daemon messages to /var/log/tecmint.log, we need to add the following line either in rsyslog.conf or in a separate file (easier to manage) inside /etc/rsyslog.d:
daemon.*    /var/log/tecmint.log
Let’s restart the daemon (note that the service name does not end with a d):
# systemctl restart rsyslog
And check the contents of our custom log before and after restarting two random daemons:
Linux Create Custom Log File
Create Custom Log File
As a self-study exercise, I would recommend you play around with the facilities and priorities and either log additional messages to existing log files or create new ones as in the previous example.

Rotating Logs using Logrotate

To prevent log files from growing endlessly, the logrotate utility is used to rotate, compress, remove, and alternatively mail logs, thus easing the administration of systems that generate large numbers of log files.
Logrotate runs daily as a cron job (/etc/cron.daily/logrotate) and reads its configuration from/etc/logrotate.conf and from files located in /etc/logrotate.d, if any.
As with the case of rsyslog, even when you can include settings for specific services in the main file, creating separate configuration files for each one will help organize your settings better.
Let’s take a look at a typical logrotate.conf:
Logrotate Configuration
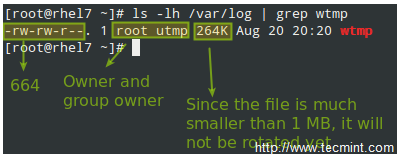
In the example above, logrotate will perform the following actions for /var/loh/wtmp: attempt to rotate only once a month, but only if the file is at least 1 MB in size, then create a brand new log file with permissions set to0664 and ownership given to user root and group utmp. Next, only keep one archived log, as specified by the rotate directive:
Logrotate Logs Monthly
Let’s now consider another example as found in /etc/logrotate.d/httpd:
Rotate Apache Log Files
You can read more about the settings for logrotate in its man pages (man logrotate and man logrotate.conf). Both files are provided along with this article in PDF format for your reading convenience.
As a system engineer, it will be pretty much up to you to decide for how long logs will be stored and in what format, depending on whether you have /var in a separate partition / logical volume. Otherwise, you really want to consider removing old logs to save storage space. On the other hand, you may be forced to keep several logs for future security auditing according to your company’s or client’s internal policies.

Saving Logs to a Database

Of course examining logs (even with the help of tools such as grep and regular expressions) can become a rather tedious task. For that reason, rsyslog allows us to export them into a database (OTB supported RDBMS include MySQL, MariaDB, PostgreSQL, and Oracle.
This section of the tutorial assumes that you have already installed the MariaDB server and client in the same RHEL 7 box where the logs are being managed:
# yum update && yum install mariadb mariadb-server mariadb-client rsyslog-mysql
# systemctl enable mariadb && systemctl start mariadb
Then use the mysql_secure_installation utility to set the password for the root user and other security considerations:
Secure MySQL Database
Note: If you don’t want to use the MariaDB root user to insert log messages to the database, you can configure another user account to do so. Explaining how to do that is out of the scope of this tutorial but is explained in detail in MariaDB knowledge base. In this tutorial we will use the root account for simplicity.
Next, download the createDB.sql script from GitHub and import it into your database server:
# mysql -u root -p < createDB.sql
Save Server Logs to Database
Finally, add the following lines to /etc/rsyslog.conf:
$ModLoad ommysql
$ActionOmmysqlServerPort 3306
*.* :ommysql:localhost,Syslog,root,YourPasswordHere
Restart rsyslog and the database server:
# systemctl restart rsyslog 
# systemctl restart mariadb

Querying the Logs using SQL syntax

Now perform some tasks that will modify the logs (like stopping and starting services, for example), then log to your DB server and use standard SQL commands to display and search in the logs:
USE Syslog;
SELECT ReceivedAt, Message FROM SystemEvents;
Query Logs in Database

Summary

In this article we have explained how to set up system logging, how to rotate logs, and how to redirect the messages to a database for easier search.

Monday, August 24, 2015

Mosh Shell – A SSH Based Client for Connecting Remote Unix/Linux Systems

http://www.tecmint.com/install-mosh-shell-ssh-client-in-linux

Mosh, which stands for Mobile Shell is a command-line application which is used for connecting to the server from a client computer, over the Internet. It can be used as SSH and contains more feature than Secure Shell. It is an application similar to SSH, but with additional features. The application is written originally by Keith Winstein for Unix like operating system and released under GNU GPL v3.
Mosh Shell SSH Client

Features of Mosh

  1. It is a remote terminal application that supports roaming.
  2. Available for all major UNIX-like OS viz., Linux, FreeBSD, Solaris, Mac OS X and Android.
  3. Intermittent Connectivity supported.
  4. Provides intelligent local echo.
  5. Line editing of user keystrokes supported.
  6. Responsive design and Robust Nature over wifi, cellular and long-distance links.
  7. Remain Connected even when IP changes. It usages UDP in place of TCP (used by SSH). TCP time out when connect is reset or new IP assigned but UDP keeps the connection open.
  8. The Connection remains intact when you resume the session after a long time.
  9. No network lag. Shows users typed key and deletions immediately without network lag.
  10. Same old method to login as it was in SSH.
  11. Mechanism to handle packet loss.

Installation of Mosh Shell in Linux

On DebianUbuntu and Mint alike systems, you can easily install the Mosh package with the help of apt-get package manager as shown.
# apt-get update 
# apt-get install mosh
On RHEL/CentOS/Fedora based distributions, you need to turn on third party repository called EPEL, in order to install mosh from this repository using yum package manager as shown.
# yum update
# yum install mosh
On Fedora 22+ version, you need to use dnf package manager to install mosh as shown.
# dnf install mosh

How do I use Mosh Shell?

1. Let’s try to login into remote Linux server using mosh shell.
$ mosh root@192.168.0.150
Mosh Shell Remote Connection
Note: Did you see I got an error in connecting since the port was not open in my remote CentOS 7 box. A quick but not recommended solution I performed was:
# systemctl stop firewalld    [on Remote Server]
The preferred way is to open a port and update firewall rules. And then connect to mosh on a predefined port. For in-depth details on firewalld you may like to visit this post.
  1. How to Configure Firewalld
2. Let’s assume that the default SSH port 22 was changed to port 70, in this case you can define custom port with the help of ‘-p‘ switch with mosh.
$ mosh -p 70 root@192.168.0.150
3. Check the version of installed Mosh.
$ mosh --version
Check Mosh Version
Check Mosh Version
4. You can close mosh session type ‘exit‘ on the prompt.
$ exit
5. Mosh supports a lot of options, which you may see as:
$ mosh --help
Mosh Shell Options
Mosh Shell Options

Cons of Mosh Shell

  1. Mosh requires additional prerequisite for example, allow direct connection via UDP, which was not required by SSH.
  2. Dynamic port allocation in the range of 60000-61000. The first open fort is allocated. It requires one port per connection.
  3. Default port allocation is a serious security concern, especially in production.
  4. IPv6 connections supported, but roaming on IPv6 not supported.
  5. Scrollback not supported.
  6. No X11 forwarding supported.
  7. No support for ssh-agent forwarding.

Conclusion

Mosh is a nice small utility which is available for download in the repository of most of the Linux Distributions. Though it has a few discrepancies specially security concern and additional requirement it’s features like remaining connected even while roaming is its plus point. My recommendation is Every Linux-er who deals with SSH should try this application and mind it, Mosh is worth a try.

Mhddfs – Combine Several Smaller Partition into One Large Virtual Storage

http://www.tecmint.com/combine-partitions-into-one-in-linux-using-mhddfs

Let’s assume that you have 30GB of movies and you have 3 drives each 20 GB in size. So how will you store?
Obviously you can split your videos in two or three different volumes and store them on the drive manually. This certainly is not a good idea, it is an exhaustive work which requires manual intervention and a lots of your time.
Another solution is to create a RAID array of disk. The RAID has always remained notorious for loss of storage reliability and usable disk space. Another solution is mhddfs.
Combine Multiple Partitions in Linux
Mhddfs – Combine Multiple Partitions in Linux
mhddfs is a driver for Linux that combines several mount points into one virtual disk. It is a fuse based driver, which provides a easy solution for large data storage. It combines all small file systems to create a single big virtual filesystem which contains every particle of its member filesystem including files and free spaces.

Why you need Mhddfs?

All your storage devices creates a single virtual pool and it can be mounted right at the boot. This small utility takes care of, which drive is full and which is empty and to write data to what drive, intelligently. Once you create virtual drives successfully, you can share your virtual filesystem using SAMBA. Your client will always see a huge drive and lots of free space.

Features of Mhddfs

  1. Get attributes of the file system and system information.
  2. Set attributes of the file system.
  3. Create, Read, Remove and write Directories and files.
  4. Support for file locks and Hardlinks on single device.
Pros of mhddfsCons of mhddfs
 Perfect for home users.mhddfs driver is not built in the Linux Kernel
 Simple to run. Required lots of processing power during runtime
 No evidence of Data loss No redundancy solution.
 Do not split the file. Hardlinks moving not supported
 Add new files to the combined virtual filesystem. 
 Manage the location where these files are saved. 
  Extended file attributes 

Installation of Mhddfs in Linux

On Debian and portable to alike systems, you can install mhddfs package using following command.
# apt-get update && apt-get install mhddfs
Install Mhddfs on Debian based Systems
On RHEL/CentOS Linux systems, you need to turn on epel-repository and then execute the below command to install mhddfs package.
# yum install mhddfs
On Fedora 22+ systems, you may get it by dnf package manger as shown below.
# dnf install mhddfs
Install Mhddfs on Fedora
If incase, mhddfs package isn’t available from epel repository, then you need to resolve following dependencies to install and compile it from source as shown below.
  1. FUSE header files
  2. GCC
  3. libc6 header files
  4. uthash header files
  5. libattr1 header files (optional)
Next, download the latest source package simply as suggested below and compile it.
# wget http://mhddfs.uvw.ru/downloads/mhddfs_0.1.39.tar.gz
# tar -zxvf mhddfs*.tar.gz
# cd mhddfs-0.1.39/
# make
You should be able to see binary mhddfs in the current directory. Move it to /usr/bin/ and /usr/local/bin/ as root.
# cp mhddfs /usr/bin/ 
# cp mhddfs /usr/local/bin/
All set, mhddfs is ready to be used.

How do I use Mhddfs?

1. Lets see all the HDD mounted to my system currently.
$ df -h
Check Mounted Devices
Sample Output
Filesystem      Size  Used Avail Use% Mounted on

/dev/sda1       511M  132K  511M   1% /boot/efi
/dev/sda2       451G   92G  336G  22% /
/dev/sdb1       1.9T  161G  1.7T   9% /media/avi/BD9B-5FCE
/dev/sdc1       555M  555M     0 100% /media/avi/Debian 8.1.0 M-A 1
Notice the ‘Mount Point‘ name here, which we will be using later.
2. Create a directory /mnt/virtual_hdd where all these all file system will be grouped together as,
# mkdir /mnt/virtual_hdd
3. And then mount all the file-systems. Either as root or as a user who is a member of FUSE group.
# mhddfs /boot/efi, /, /media/avi/BD9B-5FCE/, /media/avi/Debian\ 8.1.0\ M-A\ 1/ /mnt/virtual_hdd  -o allow_other
Mount All File System in Linux
Note: We are used mount Point names here of all the HDDs. Obviously the mount point in your case will be different. Also notice “-o allow_other” option makes this Virtual file system visible to all others and not only the person who created it.
4. Now run “df -h” see all the filesystems. It should contain the one you created just now.
$ df -h
Verify Virtual File System Mount
You can perform all the option to the Virtual File System you created as you would have done to a Mounted Drive.
5. To create this Virtual File system on every system boot, you should add the below line of code (in your case it should be different, depending upon your mount point), at the end of /etc/fstab file as root.
mhddfs# /boot/efi, /, /media/avi/BD9B-5FCE/, /media/avi/Debian\ 8.1.0\ M-A\ 1/ /mnt/virtual_hdd fuse defaults,allow_other 0 0
6. If at any point of time you want to add/remove a new drive to Virtual_hdd, you may mount a new drive, copy the contents of mount point /mnt/virtual_hddun-mount the volume, Eject the Drive you want to remove and/or mount the new drive you want to include, Mount the overall filesystem under Virtual_hdd using mhddfscommand and you should be done.

How do I Un-Mount Virtual_hdd?

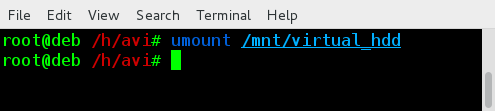
Unmounting virtual_hdd is as easy as,
# umount /mnt/virtual_hdd
Unmount Virtual Filesystem
Notice it is umount and not unmount. A lot of user type it wrong.