Showing posts with label Admin. Show all posts

Sunday, March 31, 2019

How to start your DevOps/Cloud career?

Start learning the below tools with good practice.

OS: Linux (Rhel/Ubuntu)

Cloud: Pick one first like AWS (Amazon) learn it well then move to other Azure, Google & Openstack cloud

Programming/scripting: Bash n python

Orchestration: Terraform

Configuration Management: Ansible/Chef/Puppet. Learning process same as cloud pick one learn n then move to next one.

Containers: Docker, Kubernetes

CI/CD: Jenkins

Repository: Github/Git

DataStore: Sql (postgress) & nosql (Mongodb/Redis)

Last but not least learn apache/tomcat or both.

Learning above tools/technologies will transition you to DevOps/Cloud profile.

Udemy Courses:

JENKINS

https://www.udemy.com/working-with-jenkins/
https://www.udemy.com/jenkins-beginner-tutorial-step-by-step/
https://www.udemy.com/jenkins-quick-start/
https://www.udemy.com/jenkins-devops-pipeline-as-code/
https://www.udemy.com/devops-crash-course-cicd-with-jenkins-pipelines-groovy-dsl/
https://www.udemy.com/jenkins-intro/

ANSIBLE

https://www.udemy.com/ansible-essentials-simplicity-in-automation/
https://www.udemy.com/ansible-quick-start/
https://www.udemy.com/devops-series-server-automation-using-ansible/
https://www.udemy.com/devops-beginners-guide-to-automation-with-ansible/
https://www.udemy.com/just-enough-ansible/

GIT

https://www.udemy.com/git-started-with-github/
https://www.udemy.com/learngit/
https://www.udemy.com/git-expert-4-hours/
https://www.udemy.com/git-and-github-crash-course-creating-a-repository-from-scratch/
https://www.udemy.com/git-and-github-step-by-step-for-beginners/
https://www.udemy.com/intro-to-git/
https://www.udemy.com/short-and-sweet-get-started-with-git-and-github-right-now/
https://www.udemy.com/the-ultimate-git-5-day-challenge/
https://www.udemy.com/git-quick-start/
https://www.udemy.com/gitandgithub/
https://www.udemy.com/git-basics/
https://www.udemy.com/git-bash/

MAVEN
https://www.udemy.com/maven-quick-start/

DevOPS

https://www.udemy.com/learn-devops/
https://www.udemy.com/devops-for-operations/
https://www.udemy.com/linux-academy-devops-essentials/
https://www.udemy.com/learn-devops-kubernetes-deployment-by-kops-and-terraform/
https://www.udemy.com/devops-series-setup-environment-using-virtual-machines/

AWS

https://www.udemy.com/aws-essentials/
https://www.udemy.com/aws-concepts/
https://www.udemy.com/aws-certified-solutions-architect-associate-in-30-days/
https://www.udemy.com/cloud-computing-with-amazon-web-services-part-1/
https://www.udemy.com/learn-amazon-web-services-the-complete-introduction/
https://www.udemy.com/amazon-web-services-aws-v/
https://www.udemy.com/amazon-web-services-aws/
https://www.udemy.com/introduction-to-aws-cloud-computing/
https://www.udemy.com/mastering-aws-featuring-iam/
https://www.udemy.com/namrata-h-shah-aws-tutorials-dynamodb-and-database-migration-service/
https://www.udemy.com/linux-academy-aws-essentials-2019/
https://www.udemy.com/aws-get-started-with-load-balancing-and-auto-scaling-groups/
https://www.udemy.com/aws-certified-associate-exam-vpc-security-group-nacl/
https://www.udemy.com/getting-started-with-amazon-web-services/
https://www.udemy.com/amazon-web-services-aws-ec2-an-introduction/
https://www.udemy.com/introduction-to-serverless-aws/
https://www.udemy.com/amazon-web-services-aws-cloudformation/
https://www.udemy.com/introduction-to-cloud-amazon-web-services-ec2-instance/
https://www.udemy.com/aws-redshift/

Monday, October 1, 2018

IT Automation with Python YAML and Shell Scripting.... many more

Hi All,

If anyone interested to learn below topics please do subscribe the channel for the videos...


Git,RHEL,Shell Script,Yaml,Devops,Docker,Ansible,Python,Django,Jenkins etc...


https://www.youtube.com/channel/UCosFqIt2ejM08YrM4Bc7leQ/videos


Thursday, May 18, 2017

Senior Linux Administrator

Roles and Responsibilities:
  • System Administration - including managing the trouble ticket queue, responding to proactive monitoring alerts, executing change controls, routine maintenance, shell scripting, performance monitoring, tuning, and system diagnostics.
  • 24x7 rotational on-call support, including escalation to Emergency Response Team (ERT), driving Root Cause Analysis (RCA), Preventative action follow-though, and participation in weekly operations reviews.
  • Participation in all on-going infrastructure initiatives including: Software Currency, Hardware Technology Refreshes, Security hardening / Patch currency, and Enterprise Monitoring process improvements
  • Implement Operating System security policies and procedures, in line with Client objectives.
  • Adherence to all infrastructure build standards and final certification of all new system builds through a formal team Operational Readiness reviews
  • Regular proactive capacity planning and tending reviews of all systems
  • Efficient system resource utilization, including optimal performance and management of resource Sharing environments
  • Interaction with 3rd party vendors, Client Teams and senior onsite Systems Engineers as necessary to optimally perform job responsibilities
  • Create and Maintain detailed up to date technical documentation (e.g. standards, process, Run Books)
  • Detailed reporting on the status of trouble tickets and Build projects through defined processes.

Requirements:

  • Bachelors' degree in Computer Science or equivalent.
  • 5+ years of 7*24 Production support experience in managing Linux/Unix environments across different hardware platforms.
  • Hands-on experience in build, clustering, configuration, design, deployment and scalability of Linux/Unix server hardware.
  • General Administration of Unix/Linux - Installation, Users Creation, Group Creation, Permissions, Creations of Folders, Mail (Send Mail, Postfix, Spam Filter Assassin), Web (Apache, Tomcat), FTP, DHCP, DNS, Proxy (Squid), Samba, Firewall (NAT, IP Tables, Packet Filter, IP Filter) LDAP, NFS, NIS, Clear case, Rebuilding the Kernel, Integrating Windows to Linux Domain, Domain in both Windows (ADS) and Linux using LDAP
  • Must be part of the 7*24 on-call schedule for UNIX administration; must be enthusiastic about learning and supporting other flavors of UNIX administration (eg. Solaris, AIX). Understanding of the implementation and configuration of clustering software for the primary OS is strongly desirable.
  • Hands-on experience with installation and troubleshooting various Linux/Unix flavors like RedHat, Fedora Core, CentOS. Must be able to write scripts using Shell (Bash/Ksh/csh) and Perl.
  • Excellent verbal and written communication skills, organization skills, and analytical skills, Leadership skills
  • Excellent customer service & teamwork skills, quality and changed oriented with initiative and eager ability to learn.
  • Ability to operate effectively at all levels, including internal account management and local customer environment to maximize opportunities and improve customer service.
  • Having B1/H1 visa will be an added advantage.

Tuesday, April 12, 2016

Ttech Skills That Will Gives You Huge Salary

PaaS
Cassandra
MapReduce
Cloudera
Apache H Base
Pig
Advance Business Application Programming
Chef
Flume

Saturday, January 30, 2016

50 UNIX / Linux Sysadmin Tutorials

http://www.thegeekstuff.com/2010/12/50-unix-linux-sysadmin-tutorials/

  1. Disk to disk backup using dd command: dd is a powerful UNIX utility, which is used by the Linux kernel makefiles to make boot images. It can also be used to copy data. This article explains how to backup entire hard disk and create an image of a hard disk using dd command.
  2. 15 rsync command examples: Every sysadmin should master the usage of rsync. rsync utility is used to synchronize the files and directories from one location to another. First time, rsync replicates the whole content between the source and destination directories. Next time, rsync transfers only the changed blocks or bytes to the destination location, which makes the transfer really fast.
  3. Three sysadmin rules: If you are a sysadmin, you can’t (and shouldn’t) break these three sysadmin rules.
  4. User and group disk quota: This article explains how to setup user and group quote with soft limit, hard limit and grace period. For example, if you specify 2GB as hard limit, user will not be able to create new files after 2GB.
  5. Troubleshoot using dmesg: Using dmesg you can view boot up messages that displays information about the hardware devices that the kernel detects during boot process. This can be helpful during troubleshooting process.
  6. RPM package management examples: 15 examples provided in this article explains everything you need to know about managing RPM packages on redhat based system (including CentOS).
  7. 10 netstat examples: Netstat command displays various network related information such as network connections, routing tables, interface statistics, masquerade connections, multicast memberships etc.,
  8. Manage packages using apt-* commands: These 13 practical examples explains how to manage packages using apt-get, apt-cache, apt-file and dpkg commands.
  9. Modprobe command examples: modprobe utility is used to add loadable modules to the Linux kernel. You can also view and remove modules using modprobe command.
  10. Ethtool examples: Ethtool utility is used to view and change the ethernet device parameters. These examples will explain how you can manipulate your ethernet NIC card using ethtool.
  11. NFS mount using exportfs: This is a linux beginners guide to NFS mount using exportfs. This explains how to export a file system to a remote machine and mount it both temporarily and permanently.
  12. Change timezone: Depending on your Linux distribution, use one of the methods explained in this article to change the timezone on your system.
  13. Install phpMyAdmin: phpMyAdmin is a web-based tool written in PHP to manage the MySQL database. Apart from viewing the tables (and other db objects), you can perform lot of DBA functions through the web based interface. You can also execute any SQL query from the UI.
  14. Setup squid to control internet access: Squid is a proxy caching server. You can use squid to control internet access at work. This guide will give a jump-start on how to setup squid on Linux to restrict internet access in an network.
  15. Add new swap space: Use dd, mkswap and swapon commands to add swap space. You can either use a dedicated hard drive partition to add new swap space, or create a swap file on an existing filesystem and use it as swap space.
  16. Install and configure snort: Snort is a free lightweight network intrusion detection system for both UNIX and Windows. This article explains how to install snort from source, write rules, and perform basic testing.
  17. Register RHEL/OEL linux to support: If you have purchased support from Oracle for your Linux, you can register to oracle support network (ULN) using up2date as explained here.
  18. tftpboot setup: You can install Linux from network using PXE by installing and configuring tftpboot server as explained here.
  19. Delete all iptables rules: When you are starting to setup iptables, you might want to delete (flush) all the existing iptables as shown here.
  20. Disable ping replies: Someone can flood the network with ping -f. If ping reply is disabled as explained here we can avoid this flooding.
  21. Block ip address using fail2ban: Fail2ban is a intrusion preventon framework that scans log files for various services ( SSH, FTP, SMTP, Apache, etc., ) and bans the IP that makes too many password failures. It also updates iptles firewall rules to reject these ip addresses.
  22. Package management using dpkg: On debian, you can install or remove deb packages using dpkg utility.
  23. Alfresco content management system: Alfresco is the best open source content management system. Everything you need to know to install and configure Alfresco is explained here.
  24. Bugzilla bug tracking system: Bugzilla is the best open source bug tracking system. Everything you need to know to install and configure Bugzilla is explained here.
  25. Rpm, deb, dpot and msi packages: This article explains how to view and extract files from various package types used by different Linux / UNIX distributions.
  26. Backup using rsnapshot: You can backup either a local host or remote host using rsnapshot rsync utility. rsnapshot uses the combination of rsync and hard links to maintain full-backup and incremental backups. Once you’ve setup and configured rsnapshot, there is absolutely no maintenance involved in it. rsnapshot will automatically take care of deleting and rotating the old backups.
  27. Create Linux user: This article explains how to create users with default configuration, create users with custom configuration, create users interactively, and creating users in bulk.
  28. Mount and view ISO file: ISO files are typically used to distribute the operating system. Most of the linux operating system that you download will be on ISO format. This explains how to view and mount any ISO file both as regular use and as root user.
  29. Manage password expiration and aging: Linux chage command can be used to perform several practical password aging activities including how-to force users to change their password.
  30. ifconfig examples: Interface configurator command ifconfig is used to initialize the network interface and to enable or disable the interfaces as shown in these 7 examples.
  31. Oracle db startup an sthudown: Every sysadmin should know some basic DBA operations. This explains how to shutdown and start the oracle database.
  32. PostgreSQL install and configure: Similar to mySQL, postgreSQL is very famous and feature packed free and open source database. This is a jumpstart guide to install and configure postgresql from source on Linux.
  33. Magic SysRq key: Have you wondered what the SysRq key on your keyboard does. Here is one use for it. You can safely reboot Linux using the magic SysRq key as explained here.
  34. Wakeonlan Tutorial: Using Wakeonlan WOL, you can turn on the remote servers where you don’t have physical access to press the power button.
  35. List hardware spec using lshw: ls+hw = lshw, which lists the hardware specs of your system.
  36. View hardware spec using dmidecode: dmidecode command reads the system DMI table to display hardware and BIOS information of the server. Apart from getting current configuration of the system, you can also get information about maximum supported configuration of the system using dmidecode. For example, dmidecode gives both the current RAM on the system and the maximum RAM supported by the system.
  37. Use the support effectively: Companies spend lot of cash on support mainly for two reasons: 1) To get help from vendors to fix critical production issues 2) To keep up-to-date with the latest version of the software and security patches released by the vendors. In this article, I’ve given 10 practical tips for DBAs, sysadmins and developers to use their hardware and software support effectively.
  38. Install/Upgrade LAMP using Yum: Installing LAMP stack using yum is a good option for beginners who don’t feel comfortable installing from source. Also, Installing LAMP stack using yum is a good choice, if you want to keep things simple and just use the default configuration.
  39. Template to track your hardware assests: If you are managing more than one equipment in your organization, it is very important to document and track ALL information about the servers effectively. In this article, I have listed 36 attributes that needs to be tracked for your equipments, with an explanation on why it needs to be tracked. I have also provided a spreadsheet template with these fields that will give you a jumpstart.
  40. Disable SELinux: If you don’t understand how SELinux works and the fundamental details on how to configure it, keeping it enabled will cause lot of issues. Until you understand the implementation details of SELinux you may want to disable it to avoid some unnecessary issues as explained here.
  41. Install PHP5 from source: This is a step-by-step guide to install PHP5 from source on UNIX environment.
  42. Install MySQL from source: This is a step-by-step guide to install MySQL from source on UNIX environment.
  43. Launch Linux clients on windows: If you are using SSH client to connect to Linux server from your Windows laptop, sometimes it may be necessary to launch UI application on the remote Linux server, but to display the UI on the windows laptop. Cygwin can be used to install software on Linux from Windows and launch Linux X client software on Windows.
  44. IPCS: IPC allows the processes to communicate with each another. The process can also communicate by having a file accessible to both the processes. Processes can open, and read/write the file, which requires lot of I/O operation that consumes time. This explains different types of IPCS and provides 10 IPCS command examples.
  45. Logical Volume Manager: Using LVM we can create logical partitions that can span across one or more physical hard drives.You can create and manage LVM using vgcreate, lvcreate, and lvextend lvm2 commands as shown here.
  46. 15 Tcpdump examples: tcpdump is a network packet analyzer. tcpdump allows us to save the packets that are captured, so that we can use it for future analysis. The saved file can be viewed by the same tcpdump command. We can also use open source software like wireshark to read the tcpdump pcap files.
  47. Manage partition using fdisk: Using fdisk you can create a maximum of four primary partition, delete an existing partition, or change existing partition. Using fidsk you are allowed to create a maximum of four primary partition, and any number of logical partitions, based on the size of the disk.
  48. VMWare fundamentals: At some point every sysadmin should deal with virtualization. VMWare is a very popular choise to virtualize your server environment. This article will provide the fundamental information for you to get a jumpstart on VMWare.
  49. Rotate the logs automatically: Manging log files is an importat part of sysadmin life. logrotate make it easy by allowing you to setup automatica log rotation based on several configurations. Using logrotate you can also configure it to execute custom shell scripts immediately after log rotation.
  50. Passwordless SSH login setup: Using ssh-keygen and ssh-copy-id you can setup passwordless login to remote Linux server. ssh-keygen creates the public and private keys. ssh-copy-id copies the local-host’s public key to the remote-host’s authorized_keys file.

Tuesday, November 17, 2015

Kazam Screencaster Gets Webcam And YouTube Live Support, On-Screen Mouse Click And Keyboard Indicator

http://www.webupd8.org/2014/08/kazam-screencaster-gets-webcam-and.html

Kazam is a GStreamer-based screen recording and screenshot tool for Linux. The application supports recording the entire screen (with multi-monitor support), a window or an area and features:
  • customizable framerate;
  • option to show/hide the mouse when recording;
  • record sound from speakers and/or microphone;
  • keyboard shortcuts;
  • configurable delay before capturing;
  • automatic file saving;
  • supports mp4 (H264), webm (VP8) and avi (RAW, HUFFYUV and lossless JPEG) video formats.

Kazam Screencaster

Kazam 1.5.3 was released recently and it includes some very useful new features:
  • support for webcams: it can record just the webcam or it can display the webcam in a window on top of the screencast;
  • support for broadcasting to YouTube Live;
  • added on-screen keyboard indicator and mouse click indicator;
  • new countdown timer.
 Here are a few screenshots with some of these changes:

Kazam Screencaster
Kazam mouse click indicator


Kazam Screencaster
On-screen keyboard indicator (notice "Alt Tab" under the Nemo window)
 
Kazam Screencaster
Kazam webcam options

Kazam Screencaster
YouTube Live options

Kazam demo 

Below you can watch a Kazam demo screencast recorded using the latest Kazam:

 (direct video link; for more videos, subscribe to our YouTube channel)

Install Kazam Screencaster in Ubuntu / Linux Mint


Kazam is available in the official Ubuntu repositories, but it's an old version so it doesn't have the new features mentioned in this article. To get the latest Kazam in Ubuntu or Linux Mint (and derivatives), you can use a PPA.
To add the PPA and install Kazam Screencaster, use the following commands:
sudo add-apt-repository ppa:kazam-team/unstable-series
sudo apt-get update
sudo apt-get install kazam python3-cairo python3-xlib

For other Linux distributions, grab the latest Kazam (unstable branch) from HERE (BZR).
 
Report any bugs you may find @ Launchpad.

Monday, October 26, 2015

10 open source storage solutions that might be perfect for your company

http://www.techrepublic.com/blog/10-things/10-open-source-storage-solutions-that-might-be-perfect-for-your-company/

1: Samba

Samba provides secure, stable, and fast storage (as well as print services) for all clients using the SMB/CIFS protocol (all versions of DOS and Windows, OS/2, Linux, and many others). If you plan to host storage for a variety of platforms, you will not get by without Samba. It's the glue that holds heterogeneous platforms together. In fact, many storage appliances depend upon Samba to get the job done. And now that Samba has nearly seamless integration with Microsoft Active Directory, the solution is all the more flexible.

2: NFS

NFS—the Network File System—was created in 1984 to allow computers to access file systems on remote machines as if they were mounted locally. What's nice about NFS is that it allows you to create a set-it-and-forget-it distributed file system. One caveat: The setup can get a bit complex and you must set up both server and client. NFS is available for every Linux distribution on the planet and can be installed from either the command line or the distribution's package manager.

3: File Server

File Server is a dedicated Linux storage distribution that uses Samba, Webmin, Pydio, SSL, and much more to create an outstanding storage solution without having to piece it all together yourself. One of the best features of File Server is that you can set it up as both a standard Windows-compatible storage solution and as a web-based file solution. With the help of Pydio, you can enjoy an incredibly easy -to-use web interface to store your files.

4: Ceph

Ceph is a distributed object store and file system "designed for excellent performance, reliability, and scalability." In other words, this is storage for the big boys; small shops need not apply. Ceph is the solution you want when you're looking for massive data storage. It also works seamlessly with block storage—so you can use it on a storage cluster for scalability.

5: FreeNAS

FreeNAS is another storage-based Linux distribution that can be installed on nearly any platform to create an outstanding storage solution. It features replication, encryption, data protection, snapshots, file sharing, an easy-to-use web-based interface, and a powerful plug-in system. FreeNAS provides a versatile solution that any platform can connect to and any business can enjoy.

6: Openfiler

Openfiler makes it easy for you to deploy both storage area networking (SAN) and network attached storage (NAS) with all the bells and whistles your company needs. Openfiler offers a community edition and a commercial edition. The commercial edition is ideal for iSCSI Target and Fibre Channel Target stacks and features high availability cluster/failover as well as block-level replication for disaster recovery.

7: ZFS file system

ZFS file system is one of the better file systems to use when considering a storage solution. It offers excellent scalability and data integrity. When you're installing most Linux distributions, you can choose the file system you want to use. If setting up a Linux storage solution, ZFS will go further to ensure data integrity than any other file system. If you do decide to dive into ZFS, make sure you do plenty of research and understand what it does and how it works.

8: OpenMediaVault

OpenMediaVault is an open NAS solution built on Debian that features services like SSH, (S)FTP, SMB/CIFS, DAAP media server, RSync, and BitTorrent client. OpenMediaVault offers a massive plug-in system—so if it doesn't have what you need, you can add it with ease. This might well be one of the best out-of-the-box storage solution experiences you'll ever have. It's that easy to use. OpenMediaVault also enjoys full-on UPS support.

9: Lustre

Lustre is a "scale-out architecture distributed parallel filesystem." It's lightning fast and can handle petabytes of data and tens of thousands of nodes. The description alone should indicate that Lustre is designed to address large-scale storage needs. Since 2005 Lustre has been consistently used by half of the top 10 supercomputers on the planet. Ideal industries for Lustre include meteorology, simulation, oil and gas, life science, rich media, and finance.

10: Linux

I cannot, in good conscience, list the best open source storage solutions without including Linux itself. Why? Because most Linux distributions can easily serve as an effective storage solution. Of course, depending upon your size, you may need to tweak various aspects or turn to an enterprise distribution (such as Red Hat or SUSE). But for network storage, Linux has you covered.

10 Linux GUI tools for sysadmins


http://www.techrepublic.com/blog/10-things/10-linux-gui-tools-for-sysadmins/

What are some good GUI tools that can simplify your Linux sysadmin tasks? Let's take a look at 10 of them.

1: MySQL Workbench

MySQL Workbench is one of my favorite tools for working with MySQL databases. You can work locally or remotely with this well designed GUI tool. But MySQL Workbench isn't just for managing previously created databases. It also helps you design, develop, and administer MySQL databases. A newer addition to the MySQL Workbench set of tools is the ability to easily migrate Microsoft SQL Server, Microsoft Access, Sybase ASE, PostgreSQL, and other RDBMS tables, objects, and data to MySQL. That alone makes MySQL Workbench worth using.

2: phpMyAdmin

phpMyAdmin is another MySQL administration tool... only web based. Although it doesn't offer the bells and whistles of MySQL Workbench, it's a much more user-friendly tool. With phpMyAdmin you can create and manage MySQL databases via a standard web browser. This means you can install phpMyAdmin on a headless Linux server and connect to it through any browser that has access to the machine.

3: Webmin

Webmin is a web-based one-stop-shop tool for administering Linux servers. With Webmin you can manage nearly every single aspect of a server—user accounts, Apache, DNS, file sharing, security, databases, and much more. And if what you need isn't included with the default installation, a massive number of third-party modules are available to take up the slack.

4: YaST

YaST stands for Yet Another Setup Tool. It enables system configuration for enterprise-grade SUSE and openSUSE and serves as both the installation and configuration tool for the platform. With YaST you can configure hardware, network, and services and tune system security, all with an easy-to-use, attractive GUI. YaST is installed by default in all SUSE and openSUSE platforms.

5: Shorewall

Shorewall is a GUI for configuring iptables. Yes, there are other GUIs for tuning the security of your system, but many of them don't go nearly as deep as Shorewall. Where an app like UFW is one of the best security tuners for the desktop, Shorewall is tops for the server. With this particular security GUI, you can configure gateways, VPNs, traffic controlling, blacklisting, and much more. If you're serious about your firewall, and you want a GUI for the job, Shorewall is what you want.

6: Apache Directory

Apache Directory is about the only solid GUI tool for managing any LDAP server (though it is designed particularly for ApacheDS). It's an Eclipse RCP application and can serve as your LDAP browser, schema editor, ApacheDS configuration editor, LDIF editor, ACI editor, and more. The app also contains the latest ApacheDS, which means you can use it to create a DS server in no time.

7: CUPS

CUPS is the Linux printer service that also happens to have a web-based GUI tool for the management of printers, printer classes, and print queues. It is also possible to enable Kerberos authentication and remote administration. One really nice thing about this GUI is its built-in help system. You can learn nearly everything you need to manage your print server.

8: cPanel

cPanel is one of the finest web-based administration tools you'll use. It lets you configure sites, customers' sites and services, and quite a bit more. With this tool you can configure/manage mail, security, domains, apps, apps, files, databases, logs—the list goes on and on. The only drawback to using cPanel is that it's not free. Check out the pricing matrix to see if there's a plan to fit your needs.

9: Zenmap

Zenmap is the official front end for the Nmap network scanner. With this tool, both beginners and advanced users can quickly and easily scan their network to troubleshoot issues. After scanning, you can even save the results to comb through them later. Although you won't use this tool to directly administer your system, it will become invaluable in the quest for discovering network-related issues.

10: Cockpit

Cockpit was created by Red Hat to make server administration easier. With this web-based GUI you can tackle tasks like storage administration, journal inspection, starting/stopping services, and multiple server monitoring. Cockpit will run on Fedora Server, Arch Linux, CentOS Atomic, Fedora Atomic, and Red Hat Enterprise Linux.

Friday, October 23, 2015

How to find out files updated in last N minutes

Issue
How to find out files updated in last N minutes?

Resolution
It is simple. Use the following command:
Syntax:
find -cmin -N
where N is the number of minutes
Example:
find /suresh/home/songs/ -cmin -10
Tip:
If you would like to see path of the file's directory then use the ls command along with the above command:
find /suresh/home/songs/ -cmin -10 ls

Saturday, October 10, 2015

How to boot into BOSS from the Grub Rescue prompt?

This guide will detail how to boot from the "grub rescue>" prompt for grub2 users.
Boot Procedure:
1. Locate the BOSS partition and the folder containing the Grub modules.
The Grub folder containing the modules must be located so the correct modules can be loaded. This folder was created during BOSS installation and should be located in the BOSS partition. This folder would be located at either (hdX,Y)/boot/grub or (hdX,Y)/usr/lib/grub/i386-pc.
Commands:
ls                               # List the known drives (hdX) and partitions  (hdX,Y).

ls (hdX,Y)/                      # List the contents of the partition's root.

ls (hdX,Y)/boot/grub             # Normal location of the Grub 2 modules.

ls (hdX,Y)/usr/lib/grub/i386-pc  # Alternate location of the Grub 2 modules.

2. Load the modules
commands:
set prefix=(hdX,Y)/boot/grub
insmod linux
eg:
 set prefix=(hd0,1)/boot/grub 
 insmod linux
3. Load the Linux kernel and initrd image using the following commands.
 set root=(hd0,1)
 linux /boot/vmlinuz-2.6.32-5-686 root=/dev/sda1
 initrd /boot/initrd.img-2.6.32-5-686
 boot

Monday, August 31, 2015

Install APC (Alternative PHP Cache) in RHEL/CentOS 6/5 & Fedora 20-12

http://www.tecmint.com/install-apc-alternative-php-cache-in-rhel-centos-fedora/

APC (Alternate PHP Cache) is an free and open source cache for PHP code. The main goal of this module is to provide robust framework for caching and optimizing PHP code.
Install PHP APC in Linux
Install and Enable PHP APC in Linux
The instructions provided here shows how to install and enable APC caching for PHP on RHEL 6.5/6.4/6.3/6.2/6.1/6/5.8/5.6CentOS 6.5/6.4/6.3/6.2/6.1/6/5.8/5.6 and Fedora 20,19,18,17,16,15,14,13,12using PECL command to download from the repositories.

Install Dependency Packages for APC

First, we need to install required packages called peclphpize and apxs commands, to install APC using YUMpackage manager tool.
yum install php-pear php-devel httpd-devel pcre-devel gcc make

Install APC Using PECL

Now we have all the needed packages to install APC. Here we use PECL command to install it. Please select default settings when asked.
pecl install apc
Sample Output :
WARNING: channel "pecl.php.net" has updated its protocols, use "pecl channel-update pecl.php.net" to update
downloading APC-3.1.9.tgz ...
Starting to download APC-3.1.9.tgz (155,540 bytes)
.................................done: 155,540 bytes
54 source files, building
running: phpize
Configuring for:
PHP Api Version:         20090626
Zend Module Api No:      20090626
Zend Extension Api No:   220090626
config.m4:180: warning: AC_CACHE_VAL(PHP_APC_GCC_ATOMICS, ...): suspicious cache-id, must contain _cv_ to be cached
../../lib/autoconf/general.m4:1974: AC_CACHE_VAL is expanded from...
../../lib/autoconf/general.m4:1994: AC_CACHE_CHECK is expanded from...
config.m4:180: the top level
config.m4:180: warning: AC_CACHE_VAL(PHP_APC_GCC_ATOMICS, ...): suspicious cache-id, must contain _cv_ to be cached
../../lib/autoconf/general.m4:1974: AC_CACHE_VAL is expanded from...
../../lib/autoconf/general.m4:1994: AC_CACHE_CHECK is expanded from...
config.m4:180: the top level
Enable internal debugging in APC [no] :
Enable per request file info about files used from the APC cache [no] :
Enable spin locks (EXPERIMENTAL) [no] :
Enable memory protection (EXPERIMENTAL) [no] :
Enable pthread mutexes (default) [yes] :
Enable pthread read/write locks (EXPERIMENTAL) [no] :

Enable APC PHP Extension

Run the following command to enable APC extension in Apache configuration.
echo "extension=apc.so" > /etc/php.d/apc.ini

Restart Apache Service for APC

Restart the Apache service to take new changes.
service httpd restart
OR
/etc/init.d/httpd restart

Verify APC Installation

Create a file phpinfo.php in Apache web root directory. For example /var/www/html/phpinfo.php.
# vi /var/www/html/phpinfo.php
Add the following code to it. save and close.

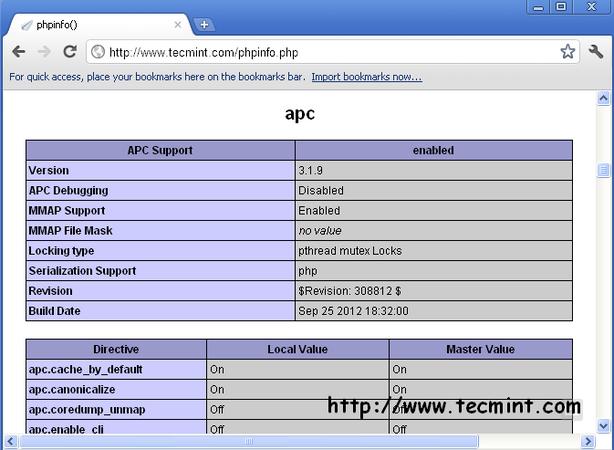
Open any browser and type the following URL. You will see APC enabled configuration similar to below.
http://localhost/phpinfo.php
PHP APC Extension
PHP APC Configuration Screen

Enable PHP APC administration

To enable APC administration panel, copy the following file.
cp /usr/share/pear/apc.php /var/www/html/
Now open the file apc.php with VI editor.
# vi /var/www/html/apc.php
Now set the username and password in the file apc.php as shown below.
defaults('ADMIN_USERNAME','apc');       // Admin Username
defaults('ADMIN_PASSWORD','Set-Password-Here');  // Admin Password - CHANGE THIS TO ENABLE!!!
Type the following URL in the browser. You will get administration panel of APC.
http://localhost/apc.php
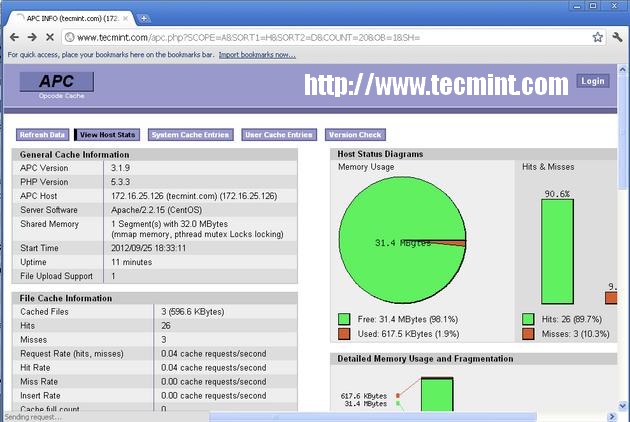
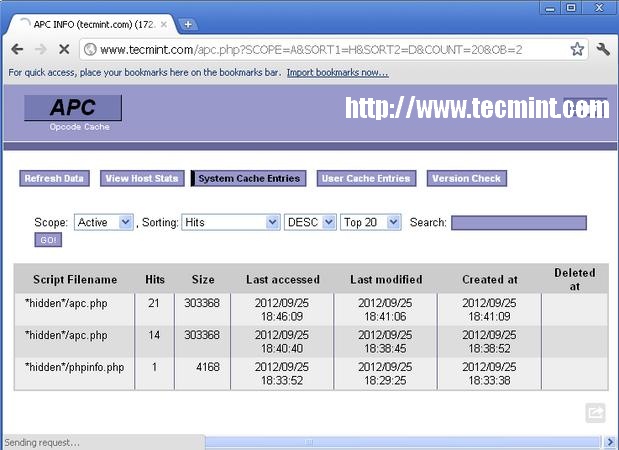
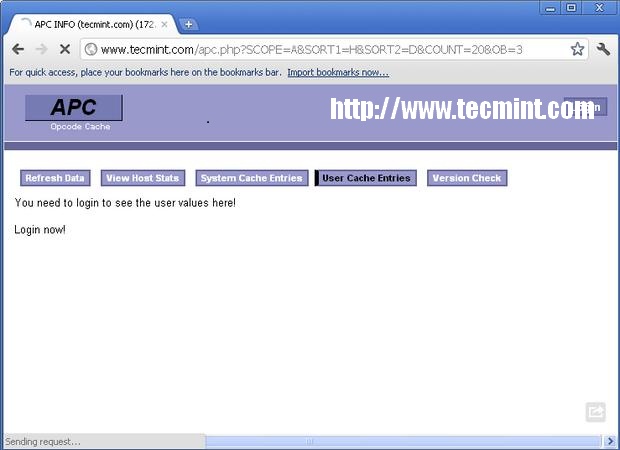
Some screenshots of APC Administration panel for your reference.
Vies Host Stats
APC View Host Stats
APC View Host Stats Overview
System Cache Entries
APC System Cache Entries
APC System Cache Entries Overview
User Cache Entries
APC User Cache Entries
APC User Cache Entries Overview
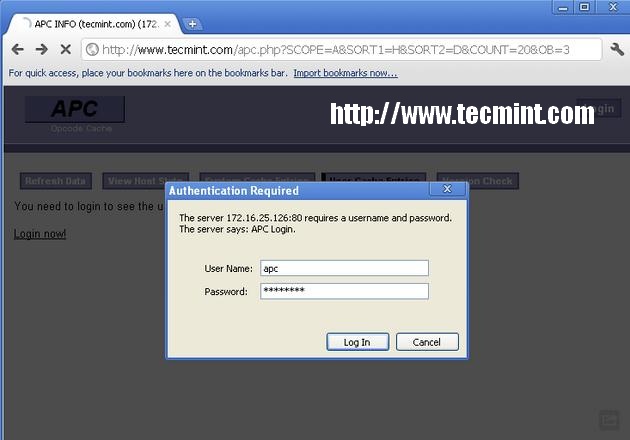
APC Login Screen
APC Admin Login
APC Admin Login Screen
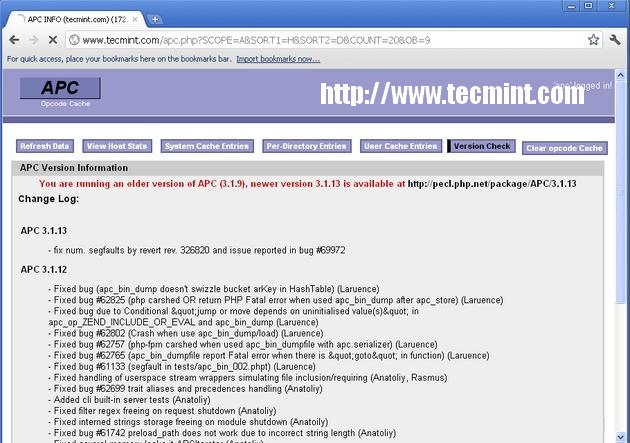
APC Version Check
APC Version Check
APC Version Check Overview

Upgrade APC using PECL

To upgrade, just execute following command it will download and upgrade APC.
pecl upgrade apc

Uninstall APC using PECL

If you like to remove it, then simple type the following command to uninstall APC completely from the system.
pecl uninstall apc

Setting Up High-Performance ‘HHVM’ and Nginx/Apache with MariaDB on Debian/Ubuntu

http://www.tecmint.com/install-hhvm-and-nginx-apache-with-mariadb-on-debian-ubuntu

HHVM stands for HipHop Virtual Machine, is an open source virtual machine created for running Hack (it’s a programming language for HHVM) and PHP written applications. HHVM uses a last minute compilation path to achieve remarkable performance while keeping the flexibility that PHP programmers are addicted to. Till date, HHVM has achieved over a 9x increase in http request throughput and more than 5x cut in memory utilization (when running on low system memory) for Facebook compared with the PHP engine + APC (Alternative PHP Cache).
HHVM can also be used along with a FastCGI-based web-server like Nginx or Apache.
Install HHVM, Nginx and Apache with MariaDB
In this tutorial we shall look at steps for setting up Nginx/Apache web server, MariaDB database server andHHVM. For this setup, we will use Ubuntu 15.04 (64-bit) as HHVM runs on 64-bit system only, although Debian and Linux Mint distributions are also supported.

Step 1: Installing Nginx and Apache Web Server

1. First do a system upgrade to update repository list with the help of following commands.
# apt-get update && apt-get upgrade
System Upgrade
System Upgrade
2. As I said HHVM can be used with both Nginx and Apache web server. So, it’s your choice which web server you will going to use, but here we will show you both web servers installation and how to use them with HHVM.

Installing Nginx

In this step, we will install Nginx/Apache web server from the packages repository using following command.
# apt-get install nginx
Install Nginx Web Server

Installing Apache

# apt-get install apache2
Install Apache Web Server
At this point, you should be able to navigate to following URL and you will able to see Nginx or Apache default page.
http://localhost
OR
http://IP-Address
Nginx Default Page
Nginx Welcome Page
Nginx Welcome Page
Apache Default Page
Apache Default Page
Apache Default Page

Step 2: Install and Configure MariaDB

3. In this step, we will install MariaDB, as it providers better performance as compared to MySQL.
# apt-get install mariadb-client mariadb-server
Install MariaDB Database
4. After MariaDB successful installation, you can start MariaDB and set root password to secure the database:
# systemctl start mysql
# mysql_secure_installation
Answer the following questions by typing y or n and press enter. Make sure you read the instructions carefully before answering the questions.
Enter current password for root (enter for none) = press enter
Set root password? [Y/n] = y
Remove anonymous users[y/n] = y
Disallow root login remotely[y/n] = y
Remove test database and access to it [y/n] = y
Reload privileges tables now[y/n] = y 
5. After setting root password for MariaDB, you can connect to MariaDB prompt with the new root password.
# mysql -u root -p

Step 3: Installation of HHVM

6. At this stage we shall install and configure HHVM. You need to add the HHVM repository to yoursources.list file and then you have to update your repository list using following series of commands.
# wget -O - http://dl.hhvm.com/conf/hhvm.gpg.key | apt-key add -
# echo deb http://dl.hhvm.com/ubuntu DISTRIBUTION_VERSION main | sudo tee /etc/apt/sources.list.d/hhvm.list
# apt-get update
Important: Don’t forget to replace DISTRIBUTION_VERSION with your Ubuntu distribution version (i.e. lucid, precise, or trusty.) and also on Debian replace with jessie or wheezy. On Linux Mint installation instructions are same, but petra is the only currently supported distribution.
After adding HHVM repository, you can easily install it as shown.
# apt-get install -y hhvm
Installing HHVM will start it up now, but it not configured to auto start at next system boot. To set auto start at next boot use the following command.
# update-rc.d hhvm defaults

Step 4: Configuring Nginx/Apache to Talk to HHVM

7. Now, nginx/apache and HHVM are installed and running as independent, so we need to configure both web servers to talk to each other. The crucial part is that we have to tell nginx/apache to forward all PHP files to HHVM to execute.
If you are using Nginx, follow this instructions as explained..
By default, the nginx configuration lives under /etc/nginx/sites-available/default and these config looks in/usr/share/nginx/html for files to execute, but it don’t know what to do with PHP.
To make Nginx to talk with HHVM, we need to run the following include script that will configure nginx correctly by placing a hhvm.conf at the beginning of the nginx config as mentioned above.
This script makes the nginx to talk to any file that ends with .hh or .php and send it to HHVM via fastcgi.
# /usr/share/hhvm/install_fastcgi.sh
Configure Nginx for HHVM
Important: If you are using Apache, there isn’t any configuration is needed now.
8. Next, you need to use /usr/bin/hhvm to provide /usr/bin/php (php) by running this command below.
# /usr/bin/update-alternatives --install /usr/bin/php php /usr/bin/hhvm 60
After all the above steps are done, you can now start HHVM and test it.
# systemctl start hhvm

Step 5: Testing HHVM with Nginx/Apache

9. To verify that hhvm working, you need to create a hello.php file under nginx/apache document root directory.
# nano /usr/share/nginx/html/hello.php       [For Nginx]
OR
# nano /var/www/html/hello.php               [For Nginx and Apache]
Add the following snippet to this file.

and then navigate to the following URL and verify to see “hello world“.
http://localhost/info.php
OR
http://IP-Address/info.php
HHVM Page
HHVM Page
If “HHVM” page appears, then it means you’re all set!

Conclusion

These steps are very easy to follow and hope your find this tutorial useful and if you get any error during installation of any packages