Ubuntu 11.10 is released. You can download ubuntu 11.10 from the official website. The latest release of ubuntu comes with lot of great features and fresh user interface changes. It is evolved as much stable operating system for modern desktop and tablet environments.
Ubuntu 11.10 comes with a good set of applications for every purpose. The selection of applications are made in Ubuntu conference.
Banshee Music Player,
Libre office, Ubuntu one cloud storage, Firefox 7, Thunder bird, Shotwell Photo editor etc are included default. The latest ubuntu 11.10 comes with
Gnome 3.2 latest linux kernel 3.1. But insted of gnome shell ubuntu 11.10 uses unity desktop environment. This time unity is much stable and polished and tested than ubuntu 11.10. Also the ubuntu paper cut project will clear all the rough edges of ubuntu. And the release of ubuntu 12.04 is aiming for LTS. The login manager also changed to Light DM. This is highly themeble.
Here is a quick Ubuntu 11.10 Post Installation guide for reference.
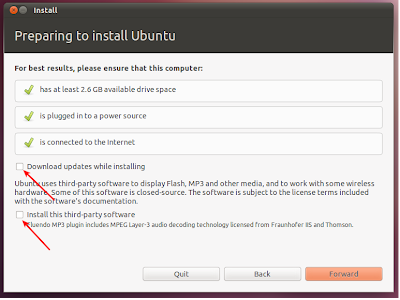
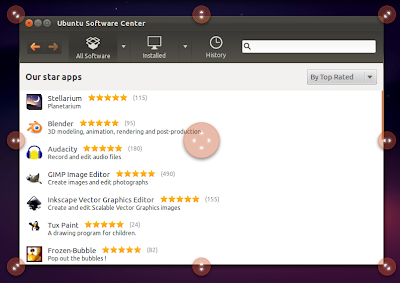
To make ubuntu 11.10 a perfect desktop for a modern user it is necessary to install some additional applicaitons and codecs for Listening music, watching movies, playing videos over the web, Viewing various languages etc. New redesigned
ubuntu software centre is included with 11.10 and it is intelligent to suggest an application for every purpose. Here you can see a hand full of applications as a quick reference list for a perfect desktop.
All the applications are installable via ubuntu software centre. Just search the application name and press install. But command line installation is much faster and easy to follow. Just open the terminal and copy paste the code press enter.
Things to do After Installing Ubuntu 11.10 Oneiric Ocelot.
First of all you need to update the repositories and restricted multimedia repositories.
Install Updates in Ubuntu 11.10
The very first thing after install ubuntu 11.10 is to update all the repositories. To do this Just open terminal (Ctrl+Alt+T) and type
sudo apt-get update && sudo apt-get upgrade
This will do the magic. You have the latest operating system with all updates.
Alternate way – start update manager (it’s installed by default, just search for it) and click on install updates.
Ubuntu restricted extras in Ubuntu 11.10
Ubuntu Restricted Extras will install Adobe Flash Player,
Java Runtime Environment (JRE) (sun-java-jre) with
Firefox plug-ins (icedtea), a set of Microsoft Fonts (msttcorefonts), multimedia codecs (w32codecs or w64codecs), mp3-compatible encoding (lame),
FFMpeg, extra Gstreamer codecs, the package for DVD decoding (libdvdread4, but see below for info on libdvdcss2), the unrar archiver, odbc, and cabextract. It also installs multiple “stripped” codecs and avutils (libavcodec-unstripped-52 and libavutil-unstripped-49). This is a single command approach.
sudo apt-get install ubuntu-restricted-extras
This will take a while to install whole package. Keep your terminal open until the whole package list will be installed. Otherwise you want to start everything from the scratch. You can install the restricted extras from the ubuntu software center also.
To install the packages below you just search in ubuntu software center and press install. But the command terminal command will do the work more faster.
Ubuntu Tweak for Tweak Ubuntu 11.10 as you like
Ubuntu tweak is a great package to change the settings in ubuntu without any hazile. It provide many useful desktop and system options to tweak ubuntu 11.10 to your needs.
ubuntu tweak will help you to install essential applicaitons with one click. Also you can tweak the interface like move the buttons from left to right. Change the welcome screen etc…
You can install ubuntu tweak from ubuntu repository
In the terminal just type
sudo add-apt-repository ppa:tualatrix/ppa
sudo apt-get update
sudo apt-get install ubuntu-tweak
Install gnome tweak tool in Ubuntu 11.10
Gnome Tweak Tool is a utility for Gnome 3 desktop for tweaking the desktop settings. Gnome Tweak Tool allows us to customize windows look, theme, Fonts etc.
To install Gnome Tweak Tool open terminal and execute
sudo apt-get install gnome-tweak-tool
Install Restricted Drivers (Graphics Drivers, Webcam and Wireless Drivers)
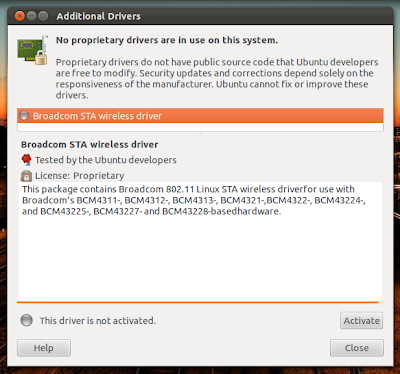
If you are using a proprietary graphics card like Nvidia or Ati Radeon then you want to install the restricted drivers for full performance like 3D rendering, gaming etc…In most of the cases, Ubuntu will automatically detect and tell you there any additional hardware drivers are necessary or not, you just need to select the appropriate driver and click on Activate.
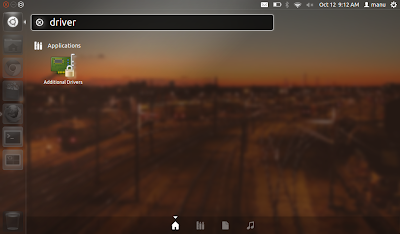
You can do this manually. Go to System Settings -> Additional Drivers and a window will appear with driver options. Select the driver software you want to install and click on Activate. After installing the driver – restart your computer. That is it.
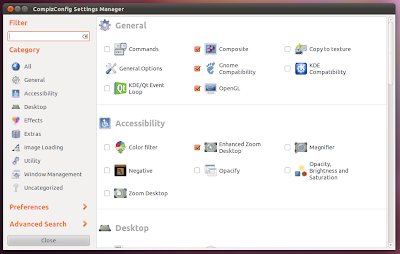
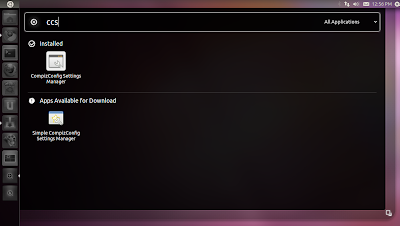
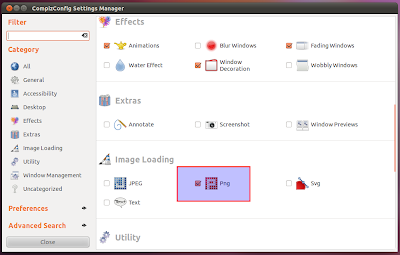
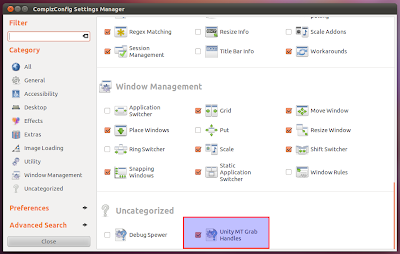
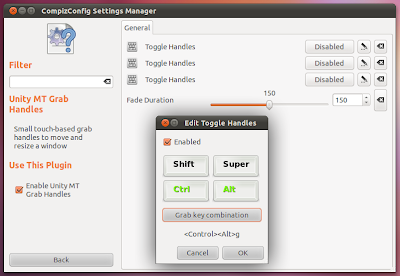
By using Compiz setting manager you’ll be able to tweak the Unity launcher reveal mode, hide behavior, change Unity-specific keyboard shortcuts, change the Unity launcher icon size, the top panel opacity, tweak various animations and more.
To install just type in the terminal
sudo apt-get install compizconfig-settings-manager
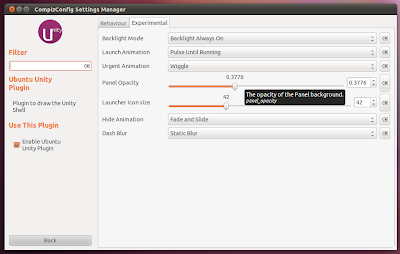
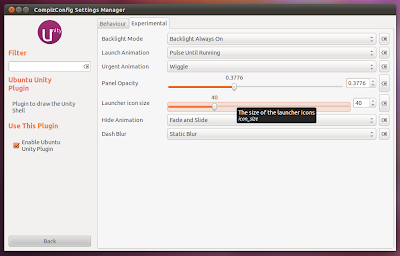
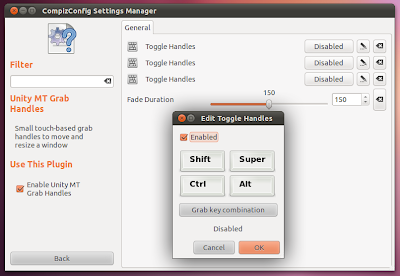
You can tweak the unity by selecting
Ubuntu Unity Plugin from ‘Desktop’ category. Now choose the Experimental tab from above. There you will see the ‘Panel Opacity’ option. Change it to the value you like. Also you can adjust the value of ‘Launcher Icon Size’ by simple scrolling. The default value of ‘Launcher Icon Size’ is 48 but you can adjust to your conveniance.
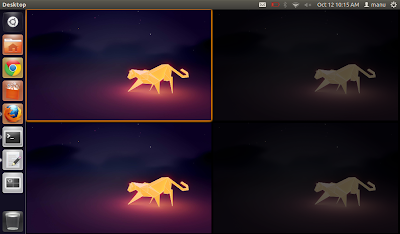
Increase or decrease the no of desktops in Ubuntu 11.10
By default there are 4 desktop available. Just press Super+s will give the overview. To change the no of desktop go to Compiz config settings manager > select General Options from the category ‘General’. Select the tab ‘Desktop Size’ and choose the values you want.
Multimedia Applications for Audio Video Playback and Edit in Ubuntu 11.10
Banshee is the default music player in Ubuntu 11.10 and totem is the default video player. But you can take look to other great applications that do the things very easly and effectively.
VLC Media player
VLC media player is a great all in one media player solution for ubuntu and the whole linux. It will play most of the media without any other codec requirements.
sudo apt-get install vlc vlc-plugin-pulse
Full DVD Playback
For fullfledged dvd play back in ubuntu you need a small package called libdvdcss. For that just type or you can search it on the software center of ubuntu.
sudo wget --output-document=/etc/apt/sources.list.d/medibuntu.list http://www.medibuntu.org/sources.list.d/$(lsb_release -cs).list && sudo apt-get --quiet update && sudo apt-get --yes --quiet --allow-unauthenticated install medibuntu-keyring && sudo apt-get --quiet update
sudo apt-get install libdvdcss2
Mplayer and smplayer (mplayer’s GUI) for video playback. It supports almost any video type, external subtitles as well as DVD playback as long as you have the needed codecs installed as shown previously. To install it type:
sudo apt-get install mplayer smplayer gnome-mplayer
Clementine is a music player inspired by Amarok 1.4, focusing on a fast and easy-to-use interface for searching and playing your music. It can listen to internet radio from Last.fm, SomaFM, Magnatune, Jamendo and Icecast. Also Visualisations from
projectM. Lyrics and artist biographies and photos and more. Lyrics and artist biographies and photos. Edit tags on MP3 and OGG files, organise your music. Remote control using a Wii Remote, MPRIS or the command-line.
sudo apt-get install clementine
Audacious is an audio player for gnome. It look and feels like winamp. It has a native GTK UI in the last release. Lot of plug-ins and skins are available for audacious.
sudo apt-get install audacious
XBMC is an award-winning software media center for digital media. It is available for Linux, OSX, Windows and the original Xbox. Currently XBMC can be used to play almost all popular audio and video formats around.Once installed, your computer will become a fully functional multimedia jukebox. To install it type:
sudo add-apt-repository ppa:team-xbmc
sudo apt-get update
sudo apt-get install xbmc
Kodi
Kodi is a software to play media files on your local storage, but that’s no more the primary use. Kodi became popular with its version 16 (Jarvis) and with Kodi 17 you get a more streamlined experience. Kodi is free to download on a range of platform like PC, Mac, Android, iOS or gaming consoles.
Openshot – Video editor in ubuntu
Openshot, the best existing actually for Linux. You can install Openshot from Ubuntu software center, but if you want to install the latest release, you can do that by adding the following repositories:
sudo add-apt-repository ppa:jonoomph/openshot-edge
sudo apt-get update
sudo apt-get install openshot openshot-doc
GTK pod is a good ipod manager. gtkpod will support iPod, iPod nano, iPod shuffle, iPod photo, and iPod mini
sudo apt-get install gtkpod
K3b – All in One CD, DVD, BluRay Burning Applicaiton for Ubuntu 11.10
K3b is a full featured disc burning tool which has all the features of Nero Burning rom. The current version support Blu-ray burning also. This is a KDE Application. If you install on Gnome It will download all the KDE Libraries. This will be a real overload.
sudo apt-get install k3b
Minitube – Youtube Desktop Client for Ubuntu
Minitube is a flash free YouTube desktop application for Linux and Mac OSX. Minitube is perhaps one of the cleanest looking YouTube desktop client I have ever used in Ubuntu.
Graphics Packages for Ubuntu 11.10
There are lot of applications available for image editing, drawing, painting, animation, 3d Modeling etc…
GIMP – The Advanced Image Editing programme for Ubuntu 11.10
A great Photo Editing and retouching software that can do gif animations . Will replace your Photoshop. A lot of plugins, brushes, gradients are avilable for gimp. A newer version gimp 2.8 is on its way with more revolutionary changes.
sudo apt-get install gimp
For some extra set of brushes, gradients and plugins etc execute :
sudo apt-get install gimp-data-extras
sudo apt-get install gimp-plugin-registry
Inkscape – Vector image editing and drawing application in Ubuntu 11.10
A great Vector drawing and logo creating software which will replace Adobe Illustrator or Corel Draw.
sudo apt-get install inkscape
Pinta Image Editor
It is a very nice image manipulation program with some basic features. it’s very easy to handle and it is most suitable for absolute beginners. it looks very similar to MS paint program.
To install pinta execute the command -
sudo apt-get install pinta
Picasa – Photo and Album collection Manager from google
A Good Photo Manager from Google. This Package will be downloaded from Google Picasa Website.
All downloads are approximately 30 MB: Picasa software (13 MB), Wine (11 MB) and Gecko engine (6 MB).
Blender is the award winning 3D modeling and Non Linear Editing Programme in Linux. Blender supports from character drawing to timeline editing . The Latest version 2.57 is the most powerfull solution for all designing and 3D needs.
sudo apt-get blender
Internet Utilities for Ubuntu 11.10
Firefox 7 is included in ubuntu 11.10 by default. But you can try other browsers like google chrome, opera.
Chromium is the opensource project sponsored by google. Chromium comes without google specific customizations.Chromium supports all the extensions/themes that you use on Chrome. it’s one of the most popular software in Ubuntu Software Center. To install it type:
sudo apt-get install chromium-browser
You should install some codecs like FFmpeg for playing multimedia contents on web.
sudo apt-get install chromium-codecs-ffmpeg-extra
Opera is a good alternative browser for good internet experience. You can Download Opera From
Opera Website.
Also You can try other web browsers like Midori, Aurora, Rekonq, Eppiphany etc…
Email Clients for Ubuntu 11.10
Thunderbird is the default email client for Ubuntu 11.10 But you can try postler, which is a good email client from elementary os team.
Chat Clients for Ubuntu 11.10
Empathy is the default IM Client for Ubuntu 10.10. Other IM Clients are pidgin,skype,amsn etc..
Pidgin is an open source IM application. It can handle various accounts . It is based on libpurple library.
sudo apt-get install pidgin
Skype is a proprietary integrated VOIP and video conferencing program similar to Ekiga. It is a complete audio video client for ubuntu. To install Skype, first activate Canonical Partner Repository, then install Skype via the Software-Center or via the Terminal.
sudo apt-get update && sudo apt-get install skype
Or you can Download skype from official website.
aMSN is an MSN Messenger utility that functions like the original client. To install it type:
sudo apt-get install amsn
Social Networking Clients for Ubuntu 11.10
gwibber is the default social networking client for ubuntu. You can manage your facebook and twitter accounts from gwibber.
sudo apt-get install gwibber
Hotot Twitter Client for ubuntu
Hotot is slick twitter client for ubuntu. It is in its early stages but it is worth take a look. Will be your favourite one soon.
sudo add-apt-repository ppa:hotot-team
sudo apt-get update
sudo apt-get install hotot
Bit torrent Clients for Ubuntu 11.10
Transmission
It is the bittorrent client for ubuntu 11.10
sudo apt-get install transmission
Vuze is the next version of Azureus. It can handle torrents more effectively. To install it type:
sudo apt-get install vuze
The Deluge was designed to be a full-featured BitTorrent client. Deluge uses libtorrent in it’s backend and PyGTK for it’s user interface, and is currently usable on Ubuntu.
sudo add-apt-repository ppa:deluge-team/ppa
sudo apt-get update
sudo apt-get install deluge
Installing the latest Java run time JRE
JRE stands for ‘Java Runtime Environment’. It’s an essential application that many applications ‘depend on’.
sudo add-apt-repository ppa:ferramroberto/java
sudo apt-get update
sudo apt-get install sun-java6-jre sun-java6-plugin sun-java6-fonts
Flash Player for web browsers in ubuntu 11.10
For Ubuntu 32 bit & 64 bit : To be able to watch videos and see flash website in your browser (firefox/ Chrome..), you need to install flash plugin, go to ubuntu software center and search word “flash” and install it.
FTP Clients for Ubuntu 11.10
filezilla and gftp are the popular ftp clients in ubuntu 11.10. Nautilus is also support ftp,sftp connections.
Filezilla is the best ftp client for Linux. It can handle all the FTP needs. Nautilus is also capable of connecting ftp.
sudo apt-get install filezilla
DropBox
Dropbox is a free service that lets you bring all your photos, docs, and videos anywhere. This means that any file you save to your Dropbox will automatically save to all your computers, phones and even the Dropbox website. Dropbox also makes it super easy to share with others, whether you’re a student or professional, parent or grandparent.
Download the Dropbox package:
Ubuntu (x86_64 .deb)
Ubuntu (x86 .deb)
Office Packages for Ubuntu 11.10
Libreoffice is installed by default. It includes Writer – A good Document Editor, Calc – A Spreadsheet Editor, Impress – A Presentation Creator and Manager and Draw – A Drawing creator. You can also try Abiword and Gnumeric.
Adobe Acrobat Reader
This will help to read pdf documents more effectively. The default Document Viewer will handle pdf files. But you get more features with this programme
sudo apt-get install acroread
Scribus is a good DTP application to prepare industry standard books for publishing and more …
sudo apt-get install scribus
Dia is a good diagram editor. Will help you to create a variety of diagrams like Flow chart, Database, Circuit, Logic, UML etc ..
sudo apt-get install dia
Miscellaneous Applications for Enhance your Ubuntu 11.10 Desktop
Some applicaitons like cheese,xsane,stellarium,unrar,p7zip are nice applications for enhance your desktop.
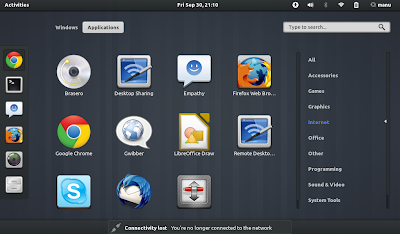
Install Gnome Shell on Ubuntu 11.10
Ubuntu 11.10 uses Unity as the default desktop manager. But ubuntu 11.10 comes with Gnome 3 so you can install Gnome shell simultaneously without breaking the Unity desktop. This is a majour problem with ubuntu 11.10. Gnome shell has been developed for modern desktop systems. The interaction and navigation has been evolved in Gnome shell. The Gnome shell is there in the official repository of Ubuntu 11.10 you can install Gnome 3 in one simple command.
sudo apt-get install gnome-shell
Cheese – Take Photos and Record Videos Using Webcam
Cheese is a must install especially if you are a laptop user, since most laptops/netbooks have a webcam these days. Cheese is a simple application that lets you take photos and record videos using your webcam.
sudo apt-get cheese
Xsane – A Scanner application for Ubuntu
Xsane is a great tool for your scanner control. This tool will help to scan documents and pictures effectively. You can control resolution, brightness, contrast etc …
sudo apt-get install xsane
Stellarium is a real-time 3D photo-realistic nightsky renderer. It can generate images of the sky as seen through the Earth’s atmosphere with more than one hundred thousand stars from the Hipparcos Catalogue, constellations, planets, major satellites and nebulas. Near 40 MB.
sudo apt-get install stellarium
Rar, Zip applicaitons for ubuntu 11.10
If you are downloading from the internet, you know how various forms archives can have. Installing the following will allow you to deal with most of these.
sudo apt-get install unace unrar zip unzip p7zip-full p7zip-rar sharutils rar uudeview mpack lha arj cabextract file-roller
Y PPA Manager
Y PPA Manager is a GUI tool to easily add PPAs, search a package in all Launchpad PPAs, remove duplicate PPAs (only works with separate .list files), backup PPAs and other PPA-related tasks. Check out the Launchpad page for a complete features list.
sudo add-apt-repository ppa:webupd8team/y-ppa-manager
sudo apt-get update
sudo apt-get install y-ppa-manager
Samba Server
Samba is the windows share folder manager. You can add windows shares using samba server
sudo apt-get install samba smbfs
Wine The windows Environment - install windows programmes into Ubuntu 11.10
If you want to install and run windows programmes under ubuntu 11.10 you need a windows environment emulator programme called wine.
- Support for multiple icon sizes in wine menu builder.
- Improvements to the help browser.
- Initial stab at DOSBox integration.
- Various MSI fixes.
- Some fixes to the Wine debugger.
sudo add-apt-repository ppa:ubuntu-wine/ppa
sudo apt-get update
sudo apt-get install wine1.3
RAM / CPU usage Indicator for Unity
Unity top panel doesn’t support any kind of applets, just AppIndicators. Luckily, there’s an AppIndicator that displays the RAM and CPU usage. Install it using the commands below:
sudo add-apt-repository ppa:alexeftimie/ppa
sudo apt-get update
sudo apt-get install indicator-sysmonitor
If you using ubuntu one cloud service then here is a nice app indicator to help you .
sudo add-apt-repository ppa:rye/ubuntuone-extras
sudo apt-get update
sudo apt-get install ubuntuone-indicator
Sysmonitor App Indicator
App Indicators are an excellent way to extend the functionality of Unity top panel in Ubuntu 11.10. And Sysmonitor application indicator will display the system status.
To install Sysmonitor Indicator in Ubuntu 11.10 just copy and pate the commands in the terminal [Ctrl+Alt+T].
sudo add-apt-repository ppa:alexeftimie/ppa
sudo apt-get update
sudo apt-get install indicator-sysmonitor
Resize Images by right click them in Ubuntu 11.10
This is a quick tweak and it is greatly usefull. If you have some large images and reduce its size to 50% or resize an image quickly. Then there is a nautilus script by using this one just right click on the image and resize for your desired sizes. Nice quick tool.
sudo apt-get install imagemagick
sudo apt-get install nautilus-image-converter
Eye Candy for Ubuntu 11.10
Incredible Themes for Ubuntu 11.10
A best theme combination is Equinox Evolution themes + Faenza icon theme combination. As an added advantage, both are available from the same PPA as well. Latest Equinox Evolution themes update brings with 3 new themes taking the total count to 5. To install Equinox GTK theme collection and Faenza icon theme in Ubuntu 11.10 type in terminal.
sudo add-apt-repository ppa:tiheum/equinox
sudo apt-get update
sudo apt-get install gtk2-engines-equinox equinox-theme faenza-icon-theme
There are other great themes from
Gnome bisigi project. You have 12 great incredible themes for ubuntu.
Conky is a lightweight system monitor application for Linux. It can be customizable in lot ways to look your desktop stunning. Type following in terminal to install conky
sudo apt-get install conky
Screenlets for Ubuntu 11.10
Screenlets are small owner-drawn applications that can be described as “the virtual representation of things lying/standing around on your desk”. Sticknotes, clocks, rulers, the possibilities are endless.Screenlets can be installed from Ubuntu software center,
sudo apt-add-repository ppa:screenlets/ppa
sudo apt-get update
sudo apt-get install screenlets