August 15, 1995, Videsh Sanchar Nigam Limited (VSNL) formally launched the Internet for the Indian public. It has been 20 very eventful years since and India and its Internet has come a long way from the dial-up modems and VSNL shell accounts. This timeline of the journey of the Internet in India highlights the important milestones of this two-decade-long journey.
Saturday, August 15, 2015

Wednesday, August 12, 2015
July 31, 2015: Celebrate “System Administrator Appreciation Day”
http://www.tecmint.com/system-administrator-appreciation-day/

July 31st, 2015 is witnessing 16th System Administrator Appreciation Day. System Administrator Appreciation Day also known as Sysadmin Day, SysAdminDay, SAD or SAAD is celebrated on the last Friday of July every Year.
System Administrator Appreciation Day
Story behind System Administrator Appreciation Day
Ted Kekatos, a System Administrator by profession got inspired by an Advertisement in Hewlett-Packard Magazine where an Administrator is greeted in the form of flowers and fruit-baskets by thankful co-workers for their new printer installed. Kekatos idea was further recognised and promoted by lots of IT organizations and professional including the ‘League of Professional System Administrator‘, SAGE/USENIX, etc.
The first System Administrator Appreciation Day was celebrated on July 28, 2000. And since then celebrating System Administrator Appreciation Day every year gets a worldly recognition and today we reached the figure16th.
Significance of this Day
Celebrating System Administrator Appreciation Day is a way to Honour a person who is responsible for upkeep, configuration, Up-to mark Operation of Computer Systems and Server. A day when we want to say thanks to a person who ensures performance, uptime, resource, security, install, upgrade, automate task, troubleshoot, provides technical support, along with meeting the need of User and the company he is working for within the resource and budget he is provided with.
This 24 hour celebration is an honest way to feel proud of a person who:
- Analyse potential issues and logs.
- Keep himself/herself updated with new technologies and integrate it into data center.
- Performs routine audit of software and System.
- Updates System.
- Apply patches.
- Configure System and Software.
- Add and Configure new hardware and software.
- One person whom you trust for security, project documentation.
- Troubleshoot and Performance System Tuning.
- Creates, Manage and Maintains Network Infrastructure.
Simply, a person who works 364 days a year (Yeah 364, Leave him/her on SAAD) behind the scene just to provide a nice and secure platform you can work with.
System Administrator is the only person who gets recognition (although, the other way) when he commits something wrong.
How to Celebrate
Well celebration always means beyond words. Chocolates, Cards, Cake, Ice Cream, Pizza, Balloons, Flowers, fruits, Pile of CASH just adds to the list.
Many online business gives special offers as an honour to IT professionals and System Administrators this day. This is the one special day when you recognize your System Administrator for their contribution and all other things they do for you and your organization.


‘LinuxSay’ – A Discussion Forum for Linux Enthusiasts
http://www.tecmint.com/launching-linuxsay-a-discussion-forum-for-linux-enthusiasts/


What is LinuxSay.com?
Linuxsay.com (A Discussion Forum for Linux Enthusiasts) is a sister site of Tecmint. It is an online collaboration platform for Linux and open source users to raise questions, obtain answers to your questions, discuss topics ranging from Linux/FOSS related news to server administration to programming languages, as well as an area for general Linux/FOSS discussion.
Features of LinuxSay.com
You do not need to register to access the content of the site. However to post questions, you need to sign-up at Linuxsay. Signing up is quite easy. You can even signing up using social media profiles such as Google+, Facebook, Twitter and Yahoo. After signup, auto-import of profile icon between your social media profile and Linuxsay.
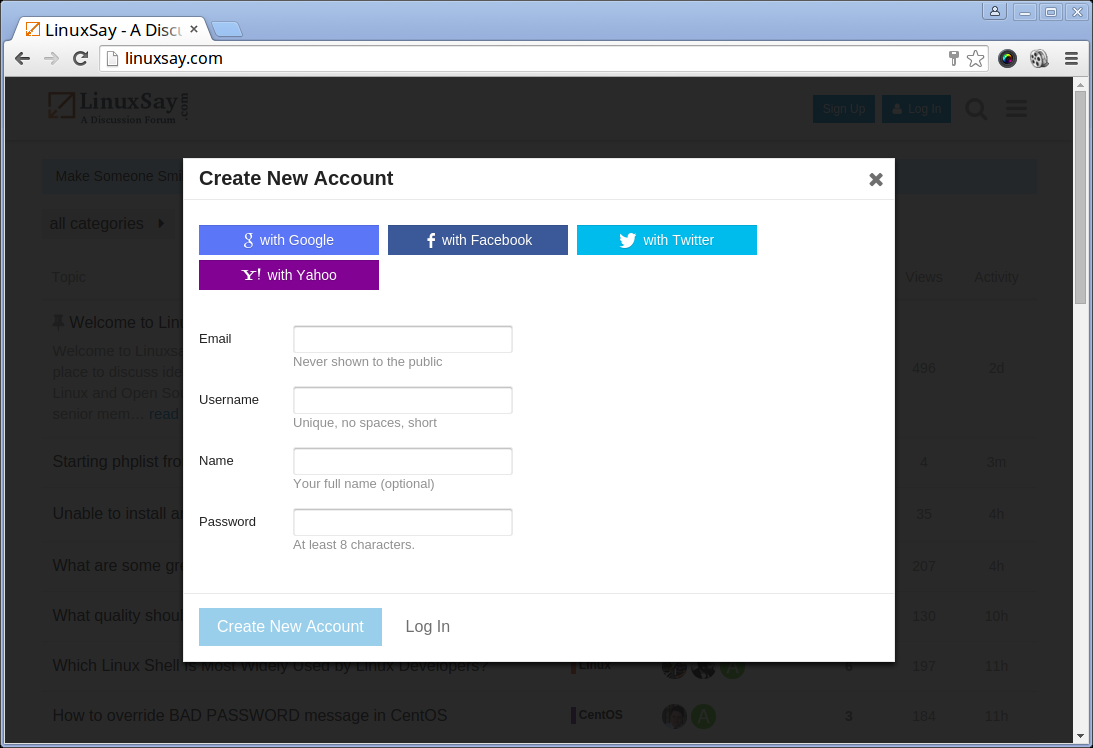
LinuxSay Signup with Social Profiles
Using LinuxSay is pretty straightforward thanks to a very friendly user interface with instant email notification when someone likes/replies to your post.

LinuxSay Interface
You can create a thread for your question right from the board and post query/question in relevant already created forum categories with just a single click. It also provides a powerful search function to search threads for answers to questions that may have already been answered.
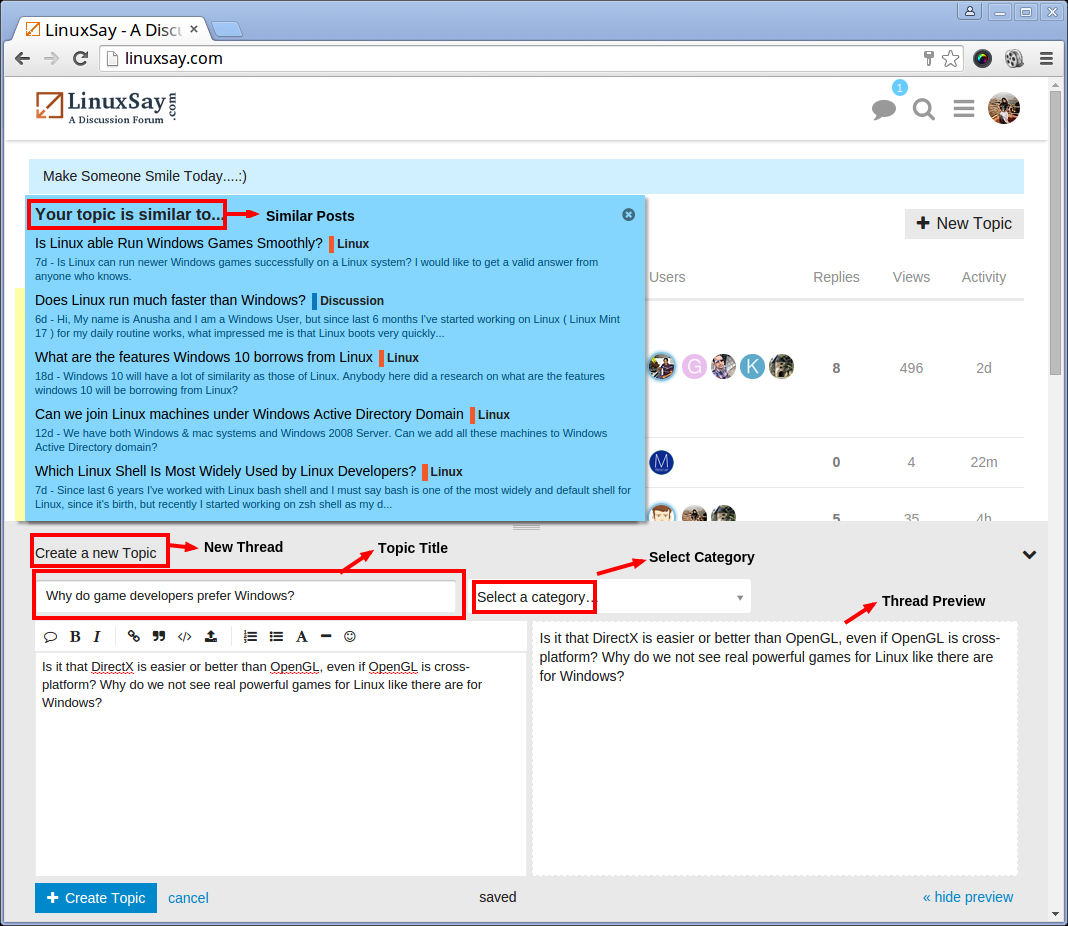
Create A New Thread
Auto-updating of the order of topics/threads based upon last reply with the latest replies appearing at the top with total number of Replies, Last reply by, Total Views and Last Activity for each topic/thread is visible to every user.
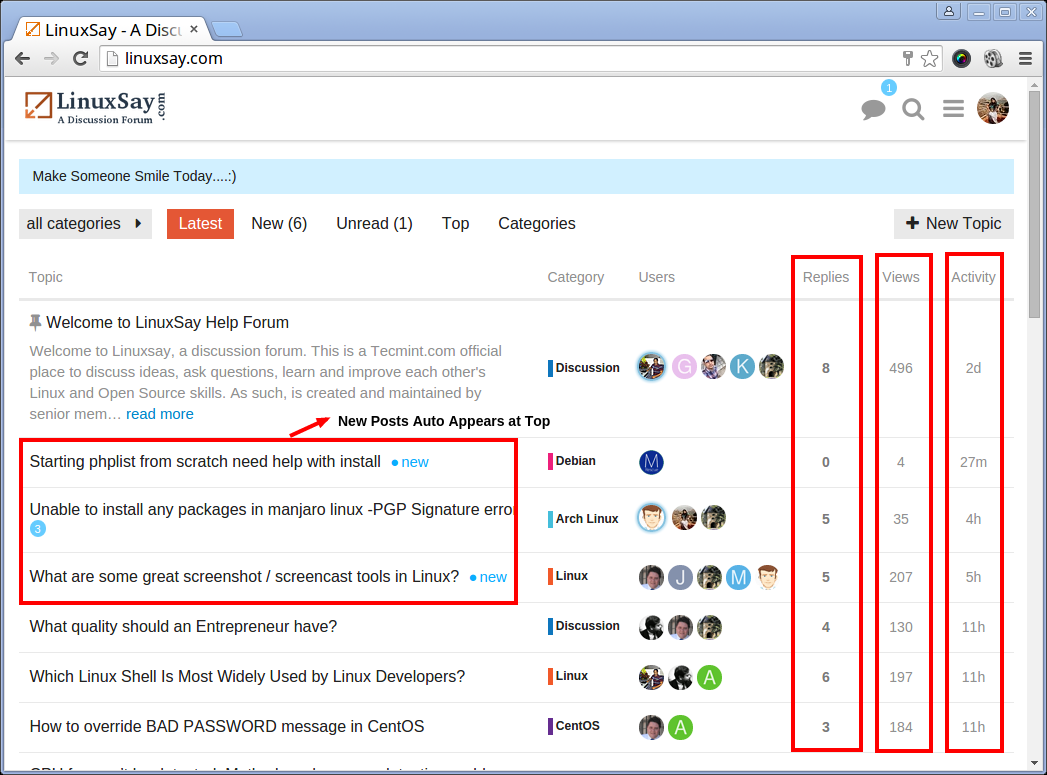
User Activity
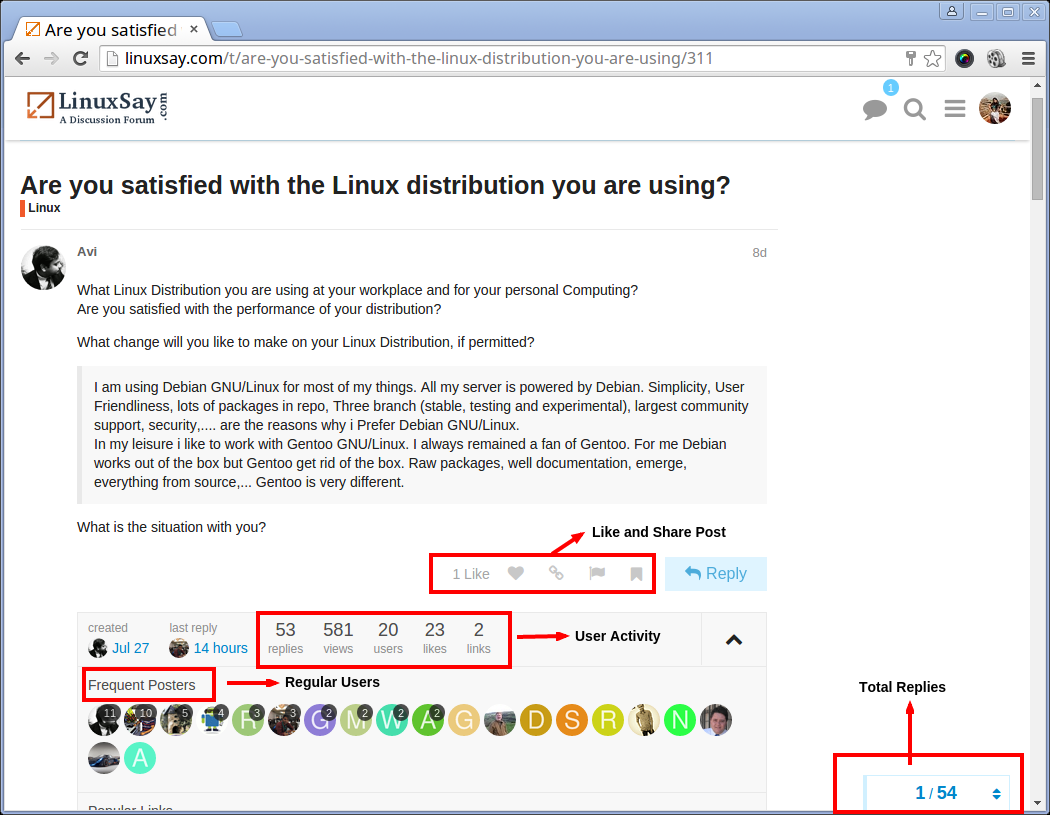
Post Activity
Allows you to Get answers to your questions from professionals across the globe in less than 24 hours. Gives you the possibility to solve others’ problems and answer their questions, if you can.
Best of all, Linuxsay is completely free! No Debit/Credit card information required.
Thursday, July 23, 2015
Configuring Kdump to troubleshoot kernel crashes, hangs, or reboots in RHEL5/RHEL6/RHEL7
http://unixadminschool.com/blog/2015/07/configuring-kdump-to-troubleshoot-kernel-crashes-hangs-or-reboots-in-rhel5rhel6rhel7/


Now edit
How Kdump works?
Using the kdump service and the kexec command, you can ensure faster boot up and creation of reliable kernel (vmcores) for diagnostic purposes.
First of all let us understand these two basic components:
• kexec: The kexec command is a fast boot mechanism that allows booting a Linux kernel from the context of an already running kernel, without going through the BIOS. Starting from the BIOS can be very time consuming especially on the big servers with lots of peripherals. Bypassing it can save a lot of time for developers who end up booting a machine numerous times.
• kdump: The kdump service is a kernel crash dumping mechanism that is reliable because the crash dump is captured from the context of a freshly booted kernel and not from the crashed kernel. Kdump uses kexec to boot into a second kernel whenever the system crashes. This second kernel, often called a capture kernel, boots with very little memory and captures the dump image. The first kernel reserves a section of memory that the second kernel uses to boot.
Kexec enables booting the capture kernel without going through BIOS hence the contents of the first kernel’s memory are preserved, which is essentially the kernel crash dump. Kdump is supported on the i686, x86_64, ia64 and ppc64 platforms. The standard kernel and capture kernel are one in the same on i686, x86_64, ia64 and ppc64.
Normal Boot behavior vs Kdump enabled boot behavior

How Kdump Collects the Kernel Crash Dump?
The control flow between the two ways of capturing kdump data is as follows:
1. The system panics2. The kdump kernel boots3. The kdump initramfs loads and runs /init4. If a dump target is not configured in /etc/kdump.conf, determine the root filesystem blockdevice and use that as the default dump target5. Capture the dump according to the /etc/kdump.conf file6. Was the dump capture successful? – If yes, go to step 12 – If no, go to step 77. Does /etc/kdump.conf set default_action to halt? – If yes, go to step 14 – If no, go to step 88. Does /etc/kdump.conf set default_action to reboot? – If yes, go to step 12 – If no, go to step 99. Mount the root filesystem, perform a pivot_root, and run /sbin/init10. Start the kdump service via /etc/init.d/kdump11. Capture core via cp /proc/vmcore /var/crash/-/vmcore12. Reboot the computer13. Drop to the shell14. Halt the system

Difference between chroot & pivot_root
The main difference between chroot and pivot_root is that pivot_root is intended to switch the complete system over to a new root directory and remove dependencies on the old one, so that you would be able to unmount the original root directory and proceed as if it had never been in use. chroot is intended to apply for the lifetime of a single process, with the rest of the system continuing to run in the old root directory, with original root file system being unchanged when the chrooted process exits.
Installation of kdump
Verify the kexec-tools package is installed:
# rpm -q kexec-tools
If it is not installed, proceed to install it via yum:
# yum install kexec-tools
On IBM Power (ppc64) and IBM System z (s390x), the capture kernel is provided in a separate package called kernel-kdump which must be installed for kdump to function:
# yum install kernel-kdump
This package is not necessary (and in fact does not exist) on other architectures.
Add Necessary Boot Parameters
The option
crashkernel must be added to the kernel command line parameters in order to reserve memory for the kdump kernel:- For i386 and x86_64 architectures on RHEL 5, edit /boot/grub/grub.conf, and append crashkernel=128M@16M to the end of the kernel line.
- For RHEL 6 i386 and x86_64 systems, use crashkernel=128M. Please note that using @16M at the end of the line on Rhel6 has caused kdump to fail. And It may be possible to use less than 128M, but testing with only 64M has proven unreliable.
Configuring crashkernel Parameter
crashkernel parameter for RHEL5 :
# grub.conf generated by anaconda
#
# Note that you do not have to rerun grub after making changes to this file
# NOTICE:  You do not have a /boot partition.  This means that
#          all kernel and initrd paths are relative to /, eg.
#          root (hd0,0)
#          kernel /boot/vmlinuz-version ro root=/dev/hda1
#          initrd /boot/initrd-version.img
#boot=/dev/hda
default=0
timeout=5
splashimage=(hd0,0)/boot/grub/splash.xpm.gz
hiddenmenu
title Red Hat Enterprise Linux Client (2.6.17-1.2519.4.21.el5)
        root (hd0,0)
        kernel /boot/vmlinuz-2.6.17-1.2519.4.21.el5 ro root=LABEL=/ rhgb quiet crashkernel=128M@16M
        initrd /boot/initrd-2.6.17-1.2519.4.21.el5.img
crashkernel parameter for RHEL6 :
# grub.conf generated by anaconda
#
# Note that you do not have to rerun grub after making changes to this file
# NOTICE:  You have a /boot partition.  This means that
#          all kernel and initrd paths are relative to /boot/, eg.
#          root (hd0,0)
#          kernel /vmlinuz-version ro root=/dev/mapper/vg_example-lv_root
#          initrd /initrd-[generic-]version.img
# boot=/dev/vda
default=0
timeout=5
splashimage=(hd0,0)/grub/splash.xpm.gz
hiddenmenu
title Red Hat Enterprise Linux Server (2.6.32-71.7.1.el6.x86\_64)
       root (hd0,0)
       kernel /vmlinuz-2.6.32-71.7.1.el6.x86_64 ro root=/dev/mapper/vg_example-lv_root rd_LVM_LV=vg_example/lv_root rd_LVM_LV=vg_example/lv_swap rd_NO_LUKS rd_NO_MD rd_NO_DM LANG=en_US.UTF-8 SYSFONT=latarcyrheb-sun16 KEYBOARDTYPE=pc KEYTABLE=us crashkernel=128M rhgb quiet
       initrd /initramfs-2.6.32-71.7.1.el6.x86_64.img
crashkernel parameter for RHEL7 :
Starting with RHEL7 kernels
crashkernel=auto should be used. The kernel will automatically reserve an appropriate amount of memory for the kdump kernel.
Keep in mind that it is the best effort memory reservation and might not meet the needs of all systems (Especially for configurations with lots of IO cards and loaded drivers). So always make sure that memory reserved by
crashkernel=auto is sufficient for the target machine by testingkdump. If it is not, reserve more memory by syntax crashkernel= XM (X is amount of memory to be reserved in megabytes).
The amount of memory reserved for the
kdump kernel can be estimated with the following scheme:Specifying Kdump Location
Dumping Directly to a Device
Kdump can be configured to dump directly to a device by using the raw directive in
/etc/kdump.conf. The syntax to be used is:
For example:
raw /dev/sda1
This will overwrite any data that was previously on the device.
Dumping to a file on Disk
kdump can be configured to mount a partition and dump to a file on disk. This is done by specifying the filesystem type followed by the device
/etc/kdump.conf. The device may be specified as a device node, a filesystem label, or filesystem UUID in the same manner as/etc/fstab. For example:ext3 /dev/sda1will mount `/dev/sda1` as an ext3 device and dump the core to `/var/crash/` directory (creating it if necessary), whereas:ext3 LABEL=/boot will mount the device that is ext3 with the label `/boot` and use that to dump the core.
The label may need to be set manually for storage devices that have been configured after Red Hat Enterprise Linux has been installed. For example, the following will set the label ‘crash’ on the storage device ‘/dev/sdd1′:
e2label /dev/sdd1 crash
To view the label for a storage device, run ‘e2label’ with the device as the only argument:
e2label /dev/sdd1
An easy way to find how to specify the device is to look at what you’re currently using in
/etc/fstab (the filesystem you’re dumping to does not need to be persistently mounted via fstab). The default directory in which the core will be dumped is/var/crash/**/ ** is the current date at the time of the crash dump. This can be changed by using the path directive in /etc/kdump.conf. For example:ext3 UUID=f15759be-89d4-46c4-9e1d-1b67e5b5da82 path /usr/local/cores
will dump the vmcore to
/usr/local/cores/ /var/crash/ Dumping to a Network Device using NFS
To configure kdump to dump to an NFS mount, edit
/etc/kdump.conf and add a line with the following format:net *: *
For example:
net nfs.example.com:/export/vmcores
This will dump the vmcore to
/export/vmcores/**-** / on the servernfs.example.com. The client system must have access to write to this mount point.
When dumping to a network location over a bonded interface, it may be necessary to define the bonding module options in the kdump.conf file.
Please note that kdump doesn’t accept module options from ifcfg-* files, because In the kdump kernel all modules are loaded prior to the network being started and thus the options can’t be set from
ifcfg-\* files.Dumping to a Network Device using SSH
SSH has the advantage of encrypting network communications while dumping. For this reason this is the best solution when you’re required to dump a vmcore across a publicly accessible network such as the Internet or a corporate WAN:
net *@ *
For example:
net kdump@crash.example.com
In this case, kdump will use
scp to connect to the crash.example.com server using the kdump user. It will copy the vmcore to the/var/crash/**-**``*/* directory. The kdump user will need the necessary write permissions on the remote server. Additionally, when first configuring kdump to use SSH, it will attempt to use the mktemp binary on the target system to ensure write permissions in the target path. If your kdump target server is running an operating system without the mktemp binary, you will need to use a different method to save a vmcore to that target.
To make this change take effect, run one of the following commands:
In RHEL 6 and earlier:
# service kdump propagate
Generating new ssh keys... done,
kdump@crash.example.com's password:
/root/.ssh/kdump_id_rsa.pub has been added to
~kdump/.ssh/authorized_keys2 on crash.example.com
In RHEL 7 and later (using systemd):
# kdumpctl propagate
Using existing keys...
/bin/ssh-copy-id: INFO: attempting to log in with the new key(s), to filter out any that are already installed
/bin/ssh-copy-id: INFO: 1 key(s) remain to be installed -- if you are prompted now it is to install the new keys
root@crashtarget's password:
Number of key(s) added: 1
Now try logging into the machine, with:   "ssh 'root@crashtarget"
and check to make sure that only the key(s) you wanted were added.
/root/.ssh/kdump_id_rsa has been added to ~root/.ssh/authorized_keys on crashtarget
Make sure the free diskspace of the partition or network location which you specified for storing the vmcore is at least larger than the whole physical memory on this system.
Dumping to a SAN Device (For RHEL5)
- Get the wwid for the SAN paths:
- Blacklist this LUN from multipath by editing
/etc/multipath.conf:blacklist { wwid "3600601f0d057000019fc7845f46fe011" }- Reload multipath configuration:
- Now let’s get a partition created on the lun, make sure to select the correct one:
# fdisk -l # /sbin/scsi_id -g -u -s /block/sd# fdisk /dev/sd - Create a Linux partition on the disk:
# partprobe /dev/sd- Validate the partition is there:
# fdisk -l- Put an ext3/ext4/xfs filesystem on it:
- Now, let’s get a udev rule in place:
# cat 99-crashlun.rules KERNEL=="sd*", BUS=="scsi", ENV{ID_SERIAL}=="3600601f0d057000019fc7845f46fe011", SYMLINK+="crashsan%n"- Trigger udev in a way as to not affect everything else:
# echo change > /sys/block/sd/sd 1/uevent - Validate that the udev rule worked, looking for /dev/crashsan1:
# ls /dev/- Now update /etc/fstab adding the following to the end of the file:
/dev/crashsan1 /var/crash ext3 defaults 0 0- Validate that the file system will mount automatically:
# mount -a # mount- Edit /etc/kdump.conf accordingly:
- Restart kdump:
# service kdump restart- Make sure sysrq is enabled and test the crash. WARNING! This will crash the system, so do it at a planned time if this a production system.
# echo 'c' > /proc/sysrq-trigger- Once the system boots back, check to confirm that it worked.
# tree /var/crash/ /var/crash/ |-- 2012-08-03-13:57 | `-- vmcore `-- lost+found- This was validated on RHEL 5:
# cat /etc/redhat-release
Red Hat Enterprise Linux Server release 5.8 (Tikanga)

# uname -a
Linux somecoolserver.redhat.com 2.6.18-308.el5 #1 SMP Fri Jan 27 17:17:51 EST 2012 x86_64 x86_64 x86_64 GNU/Linux
Dumping to a SAN Device ( For RHEL6 with blacklist of multipath)
Note: This is a workaround method therefore it depends on each environment.
Please just refer to the following method. This method is not supported by Red Hat.
- Get the wwid for the SAN paths:
#/lib/udev/scsi_id --whitelisted --replace-whitespace --device=/dev/sd- Blacklist this lun from multipath by editing
/etc/multipath.conf:blacklist { wwid "3600601f0d057000019fc7845f46fe011" }- Reload the multipath configuration:
# /etc/init.d/multipathd reload- Now let’s get a partition created on our LUN. Be sure to select the right one:
# fdisk -l # /lib/udev/scsi_id --whitelisted --replace-whitespace --device=/dev/sd# fdisk /dev/sd - Create a Linux partition on the disk:
# partprobe /dev/sd- Validate the partition is there:
# fdisk -l- Put an ext3/ext4/xfs file system on it:
# mkfs.ext3 /dev/sd1 - Comment any unnecessary wwid entries in the following two files using the “#” character:
- Switch into the multipath configuration directory:
# cd /etc/multipath- Edit the
wwidsfile and comment out the unnecessary wwid entries (the following is an example):# vi wwids {output truncated} # /3600144f08c3d8b000000511256f00001/- Edit the
bindingsfile and do the same (the following is an example):# vi bindings {output truncated} # mpathc 3600144f08c3d8b000000511256f00001- Add the multipath configuration to the initial ramdisk (initramfs):
# dracut --force --add multipath --include /etc/multipath /etc/multipath- Now update
/etc/fstabadding the following to the end of the file using the UUID:
- Check the uuid with blkid:
# blkid- Ex: /etc/fstab:
UUID=4262c8fc-23ad-42b2-9c5d-af9c64d5bb92 /var/crash ext3 defaults 0 0- Validate that the filesystem will mount automatically:
# mount -a # mount- Edit
/etc/kdump.confaccordingly:ext3 UUID=4262c8fc-23ad-42b2-9c5d-af9c64d5bb92- Restart kdump and chkconfig it on:
# service kdump restart # chkconfig kdump on- Make sure sysrq is enabled and test the crash. WARNING! This will crash the system, so do it at a planned time if this a production system.
# echo 'c' > /proc/sysrq-trigger- Once system boots back, let’s check to confirm that it worked:
# tree /var/crash/
/var/crash/
├── 127.0.0.1-2013-02-12-21:11:03
│   └── vmcore
└── lost+found
Note: Checking environments is below.
# cat /etc/redhat-release
Red Hat Enterprise Linux Server release 6.3 (Santiago)

# uname -a
Linux xxxxx 2.6.32-279.22.1.el6.x86_64 #1 SMP Sun Jan 13 09:21:40 EST 2013 x86_64 x86_64 x86_64 GNU/Linux

# rpm -qa | grep kexec
kexec-tools-2.0.0-245.el6.x86_64

# rpm -qa | grep multipath
device-mapper-multipath-0.4.9-56.el6_3.1.x86_64
device-mapper-multipath-libs-0.4.9-56.el6_3.1.x86_64
Dumping to a SAN Device ( For RHEL6 with multipath device)
Note: This method is supported by Red Hat. Please read below sentences.
This configuration is only vaildate from kexec-tools-2.0.0-245.el6.x86_64 version,if user uses old kexec-tools package,user can not use multipath device for kdump.# cat /etc/redhat-release Red Hat Enterprise Linux Server release 6.3 (Santiago) # uname -a Linux xxxxx 2.6.32-279.22.1.el6.x86_64 #1 SMP Sun Jan 13 09:21:40 EST 2013 x86_64 x86_64 x86_64 GNU/Linux # rpm -qa | grep kexec kexec-tools-2.0.0-245.el6.x86_64 # rpm -qa | grep multipath device-mapper-multipath-0.4.9-56.el6_3.1.x86_64 device-mapper-multipath-libs-0.4.9-56.el6_3.1.x86_64
Checking multipath status
# multipath -ll
mpathf (3600144f08c3d8b000000511a51b10002) dm-7
size=100G features='0' hwhandler='0' wp=rw
`-+- policy='round-robin 0' prio=1 status=active
  |- 12:0:0:1 sdk 8:160 active ready running
  |- 13:0:0:1 sdm 8:192 active ready running
  |- 14:0:0:1 sdo 8:224 active ready running
  |- 15:0:0:1 sdq 65:0  active ready running
  `- 16:0:0:1 sds 65:32 active ready running
Now let’s get a partition created on our lun, make sure you have the right one
# fdisk -l
# fdisk /dev/mapper/mpath
Create linux partition on the disk
# partprobe /dev/mapper/mpath# multipath -r
Validate the partition is there
# fdisk -l
Put an ext3 fs on it (probably could do ext4)
# mkfs.ext3 /dev/mapper/mpathp1
Now update
Using UUID.
/etc/fstab adding the following to the end of the fileUsing UUID.
Check uuid with blkid command.
# blkid
# vi /etc/fstab
  Ex:
        UUID=b2d74f2e-2dbf-4714-9787-ba1c147c4386           /var/crash            ext4     defaults,_netdev 0 0    <---for 0="" code="" crash="" defaults="" ext4="" for="" iscsi="" multipath="" san="" uuid="b2d74f2e-2dbf-4714-9787-ba1c147c4386" var="">
Validate that the partition will mount automatically
# mount -a
# mount
Now edit /etc/kdump.conf accordingly
ext3 UUID=b2d74f2e-2dbf-4714-9787-ba1c147c4386
Restart kdump and chkconfig on.
# service kdump restart

# chkconfig kdump on
Make sure sysrq is enabled and test the crash.
This will crash the system, so do it at the right time if this a production system.
# echo 'c' > /proc/sysrq-trigger
Once system boots back check to confirm that it worked
# tree /var/crash/
/var/crash/
├── 127.0.0.1-2013-02-12-21:11:03
│   └── vmcore
└── lost+found
Subscribe to:
Posts (Atom)