Thursday, July 16, 2015

Setting Up ‘XR’ (Crossroads) Load Balancer for Web Servers on RHEL/CentOS

http://www.tecmint.com/setting-up-xr-crossroads-load-balancer-for-web-servers-on-rhel-centos/


Crossroads is a service independent, open source load balance and fail-over utility for Linux and TCP based services. It can be used for HTTP, HTTPS, SSH, SMTP and DNS etc. It is also a multi-threaded utility which consumes only one memory space which leads to increase the performance when balancing load.
Let’s have a look at how XR works. We can locate XR between network clients and a nest of servers which dispatches client requests to the servers balancing the load.
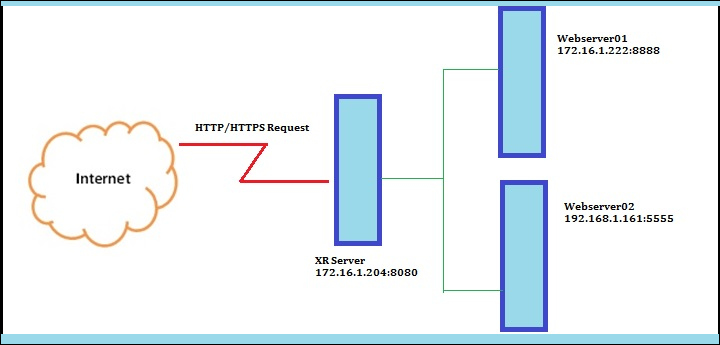
If a server is down, XR forwards next client request to the next server in line, so client feels no down time. Have a look at the below diagram to understand what kind of a situation we are going to handle with XR.
Install XR Crossroads Load Balancer
There are two web-servers, one gateway server which we install and setup XR to receive client requests and distribute them among the servers.
XR Crossroads Gateway Server : 172.16.1.204
Web Server 01 : 172.16.1.222
Web Server 02 : 192.168.1.161
In above scenario, my gateway server (i.e XR Crossroads) bears the IP address 172.16.1.222webserver01 is172.16.1.222 and it listens through port 8888 and webserver02 is 192.168.1.161 and it listens through port5555.
Now all I need is to balance the load of all the requests that receives by the XR gateway from internet and distribute them among two web-servers balancing the load.

Step1: Install XR Crossroads Load Balancer on Gateway Server

1. Unfortunately, there isn’t any binary RPM packages available for crosscroads, the only way to install XR crossroads from source tarball.
To compile XR, you must have C++ compiler and Gnu make utilities installed on the system in order to continue installation error free.
# yum install gcc gcc-c++ make
Next, download the source tarball by going to their official site (https://crossroads.e-tunity.com), and grab the archived package (i.e. crossroads-stable.tar.gz).
Alternatively, you may use following wget utility to download the package and extract it in any location (eg:/usr/src/), go to unpacked directory and issue “make install” command.
# wget https://crossroads.e-tunity.com/downloads/crossroads-stable.tar.gz
# tar -xvf crossroads-stable.tar.gz
# cd crossroads-2.74/
# make install
Install XR Crossroads Load Balancer
After installation finishes, the binary files are created under /usr/sbin/ and XR configuration within /etc namely “xrctl.xml”.
2. As the last prerequisite, you need two web-servers. For ease of use, I have created two pythonSimpleHTTPServer instances in one server.
To see how to setup a python SimpleHTTPServer, read our article at Create Two Web Servers Easily Using SimpleHTTPServer.
As I said, we’re using two web-servers, and they are webserver01 running on 172.16.1.222 through port 8888and webserver02 running on 192.168.1.161 through port 5555.
XR WebServer 01
XR WebServer 01
XR WebServer 02
XR WebServer 02

Step 2: Configure XR Crossroads Load Balancer

3. All requisites are in place. Now what we have to do is configure the xrctl.xml file to distribute the load among the web-servers which receives by the XR server from the internet.
Now open xrctl.xml file with vi/vim editor.
# vim /etc/xrctl.xml
and make the changes as suggested below.
1.0<94> encoding=<94>UTF-8<94>?>


true
/tmp


Tecmint

172.16.1.204:8080
tcp 0:8010 yes 0 0
0 0
172.16.1.222:8888
192.168.1.161:5555
Configure XR Crossroads Load Balancer
Here, you can see a very basic XR configuration done within xrctl.xml. I have defined what the XR server is, what are the back end servers and their ports and web interface port for the XR.
4. Now you need to start the XR daemon by issuing below commands.
# xrctl start
# xrctl status
Start XR Crossroads
Start XR Crossroads
5. Okay great. Now it’s time to check whether the configs are working fine. Open two web browsers and enter the IP address of the XR server with port and see the output.
Verify Web Server Load Balancing
Fantastic. It works fine. now it’s time to play with XR.
6. Now it’s time to login into XR Crossroads dashboard and see the port we’ve configured for web-interface. Enter your XR server’s IP address with the port number for web-interface you have configured in xrctl.xml.
http://172.16.1.204:8010
XR Crossroads Dashboard
This is what it looks like. It’s easy to understand, user-friendly and easy to use. It shows how many connections each back end server received in the top right corner along with the additional details regarding the requests receiving. Even you can set the load weight each server you need to bear, maximum number of connections and load average etc..
The best part is, you actually can do this even without configuring xrctl.xml. Only thing you have to do is issue the command with following syntax and it will do the job done.
# xr --verbose --server tcp:172.16.1.204:8080 --backend 172.16.1.222:8888 --backend 192.168.1.161:5555
Explanation of above syntax in detail:
  1. –verbose will show what happens when the command has executed.
  2. –server defines the XR server you have installed the package in.
  3. –backend defines the webservers you need to balance the traffic to.
  4. Tcp defines it uses tcp services.
For more details, about documentations and configuration of CROSSROADS, please visit their official site at:https://crossroads.e-tunity.com/.
XR Corssroads enables many ways to enhance your server performance, protect downtime’s and make your admin tasks easier and handier.

Tuesday, July 14, 2015

Setting Up Web Servers Load Balancing Using ‘POUND’ on RHEL/CentOS

http://www.tecmint.com/setting-up-pound-web-server-load-balancing-in-linux/

POUND is a load balancing program developed by ITSECURITY Company. It is a lightweight open source reverse proxy tool which can be used as a web-server load balancer to distribute load among several servers. There are several advantages POUND gives to end user which are very convenient and does the job right.
  1. Supports virtual hosts.
  2. Configurable.
  3. When a backend server is failed or recovered from a failure, it detects it automatically and bases its load balancing decisions according to that.
  4. It rejects incorrect requests.
  5. No specified browser or webservers.
Let’s have a look at how can get this hack done.
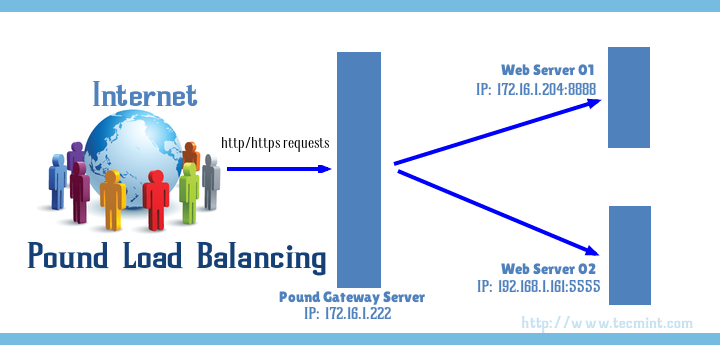
First of all you will need a scenario for better understanding about getting this done. So I will use a scenario where there are two webservers and one gateway server which needs to balance the requests comes to gateway server to webservers.
Pound Gateway Server : 172.16.1.222
Web Server 01 : 172.16.1.204
Web Server 02 : 192.168.1.161
Install Pound Load Balancer in Linux
Pound Web Server Load Balancer

Step1: Install Pound Load Balancer on Gateway Server

1. The easiest way to install Pound is using pre-compiled RPM packages, you can find RPMs for RedHat based distributions at:
  1. http://www.invoca.ch/pub/packages/pound/
Alternatively, Pound can be easily installed from the EPEL repository as shown below.
# yum install epel-release
# yum install Pound
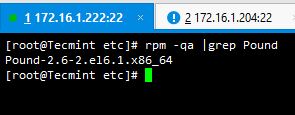
After Pound installed, you can verify whether it is installed by issuing this command.
# rpm –qa |grep Pound
Install Pound Load Balancer
2. Secondly, you need two web-servers to balance the load and make sure you have clear identifiers in order to test the pound configuration works fine.
Here I have two servers bearing IP addresses 172.16.1.204 and 192.168.1.161.
For ease of use, I have created python SimpleHTTPServer to create an instant webserver on both servers. Read about python SimpleHTTPServer
In my scenario, I have my webserver01 running on 172.16.1.204 through port 8888 and webserver02 running on 192.168.1.161 through port 5555.
Pound Webserver 1
Pound Webserver 1
Pound Webserver 2
Pound Webserver 2

Step 2: Configure Pound Load Balancer

3. Now it’s time to make the configurations done. Once you have installed pound successfully, it creates the pound’s config file in /etc, namely pound.cfg.
We have to edit the server and backend details in order to balance the load among the webservers. Go to /etcand open pound.cfg file for editing.
# vi /etc/pound.cfg
Make the changes as suggested below.
ListenHTTP
    Address 172.16.1.222
    Port 80
End

ListenHTTPS
    Address 172.16.1.222
    Port    443
    Cert    "/etc/pki/tls/certs/pound.pem"
End

Service
    BackEnd
        Address 172.16.1.204
        Port    8888
    End

    BackEnd
        Address 192.168.1.161
        Port    5555
    End
End
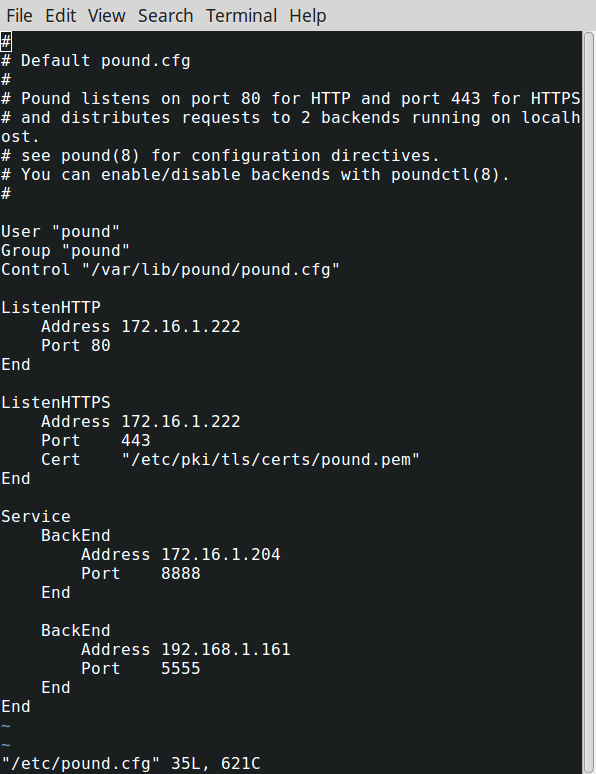
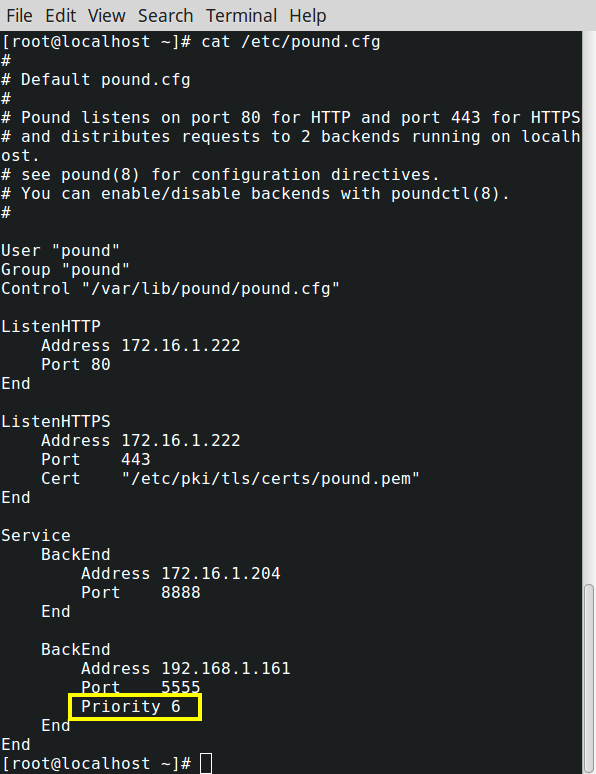
This is how my pound.cfg file looks like.
Configure Pound Load Balancer
Under the “ListenHTTP” and “ListenHTTPS” tags, you have to enter the IP address of the server you have installed POUND.
By default a server handles HTTP requests though port 80 and HTTPS requests through port 443. Under the “Service” tag, you can add any amount of sub tags called “BackEnd”. BackEnd tags bears the IP addresses and the port numbers which the webservers are running on.
Now save the file after editing it correctly and restart the POUND service by issuing one of below commands.
# /etc/init.d/pound restart 
OR
# service pound restart
OR
# systemctl restart pound.service
Start Pound Load Balancer
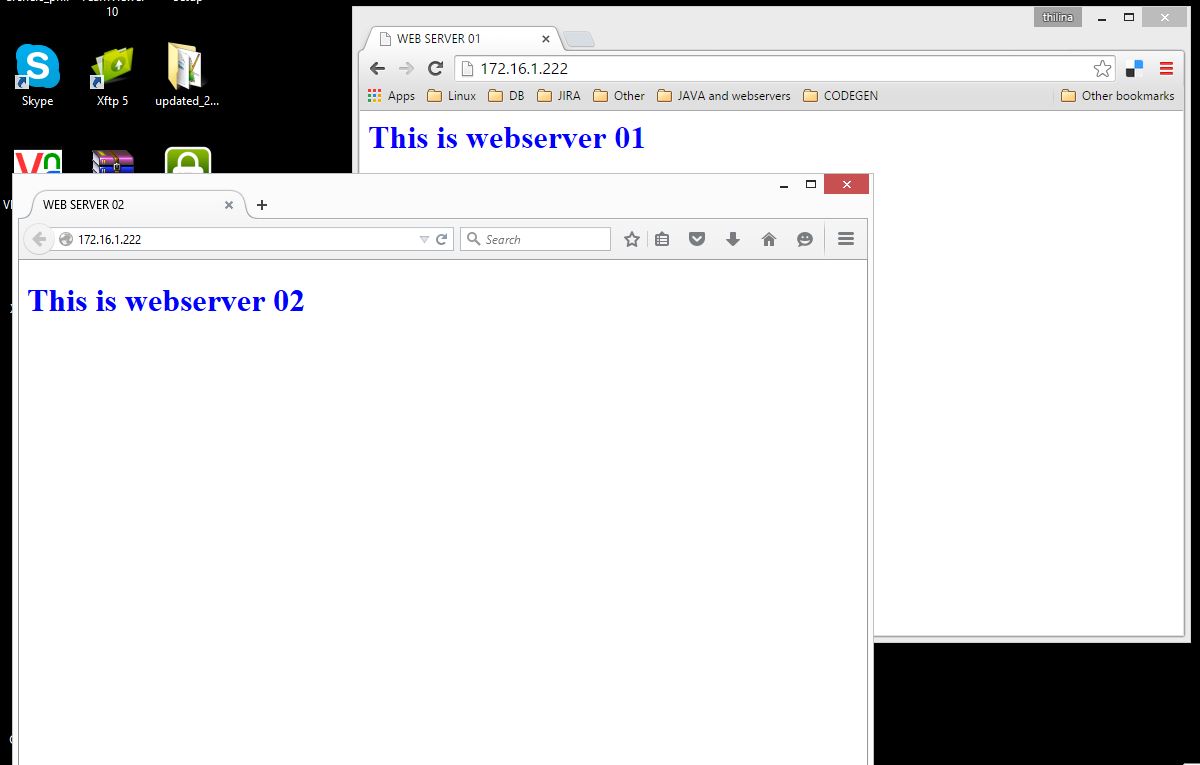
4. Now it’s time to check. Open two web browsers to check whether our configurations work fine. In the address bar type your POUND gateway’s IP address and see what appears.
First request should load the first webserver01 and second request from the other web browser should load the second webserver02.
Check Pound Load Balancing
Furthermore, think of a scenario like if you have two webservers to load balance and one of the server’s performance is good and other’s performance is not so good.
So when load balancing among them, you will have to consider for which server you have to put more weight on. Obviously for the server with good performance specs.
To balance the load like that, you just have to add a single parameter inside the pound.cfg file. Let’s have a look at it.
Think server 192.168.1.161:5555 is the better server. Then you need put more requests flow to that server. Under the “BackEnd” tag which is configured for 192.168.1.161 server, add the parameter “Priority” before the End tag.
Look at below example.
Pound Load Balancing Priority
The range we can use for the “Priority” parameter is between 1-9. If we do not define it, default value of 5 will be assigned.
Then load will be balanced equally. If we define the Priority number, POUND will load the server with higher priority number more oftenly. So in this case, 192.168.1.161:5555 will be loaded more often than the server172.16.1.204:8888.

Step 3: Planning Emergency Breakdowns

Emergency Tag: This tag is used to load a server in case of all the back end servers are dead. You can add it before the last End tag of pound.cfg as follows.
“Emergency
           Address 192.168.5.10
           Port        8080
   End”
6. POUND always keep track of which backend servers are alive and which are not. We can define after how many seconds POUND should checkout the backend servers by adding “Alive” parameter in pound.cfg.
You can use the parameter as “Alive 30” for set it to 30 seconds. Pound will temporarily disable the backend servers which are not responding. When we say not responding server may be dead or cannot establish a connection at that moment.
POUND will check the disabled backend server after every time period you have defined in the pound.cfg file in case if the server could establish a connection, then POUND can get back to work with the server.
7. POUND daemon will be handled by poundctl command. By having that we don’t need to edit the pound.cfgfile and we can issue Listner ServerBackEnd servers and sessions etc. via a single command.
Syntax: poundctl -c /path/to/socket [-L/-l] [-S/-s] [-B/-b] [-N/-n] [-H] [-X]
  1. -c defines path to your socket.
  2. -L / -l defines the listener of your architecture.
  3. -S / -s defines the service.
  4. -B / -b defines the backend servers.
See poundctl man pages for more information.
Hope you enjoy this hack and discover more options regarding this.