Friday, August 12, 2011

Managing links in Linux

Hard and Symbolic links are the two types of files that exist in a Unix Operating System to point to another file.
Hard Links: They are a pointer that is exactly as the same than the file it points to, no mather if it has a different name, any modification done to the pointer are also done to the target file. The hard links can only point to other files, but not directories (though directories are a special kind of files). And the other main difference with Symbolic Links is that hard links MUST reside in the same filesystem than the file they point to, because they have the same inode number.
Symbolic liks: The are a pointer to another file but they contain the name of the file they point to, it can span filesystems (they have a different inode number), and they can point to files or direcoties.
Creating Hard and Symbolic Links:
ln -fs []

By default ln (without arguments) it creates hard links.
-f, --force : Remove existing destination files.
-s, --symbolic : Make symbolic links instead of hard links.

Analysing logs in Linux

Part of the security and sysadmins tasks is the log analysis and decision taking. There is plenty of information in http://www.linux.org/apps/all/Administration/Log_Analyzers.html.

The tools i recommend is called "Lire", this tool permits the creation of several reporting formats, including html, pdf, xml, between others. It also permits to analyze many log file formats, which include MySQL, Iptables, BIND, Apache, Qmail, Postfix, Syslog and more. Lire is GPL'ed Free Software (and Open Source), built around the idea of extendibility.

This tool is available from http://www.logreport.org/lire, it has been deveploped in Perl and i recommend you to install all the dependence modules with CPAN (type "perl -M CPAN -e shell" on the command line as root).

Introduction to Iptables usage in Linux

I am going to explain the generic matches, the ones that apply to all the IP packets. In general, the patch pattern looks like "-s (--src, --source).

For example:
iptables -A INPUT -s 10.10.10.5 -j DROP

The IP address could also be a hostname, in that case it would be resolved to an ip address before being added to the chain. The field of the IP address could also be a range of addresses using a netmask. This instruction is applied in the INPUT chain, but it could be used also in the OUTPUT chain if the machine has more than one ip address.

iptables -A INPUT -s 10.10.10.0/24 -j DROP

This instructions matches the first 24 bits of the address. This means, it matches addresses between 10.10.10.0 - 10.10.10.255.

iptables -A INPUT -s ! 10.10.10.5 -j DROP

The exclamation mark negates the ipaddress, this matches the packets where the source IP is no 10.10.10.5

The "-d (--dst --destination)" matches the destination address of the packets and is used generaly on the OUTPUT chain. The same rules than in the -s option apply (address ranges can be specified as hostnames, a single IP address or a range, and negation of the addresses). For example:

iptables -A OUTPUT -d ! 10.10.10.4 -j REJECT

The "-i (--in-interface) " specify on which network interface the rule should take effect, for example "eth0". This options could be used in the FORWARD, INPUT and PREROUTING chains. The network interface also accepts wildcards, for example, if you want to filter all the traffic from a privat eaddress such as 10.10.10.2 in all the interfaces:

iptables -A INPUT -s 10.10.10.2 -i eth* -j DROP

This would drop all packets arriving on eth0, eth1, eth2, etc.

A final "-p" option allows to work with a specific protocol, for example, if you want to drop all the UDP packets:

iptables -A INPUT -p udp -j DROP

The protocols that can be used are:
TCP, UDP, ICMP, ALL (this is for all the protocols).

 i explained some general packet matching with Iptables, now i am going to explain the TCP packet matching generalities, where the commands displayed following, all match specific values from the TCP packet headers, for example the source and destination ports, tcp options, tcp flags (for example the syn, fin, etc).

You use the --protocol argument to match TCP packets, and optionally, the source port of the packet can be specified with "--sport (--source-port) ", the source port can be a numeric value or the name of the port, that should match the port number we want in the /etc/servicesfile.

Here are two examples:
iptables -A INPUT -p tcp --sport 23 -j REJECTiptables -A INPUT -p tcp --sport telnet -j REJECT

This rules do the same, they reject the inbound traffic from the TCP port 23 of the remote host). The usage of port names instead of the number, creates a little more cpu consume and could be told as "speed penalty" in large rulesets.

It is possible also to specify a range of ports in the rules, lower and upper port separated by a colon. Here i filter all the ports between 10 and 999:
iptables -A OUTPUT -p tcp --sport 10:999 -j REJECT

All TCP source ports except the 80 are accepted with this rule:
iptables -A INPUT -p tcp --sport ! 80 -j ACCEPT

The same can be done with a range of ports:
iptables -A INPUT -p tcp --sport ! 1024:40000 -j LOG

If the first port is numerically higher than the second, iptables swaps both numbers around automatically.

To specify a TCP destination port, the "-dport (--destination-port) [port]" is used, and its rules are the same than in TCP source port matching.

For example, to stop users in your private network to connect to IRC, supposing that IRC uses the ports between 6667 to 66670, you may want to add this rule:
iptables -A OUTPUT -p tcp --dport 6667:6670 -j REJECT

To match a specific flag in the TCP header, you have to make use of "--tcp-flags [mask] [flags]".

The [mask] argument is a list of flags separated by commas, which should be matched.
The [flags] argument is a list of flags that must be set, any flag listed in the [mask] argument, but not in the second, this means that the flag must be unset.

The possible flags are: SYN, ACK, FIN, RST, PSH and URG. ALL and NONE are also possible.

In this example, the SYN,ACK and FIN flags are the mask, and the SYN flag is the one that has to be set:
iptables -A FORWARD -p tcp --tcp-flags SYN,ACK,FIN SYN -j ACCEPT

The mask can also be inverted, meaning that the ACK and FIN should be set, but not the SYN:
iptables -A FORWARD -p tcp --tcp-flags ! SYN,ACK,FIN SYN -j ACCEPT

Matching a particular TCP flag:
This is accomplished with the "--syn" flag, it is usefull because the SYN flag is the TCP start sequence also known as the "3 way handshake", explained in this picture:

iptables -A FORWARD -p tcp --syn -j ACCEPT iptables -A FORWARD -p tcp ! --syn -j ACCEPT


In this case i am going to explain some iptables features related with UDP. UDP (User Datagram Protocol) has the characteristic of being connectionless.

The packets format is this:
In this packet format can be seen that UDP has no flags like TCP. UDP cares only about the source and destination addresses.

In Iptables, udp is specified with the "-p udp" argument. Similar rules apply to udp than with TCP matching, negation and port ranges are allowed:

-sport (--source-port) 
--dport (--destination-port) 

This rule matches any UDP packet with source port of 161 (SNMP)
iptables -A INPUT -p udp --sport 161 -j ACCEPT

This rule logs all the packets with destination port with range from 161 to 180
iptables -A INPUT -p udp --dport 161:180 -j LOG

To learn more about UDP, see the RFS 768

10 most important Unix Security issues

1. Web Server. One of the places that an intruder is going to check first is for vulnerabilities in your Apache version and in you cgi-scripts.

2. Remote Procedure Calls. RPC Services should be down if they are not required, they allow a remote user to execute instructions in your computer; the intruder usualy gains root access this way.
3. SNMP (Simple Network Management Protocol). This protocol is known to have had its vulnerabilities and their password can be easily cracked and more easier captured from the network.
4. SSH (Secure Shell). SSH has been exploited before, if you do not need it then you can turn it off, or filter the source ip addresses with TCP Wrapper.

5. Remote Services (Trusted host). This was a setup in the machines based on the rely of other machines IP address, and leaved access without asking password. Their binaries are "rsh", "rcp", "rlogin" and "rexec". They exist and can be used also today, the attacked can do a party with your machine if they use a technique known as "ip spoofing".

6. FTP (File Transfer Protocol). Many vulnerabilities have been found in FTP, as exploits and protocol weaknesses, like clear text password transfer (resolved in SFTP).

7. LPD (Line Printer Daemon). This daemon is also remotely exploitable with help of an overflow and a shellcode, gaining root access if the server is running as root.

8. BIND/DNS (Dynamic Name Server). DNS Flooding, exploits and other attacks are available, if you are going to set up a DNS, use a firewall to filter any port that you do not want.

9. Sendmail. This mail transfer agent is known for its buffer overflows and remote exploits, though it has resolved its issues, always appears something new. It is recommended to use qmail.

10. Weak Password / No Passwords in the system. I do not need to explain this.

Many people that talk about security talk about a false sense of security that one can have in the cyberspace, i do not totaly agree with them, i see very often thay it is created a false sense of insecurity also. The items i have listed before create some sense of insecurity and alert; but do not worry, if you are going to run one of this critical services, just keep in mind:

* Use a well configured firewall (pay more attention to "well configured" than "firewall")
* Set up correctly an Intrusion Detection and Prevention System.
* Ask for help a security professional

How to do an secure tunel with ssh in Linux

You may know that ssh is a secure way to connect, remember those old days when telnet was used and the passwords just flew through the network and any person with a sniffer could capture it ?

With ssh you can create a secure connection from one point to anther, going through a middle point, like the figure shows:
The tunnel is an cyphered connection from A to B, and from B to C the connection is not cyphered (almost not by ssh that we are using). B acts as a gateway to C.
In A you would write:
$ ssh -g -L [port in A]:[C address]:[port in C] [b address]
Example of doing a tunnel to a webpage:
$ ssh -g -L 8000:www.gmail.com:80 sureshkumarpakalapati.in

You would connect with your browser to www.gmail.com:8000.
This would create a tunnel from A to B and B to gmail, this way nobody in A's network will be able to sniff the gmail traffic, only in B's network would that be possible.

Limit users access to Linux in a time range

In the cases when you want to limit the access to a Linux operating system in a time range, you would like to use pam_time.so. pam_time was written by Andrew G. Morgan.

Take a look at /etc/security/time.conf

To limit for example ssh access from 23:00 PM and 08:00 AM.
sshd;*;*;!Al2300-0800

The format of the file is:
Service;ttys;users;time

the !Al means, anything except "All the days".

If you would like to permit people from 4 to 8 PM all the days, except root:
login;*;!root;!Al1600-2000

Further reading:man time.conf

Disable users from loggin into the server, except the administrator

In cases where you have to disable the login to all users,except root, for example when you have to do a backup, you have to use pam_nologin.so (man nologin).

1) Edit the pam file for the service you want to control, in this example i modify ssh pam control file, located in /etc/pam.d/sshd

Add this line
account required pam_nologin.so


2) Create the /etc/nologin file, just do "touch /etc/nologin"

This should disable the login from ssh. If you want to disable the login from terminal, modify the /etc/pam.d/login file.

3) To re-enable the login just remove /etc/nologin

How to control which files have been deleted and by who ?

 This is a hack you can use to control file deletion and know exactly who deleted a file.

The trick is to add into the /etc/profile file this script:

[walter@walter ~]$ rm () { echo `id` deleted the file $1 at `date` >> /tmp/.log; /bin/rm $1; }

The log file will show you this:

uid=500(walter) gid=500(walter) groups=500(walter) deleted the file test at Mon Nov 26 10:31:16 ART 2007 
To print also the hostname where the deletion has come from:
$ rm() { i=`tty | cut -d / -f 3,4`;host=`w | grep $i | awk '{print $3}'`;echo -e `id` deleted the file $1 at `date` comming from "$host\n" >> /tmp/.log;/bin/rm "$@";}
The output would be:
uid=0(root) gid=0(root) groups=0(root),1(bin),2(daemon),3(sys),4(adm),6(disk),10(wheel),503(devel) deleted the file at Tue Nov 27 15:09:14 ART 2007
The problem of this solution is that if the user is some curious, he could know about this "set" variable, and:

* Unset the variable
* Execute the binary calling it directly

So, if you need the best way, you will have to write a little C script that replaces the original "rm" binary and rename the original "rm" binary to "rm.orig". Now, the "rm" binary should log the deletion of the file and then execute the "rm.orig", obviously, changing the process name to "rm", so the user do not suspects.

Advantages of Linux over its commercial competitors

Linux is free.
You can install a complete Unix system at no expense other than the hardware.

Linux is fully customizable in all its components.
Thanks to the General Public License (GPL), you are allowed to freely read and modify the source code of the kernel and of all system programs.

Linux runs on low-end, cheap hardware platforms.
You can even build a network server using an old Intel 80386 system with 4 MB of RAM.

Linux is powerful.
Linux systems are very fast, since they fully exploit the features of the hardware components. The main Linux goal is efficiency, and indeed many design choices of commercial variants, like the STREAMS I/O subsystem, have been rejected by Linus because of their implied performance penalty.

Linux has a high standard for source code quality.
Linux systems are usually very stable; they have a very low failure rate and system maintenance time.

The Linux kernel can be very small and compact.
It is possible to fit both a kernel image and full root filesystem, including all fundamental system programs, on just one 1.4 MB floppy disk. As far as we know, none of the commercial Unix variants is able to boot from a single floppy disk.

Linux is highly compatible with many common operating systems.
It lets you directly mount filesystems for all versions of MS-DOS and MS Windows, SVR4, OS/2, Mac OS, Solaris, SunOS, NeXTSTEP, many BSD variants, and so on. Linux is also able to operate with many network layers, such as Ethernet (as well as Fast Ethernet and Gigabit Ethernet), Fiber Distributed Data Interface (FDDI), High Performance Parallel Interface (HIPPI), IBM's Token Ring, AT&T WaveLAN, and DEC RoamAbout DS. By using suitable libraries, Linux systems are even able to directly run programs written for other operating systems. For example, Linux is able to execute applications written for MS-DOS, MS Windows, SVR3 and R4, 4.4BSD, SCO Unix, XENIX, and others on the 80 x 86 platform.

Linux is well supported.
Believe it or not, it may be a lot easier to get patches and updates for Linux than for any other proprietary operating system. The answer to a problem often comes back within a few hours after sending a message to some newsgroup or mailing list. Moreover, drivers for Linux are usually available a few weeks after new hardware products have been introduced on the market. By contrast, hardware manufacturers release device drivers for only a few commercial operating systems — usually Microsoft's. Therefore, all commercial Unix variants run on a restricted subset of hardware components.

With an estimated installed base of several tens of millions, people who are used to certain features that are standard under other operating systems are starting to expect the same from Linux. In that regard, the demand on Linux developers is also increasing. Luckily, though, Linux has evolved under the close direction of Linus to accommodate the needs of the masses.

Thursday, August 4, 2011

How to Setup GFS2 or GFS in Linux Centos

It has been a nightmare for me setting up GFS2 with my 3 shared hosting servers and 1 SAN Storage. I have been reading all over the internet and the solutions to this is either outdated or contains bug that cannot make my SAN storage SAN to work. Finally, i managed to setup my GFS2 on my Dell MD3200i with 10TB of disk space.


GFS2/GFS Test Environment


Here is the test environment equipment that i utilized for this setup.
3 Centos Web Server
1 MD3200i Dell SAN Storage
1 Switch to connect all these equipment together


Assumption


I will assume you would have setup all your 3 Centos servers to communicate with your SAN ISCSI storage. This means that all your 3 Centos servers will be able to view your newly created LUN using iscsiadmn. And you have switch off your iptabls and selinux. If your iscsi storage hasn’t configure, you can do so at cyberciti.


Setup GFS2/GFS packages


On all of your 3 Centos servers, you must install the following packages:


cman
gfs-utils
kmod-dlm
modcluster
ricci
luci
cluster-snmp
iscsi-initiator-utils
openais
oddjobs
rgmanager


Or you can simple type the following yum on all 3 Centos machine view sourceprint?

1 yum install -y cman gfs-utils kmod-gfs kmod-dlm modcluster ricci luci cluster-snmp iscsi-initiator-utils openais oddjob rgmanager


Or even simplier, you can just add the cluster group via the following line view sourceprint?

1 yum groupinstall -y Clustering
2 yum groupinstall -y "Storage Cluster"


Oh, remember to update your Centos before proceeding to do all of the above.

1 yum -y check-update
2 yum -y update


After you have done all of the above, you should have all the packages available to setup GFS2/GFS on all your 3 Centos machine.


Configuring GFS2/GFS Cluster on Centos


Once you have your required centos packages installed, you would need to setup your Centos machine. Firstly, you would need to setup all your hosts file with all 3 servers machine name. Hence, i appended all my 3 servers machine name across and in each machine i would have the following additional line in my /etc/hosts file.

1 111.111.111.1 gfs1.hungred.com
2 111.111.111.2 gfs2.hungred.com
3 111.111.111.3 gfs3.hungred.com

where *.hungred.com is each machine name and the ip beside it are the machine ip addresses which allows each of them to communicate with each other by using the ip stated there.

Next, we will need to setup the cluster configuration of the server. On each machine, you will need to execute the following instruction to create a proper cluster configuration on each Centos machine.
view sourceprint?
1 ccs_tool create HungredCluster
2 ccs_tool addfence -C node1_ipmi fence_ipmilan ipaddr=111.111.111.1 login=root passwd=machine_1_password
3 ccs_tool addfence -C node2_ipmi fence_ipmilan ipaddr=111.111.111.2 login=root passwd=machine_2_password
4 ccs_tool addfence -C node3_ipmi fence_ipmilan ipaddr=111.111.111.3 login=root passwd=machine_3_password
5 ccs_tool addnode -C gfs1.hungred.com -n 1 -v 1 -f node1_ipmi
6 ccs_tool addnode -C gfs2.hungred.com -n 2 -v 1 -f node2_ipmi
7 ccs_tool addnode -C gfs3.hungred.com -n 3 -v 1 -f node3_ipmi


Next, you will need to start cman.view sourceprint?

1 service cman start
2 service rgmanager start
cman should starts without any error. If you have any error while starting cman, your GFS2/GFS will not work. If everything works fine, you should see the following when you type the command as shown below,


view sourceprint?

1 [root@localhost ]# cman_tool nodes
2 10.0.0.1
3 Node Sts Inc Joined Name
4 1 M 16 2011-1-06 02:30:27 gfs1.hungred.com
5 2 M 20 2011-1-06 02:30:02 gfs2.hungred.com
6 3 M 24 2011-1-06 02:36:01 gfs3.hungred.com

If the above shows, this means that you have properly setup your GFS2 cluster. Next we will need to setup GFS2!


Setting up GFS2/GFS on Centos


You will need to start the following services.


service gfs start
service gfs2 start

Once, this two has been started. All you need to do is to partition your SAN storage LUN. If you want to use GFS2, partition it with gfs2


view sourceprint?1 /sbin/mkfs.gfs2 -j 10 -p lock_dlm -t HungredCluster:GFS /dev/sdb


Likewise, if you like to use gfs, just change it to gfs instead of gfs2


view sourceprint?1 /sbin/mkfs.gfs -j 10 -p lock_dlm -t HungredCluster:GFS /dev/sdb


A little explanation here. HungredCluster is the one we created while we were setup out GFS2 Cluster. /dev/sdb is the SAN storage lun space which was discovered using iscsiadm. -j 10 is the number of journals. each machine within the cluster will require 1 cluster. Therefore, it is good to determine the number of machine you will place into this cluster. -p lock_dlm is the lock type we will be using. There are other 2 more types beside lock_dlm which you can search online.


P.S: All of the servers that will belong to the GFS cluster will need to be located in the same VLAN. Contact support if you need assistance regarding this.


If you are only configuring two servers in the cluster, you will need to manually edit the file /etc/cluster/cluster.conf file on each server. After the tag, add the following text:


If you do not make this change, the servers will not be able to establish a quorum and will refuse to cluster by design.


Setup GFS2/GFS run on startup


Key the following to ensure that GFS2/GFS starts everytime the system reboot.


view sourceprint?
1 chkconfig gfs on
2 chkconfig gfs2 on
3 chkconfig clvmd on //if you are using lvm
4 chkconfig cman on
5 chkconfig iscsi on
6 chkconfig acpid off
7 chkconfig rgmanager on
8 echo "/dev/sdb /home gfs2 defaults,noatime,nodiratime 0 0" >>/etc/fstab
9 mount /dev/sdb


Once this is done, your GFS2/GFS will have mount on your system to /home. You can check whether it works using the following command.


view sourceprint?

1 [root@localhost ~]# df -h


You should now be able to create files on one of the nodes in the cluster, and have the files appear right away on all the other nodes in the cluster.


Optimize clvmd


We can try to optimize lvmd to control the type of locking lvmd is using.


view sourceprint?

1 vi /etc/clvmd/clvmd.conf
2 find the below variables and change it to the variable as shown below
3 locking_type = 3
4 fallback_to_local_locking = 0
5 service clvmd restart
credit goes to http://pbraun.nethence.com/doc/filesystems/gfs2.html


Optimize GFS2/GFS
There are a few ways to optimize your gfs file system. Here are some of them.
Set your plock rate to unlimited and ownership to 1 in /etc/cluster/cluster.conf
view sourceprint?1
Set noatime and nodiratime in your fstab.
view sourceprint?1 echo "/dev/sdb /home gfs2 defaults,noatime,nodiratime 0 0" >>/etc/fstab
lastly, we can tune gfs directy by decreasing how often GFS2 demotes its locks via this method.
view sourceprint?
1 echo "
2 gfs2_tool settune /GFS glock_purge 50
3 gfs2_tool settune /GFS scand_secs 5
4 gfs2_tool settune /GFS demote_secs 20
5 gfs2_tool settune /GFS quota_account 0
6 gfs2_tool settune /GFS statfs_fast 1
7 gfs2_tool settune /GFS statfs_slots 128
8 " >> /etc/rc.local


credit goes to linuxdynasty.
iptables and gfs2/gfs port
If you wish to have iptables remain active, you will need to open up the following ports.


view sourceprint?
1 -A INPUT -i 10.10.10.200 -m state --state NEW -p udp -s 10.10.10.0/24 -d 10.10.10.0/24 --dport 5404, 5405 -j ACCEPT
2 -A INPUT -i 10.10.10.200 -m state --state NEW -m multiport -p tcp -s 10.10.10.0/24 -d 10.10.10.0/24 --dports 8084 -j ACCEPT
3 -A INPUT -i 10.10.10.200 -m state --state NEW -m multiport -p tcp -s 10.10.10.0/24 -d 10.10.10.0/24 --dports 11111 -j ACCEPT
4 -A INPUT -i 10.10.10.200 -m state --state NEW -m multiport -p tcp -s 10.10.10.0/24 -d 10.10.10.0/24 --dports 14567 -j ACCEPT
5 -A INPUT -i 10.10.10.200 -m state --state NEW -m multiport -p tcp -s 10.10.10.0/24 -d 10.10.10.0/24 --dports 16851 -j ACCEPT
6 -A INPUT -i 10.10.10.200 -m state --state NEW -m multiport -p tcp -s 10.10.10.0/24 -d 10.10.10.0/24 --dports 21064 -j ACCEPT
7 -A INPUT -i 10.10.10.200 -m state --state NEW -m multiport -p tcp -s 10.10.10.0/24 -d 10.10.10.0/24 --dports 41966,41967,41968,41969 -j ACCEPT
8 -A INPUT -i 10.10.10.200 -m state --state NEW -m multiport -p tcp -s 10.10.10.0/24 -d 10.10.10.0/24 --dports 50006,50008,50009 -j ACCEPT
9 -A INPUT -i 10.10.10.200 -m state --state NEW -m multiport -p udp -s 10.10.10.0/24 -d 10.10.10.0/24 --dports 50007 -j ACCEPT


Once these ports are open on your iptables, your cman should be able to restart properly without getting start either on fencing or cman starting point. Good Luck!


Troubleshooting


You might face some problem setting up GFS2 or GFS. Here are some of them which might be of some help


CMAN fencing failed
You get something like the following when you start your cman
view sourceprint?
1 Starting cluster:
2 Loading modules... done
3 Mounting configfs... done
4 Starting ccsd... done
5 Starting cman... done
6 Starting daemons... done
7 Starting fencing... failed


One of the possibility that is causing this is that your gfs2 has already been mounted to a drive. Hence, fencing failed. Try to unmount it and start it again.


mount.gfs2 error
if you are getting the following error
view sourceprint?

1 mount.gfs2: can't connect to gfs_controld: Connection refused
you need to try to start the cman service

Clearing kernel cache in linux

This is about the drop_caches tunability. It's available in kernel 2.6.16 and above, and exists in /proc/sys/vm.

If you echo various values to it, various kernel cache data structures are dropped. This is a non-destructive operation, so if you still see stuff hanging out after it, it's likely that it was dirty cache. Anyhow, on to the values:

1 - drop the pagecache

2 - drop the dentry and inode caches

3 - drop both the dentry and inode caches, as well as the pagecache.

echo 3 > /proc/sys/vm/drop_caches as a root or admin user
A gateway is a node that allows you to gain entrance into a network and vice versa. On the Internet the node which is the stopping point can be a gateway or a host node. A computer that controls the traffic your network or your ISP (Internet Service Provider) receives is a node. In most homes a gateway is the device provided by the Internet Service Provider that connects users to the internet. We can find the gateway IP address on Windows, Linux and Mac as below.

On Windows :

Click Start -> Run -> Type cmd to launch command prompt.

In command prompt type :

route PRINT

The output will have a list of gateway addresses for the particular system.

On Lunux :

Start Terminal and Run ,

$ route -n

This will display the routing table as below

Kernel IP routing table

Destination Gateway Genmask Flags Metric Ref Use Iface

192.168.31.0 192.168.1.1 255.255.255.0 UG 0 0 0 eth0 127.0.0.0 0.0.0.0 255.0.0.0 U 0 0 0 lo In the above output the default gateway for the system is 192.168.1.1 as the flag is set as G (refers to gateway) for this ip adress.

On Mac :

Open Terminal and Type : $ netstat -rn The output will look like as below. Routing tables

Internet:

Destination Gateway Flags Refs Use Netif Expire

default 192.168.1.1 UGSc 7 0 en0

127 localhost UCS 0 0 lo0

localhost localhost UH 1 7373 lo0

The output shows the default gateway for the mac as 192.168.1.1 a the flag for default network connection is set as "G".

How to erase the harddisk completly using linux ?

Erasing the entire hard disk using Linux:

Run the following command to fill your entire hard disk with zeros

$ dd if=/dev/zero of=/dev/sda bs=1M

The above command will whole hard disk with zeros. Note: this will take long time to complete.

Erasing/filling the hard Disk with random data:

We can fill the hard disk with random data in case of any security requirement to prevent data loss. Run the below

$ dd if=/dev/random of=/dev/sda bs=1M

Erasing the MBR(Master Boot Record) of the Hard Disk.

To Erase only code area in your MBR:

Run

$ dd if=/dev/zero of=/dev/sda bs=446 count=1

To Erase entire MBR :

Run

$ dd if=/dev/zero of=/dev/sda bs=512 count=1

Note : If linux is not installed, Boot into Linux image from Live CD to perform above operations on the hard disk.


How to setup Redhat cluster and GFS2 on RedHat Enterprise Linux 6 on Vmware ESXi

1) Installing RHEL6 on Vmware esxi with clustering packages.


a) Creating a RedHat Enterprise Linux 6.0 Virtual image.

i) Open vSphere Client by connecting to a Vmware ESXi Server.

ii) Login into your vSphere Client

iii) Goto File -> New -> Virtual Machine (VM).

iv) Select Custom option in Create New Virtual Machine Window and click Next

v) Give a name to the virtual machine(VM) ( In my case name of my virtual machine is – RHEL6-ClusterNode1) and click next.

vi) Select a resource pool where you want your VM to reside ( In my case , I have created a resource pool named RHEL6-Cluster.) and click Next.

vii) Select a datastore to store your VM files and Click Next.

viii) Select VM version which is suitable for your environment.( In my case VM version is 7) and click Next.

ix) Specify the guest operating system type as Linux and select version as RedHat Enterprise Linux 6.0 -32 bit. Click Next.

x) Select number of CPU for the VM ( you can assign multiple CPU if your processor is multicore.) (in my case : I had assigned 1 cpu) and Click Next.

xi) Configure the memory for your VM (assign the memory wisely, so that VM performance is not degraded when multiple VM’s run in parallel). Click Next.

xii) Create Network Connection for your VM ( generally do not change the default connection ) . Click Next.

xiii) Select SCSI controller as LSI Logic Parallel , Click Next.

xiv) Select “Create New Virtual Disk” and Click Next.

xv) Allocate virtual disk capacity for the VM as needed.( In my case : virtual disk size was assigned as 10GB. Select “Support Clustering features such as fault tolerance. Select “ Specify a datastore “ and assign a datastore to store the VM. Click Next

xvi) Under Advanced options, Let the Virtual Device Node be SCSI(0:0). Click Next.

xvii) On “the Ready to Complete” window select “Edit the virtual machine settings before completion “ and Click continue.

xviii) On the “ RHEL6-Cluster1 – VM properties window”, select New SCSI controller and change the SCSI bus sharing type from None to “Virtual” so that virtual disks can be shared between VM’s

xix) Similarly for “New CD/DVD” supply either client device or host device or Operating system installer ISO file located on the datastore to start the installation of the operating system. Note: do not forget to enable “Connect at power on “ option for Host Device or Datastore ISO device option.

xx) Now Click Finish, No you are ready to start the installation of the RHEL6 operating system on Virtual Machine.

2) Installing RedHat Enterprise for Linux 6.0 on the Virtual Machine.

a) File System Partitioning for the RHEL6.0 VM.

i) Start the RHEL Installation.

ii) Select custom partitioning for disk.

iii) Create a /boot partition of 512MB

iv) Create physical LVM Volume from remaining free space on the virtual disk.

v) Create logical volume group and create a logical volume for swap and “/” on the available LVM disk space.

vi) Apply the above changes to create the partition structure.

b) Selecting the packages required for clustering

i) Select the packages to be installed on to the disk by selecting custom package selection ( Enable additional repository High Availability, Resilient storage

ii) Select all packages under High Availability, Resilient storage. Click next to start installation of the operating system.

Note : At the end of the installation cman, luci, ricci, rgmanager, clvmd, modclusterd, gfs2-tools packages will get installed onto the system.

iii) After the operating system is installed, Restart the VM to boot into the VM and perform post installation tasks and shutdown the guest RHEL6.0 VM.


3) Cloning the RHEL6.0 VM image into two copies named as RHEL6-Cluster2 and RHEL6-Cluster3.

i) Open the datastore of your VMware ESXi by right clicking and selecting “Browse Datastore” on the datastore in the summary page of the ESXi console.

ii) Create two directories RHEL6-Cluster2 and RHEL6-Cluster3

iii) Copy the VM image files from RHEL6-Cluster1 directory to above two directories i.e., RHEL6-Cluster2 and RHEL6-Cluster3.

iv) Once you have copied the all the files to respective directory, browse to RHEL6-Cluster2 directory under datastore and locate “RHEL6-Cluster1.vmx” file, right click on it and select “Add to Inventory”.

v) In the “Add to Inventory” window add the VM as RHEL6-Cluster2 and finish the process

vi) Similarly perform previous step to add RHEL6-cluster3 to the inventory.

4) Adding a shared harddisk to all the 3 VM’s

a) Adding a hard disk for clustering to RHEL6-Cluster1 VM/node.

i) In vSphere Client select RHEL6-Cluster1 VM , Open Virtual Machine Properties window by right clicking and selecting “Edit Settings”.

ii) Click on “Add” in Virtual Machine Properties window , Add hardware window pops up.

iii) Select Hard Disk as device type, Click Next.

iv) Select “ Create a new virtual disk” and click Next.

v) Specify the required disk size and select Disk Provisioning as “Support clustering features such fault tolerance” and Location as “Store with the virtual machine” Click Next.

vi) In the Advanced Options window, Select the Virtual Device Node as : SCSI (1:0). Click Next. Complete the “Add hardware “ process.

vii) On the “ RHEL6-Cluster1 – VM properties window”, select SCSI controller 1 and change the SCSI bus sharing type from None to “Virtual” so that virtual disks can be shared between VM’s.

b) Sharing the RHEL6-Cluster1 node’s additional hard disk with other two VM/cluster nodes.

i) In vSphere Client select RHEL6-Cluster2 VM , Open Virtual Machine Properties window by right clicking and selecting “Edit Settings”.

ii) Click on “Add” in Virtual Machine Properties window , Add hardware window pops up.

iii) Select Hard Disk as device type, Click Next.

iv) Select “Use an existing virtual disk” and click Next.

v) Browse the datastore, locate RHEL6-cluster1’ directory and select RHEL6-Cluster1_1.vmdk ( Note : Additional hardisk will named as VMname _1 or 2 or 3.vmdk . Do not select RHEL6-Cluster1.vmdk as this your VMimage file) to add as second hard disk to the VM. Click Next.

vi) In the Advanced Options window, Select the Virtual Device Node as : SCSI (1:0). Click Next. Complete the “Add hardware “ process.

vii) On the “ RHEL6-Cluster2 – VM properties window”, select SCSI controller 1 and change the SCSI bus sharing type from None to “Virtual” so that virtual disks can be shared between VM’s.

c) Similarly perform the above steps described under section (b) for the 3rd node.

5) Configuring the static IP address, hostname and /etc/hosts file on all three nodes.

Assign the static IP addresses to all the three VM as below

Ex :

192.168.1.10 RHEL6-Cluster1

192.168.1.11 RHEL6-Cluster2

192.168.1.12 RHEL6-Cluster3

Gateway in this case is :192.168.1.1

DNS in this case is : 192.168.1.1

DOMAIN in this case is: linuxlabs.com

i) To Assign above IP and hostname Start all the three VM’s

ii) Note : When you have started the VM, The network manager daemon/service on RHEL6 would have started the network by getting an ipaddress from DHCP and assigning it to eth0 or eth1. Note down the hardware address of your Active Ethernet by running ifcfg command ( The HWaddr would be like 00:0C:29:86:D3:E6 etc as this needed to added into “/etc/sysconfig/network-scripts/ifcfg-eth0” depending upon which Ethernet port is active on your image.).

iii) Disable and stop the Network Manager daemon as other cluster related daemons require this daemon to be off.

To stop the network manager daemon, run:

/etc/init.d/NetworkManager stop

To disable the network manager daemon service , run:

Chkconfig –level 345 NetworkManager off

iv) Add the following details to “/etc/sysconfig/network-scripts/ifcfg-eth0” file

DEVICE="eth0"

NM_CONTROLLED="no"

ONBOOT="yes"

HWADDR=00:0C:29:96:D3:E6

TYPE=Ethernet

BOOTPROTO=none

IPADDR=192.168.1.10

PREFIX=24

GATEWAY=192.168.1.1

DNS1=192.168.1.1

DOMAIN=linuxlabs.com

DEFROUTE=yes

IPV4_FAILURE_FATAL=yes

IPV6INIT=no

NAME="System eth0"

UUID=5fb06bd0-0bb0-7ffb-45f1-d6edd65f3e03


Note : HWADDR and DEVICE may change from VM to VM.

v) Now add hostnames as RHEL6-cluster1 or RHEL6-Cluster2 or RHEL6-Cluster3 to “/etc/sysconfig/network” file inside each VM.

After adding the hostname the “/etc/sysconfig/network” file will look like as below:

NETWORKING=yes

HOSTNAME=RHEL6-Cluster1

vi) Now add hostname resolution information to /etc/hosts file. As below.


#192.168.1.232 RHEL6-Cluster1 # Added by NetworkManager

192.168.1.10 RHEL6-Cluster1.linuxlabs.com

#127.0.0.1 localhost.localdomain localhost

#::1 RHEL6-Cluster1 localhost6.localdomain6 localhost6

192.168.1.11 RHEL6-Cluster2.linuxlabs.com

192.168.1.12 RHEL6-Cluster3.linuxlabs.com

Note : Similarly perform the above steps on the other two VM’s .

vii) After configuring all the 3 VM’s , Restart the VM’s and Verify the network connection by pinging each other VM to confirm the network configuration is correct and working fine.


6) Configuring the cluster on RHEL6.0 with High Availability Management web UI.

i) Start the luci service on all the 3 nodes by running command in terminal.
service lcui start

ii) Start the ricci service on all the 3 nodes by running the command in terminal. Ricci daemon runs on 11111 port.

service ricci start

iii) Open the browser, type https://rhel6-cluster1.linuxlabs.com:8084/ to High Availability Management Console.

iv) Login into the console with your root user credentials.

v) Create a cluster as “mycluster”

vi) Add All the 3 client nodes to the cluster as below:

Node Host name Root Password Ricci Port

RHEL6-Cluster1.linuxlabs.com ********* 11111

RHEL6-Cluster2.linuxlabs.com ********* 11111

RHEL6-Cluster3.linuxlabs.com ********* 11111

Click on “Create Cluster” to create and Add all the nodes to the cluster.

By performing above action , the all the 3 nodes are now part of the cluster “mycluster” . cluster.conf under “/etc/cluster/cluster.conf “ on all the three nodes gets populated like some thing as below.

[root@RHEL6-Cluster1 ~]# cat /etc/cluster/cluster.conf


7) Creating GFS2 file system with clustering.

a) Once you have created a cluster and added all the 3 nodes as cluster member. Run the following command on all three nodes to verify the cluster node status.

ccs_tool lsnode

the output will be

[root@RHEL6-Cluster1 ~]# ccs_tool lsnode

Cluster name: mycluster, config_version: 1

Nodename Votes Nodeid Fencetype

RHEL6-Cluster1.linuxlabs.com 1 1

RHEL6-Cluster2.linuxlabs.com 1 2

RHEL6-Cluster3.linuxlabs.com 1 3


b) Now start the cman and rgmanager service on all 3 nodes by running command

service cman start

service rgmanager start

c) now check the status of your cluster by running the commands below.

clustat

cman_tool status

The output of the clustat command would be something like:


[root@RHEL6-Cluster1 ~]# clustat

Cluster Status for mycluster @ Wed Jul 6 16:27:36 2011

Member Status: Quorate

Member Name ID Status

------ ---- ---- ------

RHEL6-Cluster1.linuxlabs.com 1 Online, Local

RHEL6-Cluster2.linuxlabs.com 2 Online

RHEL6-Cluster3.linuxlabs.com 3 Online

The output of the cman_tool status command would be something like:


[root@RHEL6-Cluster1 ~]# cman_tool status

Version: 6.2.0

Config Version: 1

Cluster Name: mycluster

Cluster Id: 65461

Cluster Member: Yes

Cluster Generation: 48

Membership state: Cluster-Member

Nodes: 3

Expected votes: 3

Total votes: 3

Node votes: 1

Quorum: 2

Active subsystems: 9

Flags:

Ports Bound: 0 11 177

Node name: RHEL6-Cluster1.linuxlabs.com

Node ID: 1

Multicast addresses: 239.192.255.181

Node addresses: 192.168.1.10

d) Now we need enable clustering on LVM2 by running the command as below:

lvmconf –enable-cluster

e) Now we need to create the LVM2 volumes on the additional hard disk attached to the VM. Follow below commands exactly.

pvcreate /dev/sdb

vgcreate –c y mygfstest_gfs2 /dev/sdb

lvcreate –n mytestGFS2 –L 7G mygfstest_gfs2

Note : By executing the above list of commands serially we would have created physical lvm volume, volume group and logical volume.

f) Now start clvmd service on all 3 nodes by running:

service clvmd start

g) Now we have to create a GFS2 file system on the above LVM volume. To create the GFS2 file system , run the command as below:

Format of the command is as below.

mkfs -t -p -t : -j

mkfs -t gfs2 -p lock_dlm -t mycluster:mygfs2 -j 4 /dev/mapper/mygfstest_gfs2-mytestGFS2

this will format the LVM device and create a GFS2 file system .

h) Now we have to mount the GFS2 file system on all the 3 nodes by running the command as below:

mount /dev/mapper/mygfstest_gfs2-mytestGFS2 /GFS2

where /GFS2 is mount point. You might need to create /GFS2 directory to create a mount point for the GFS2 file system.

i) Congrats, your GFS2 file system setup with cluster is ready for use.

Run the below command to know the size and mount details of the file system by running:

mount

df -kh

8) Now that we have a fully functional cluster and a mountable GFS2 file system, we need to make sure all the necessary daemons start up with the cluster whenever VM are restarted.

chkconfig --level 345 luci on

chkconfig --level 345 ricci on

chkconfig --level 345 rgmanager on

chkconfig --level 345 clvmd on

chkconfig --level 345 cman on

chkconfig --level 345 modclusterd on

chkconfig --level 345 gfs2 on

a) If you want the GFS2 file system to be mounted at startup you can add the filesytem and mount point details to /etc/fstab file

echo "/dev/mapper/mygfstest_gfs2-mytestGFS2 /GFS2 gfs2 defaults,noatime,nodiratime 0 0" >> /etc/fstab


Wednesday, August 3, 2011

Make multiple phone calls using Gmail

Log in to your Gmail account.

On the left side of the screen, you should see a link named "Call Phone" in the Chat section. Click on that link, and a small dialer window will pop up in the lower right of your screen.

Before you can make your first call, you'll first need to download Google's voice plug-in, which you can do by clicking on the link for it in the dialer window.

You'll see a screen asking you to install voice and video chat. Install the plugin.

After the plug-in is installed, just reopen the voice dialer on your Gmail page and you can now make a call.


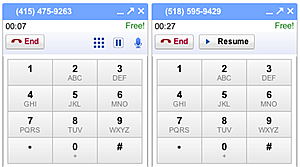
If you wish to make a second call and not lose the first one, simply click on the "Call Phone" link in the Chat section again. Your first call will automatically switch to hold. And as explained in the Picture, clicking on the Resume button will let you switch back and forth from one call to another.

Personality Development Notes

Monday, August 1, 2011

E-filing your income tax returns is cheap, convenient and easy

See, filing returns online is really as easy as A, B, C ....Even filling up the form through a tax-filing portal is a smooth process. The website explains each step and computes all the calculations, making the procedure a breeze even for newbies. All you need are the relevant documents, such as Form 16 from your employer, and then replicate the information in the portal. The only question that remains is, how should you choose a tax-filing portal?


ABC of filing online returns

A Register with a tax-filing portal.It will help you choose the correct form and guide you while filling it.

B Review the completed form and submit for e-filing. If you use a digital signature, the process is complete. If you don't want to spend on the signature, you'll get the ITR V acknowledgement by e-mail.

C Print the ITR V and mail it by regular post or speed post to the Centralised Processing Centre at Bangalore. The address is: Income Tax Department- CPC, Post Box No. 1, Electronic City Post Office, Bangalore - 560100, Karnataka.


Register with a tax-filing portal.It will help you choose the correct form and guide you while filling it.

Review the completed form and submit for e-filing. If you use a digital signature, the process is complete. If you don't want to spend on the signature, you'll get the ITR V acknowledgement by e-mail.

Print the ITR V and mail it by regular post or speed post to the Centralised Processing Centre at Bangalore. The address is: Income Tax Department- CPC, Post Box No. 1, Electronic City Post Office, Bangalore - 560100, Karnataka.

The first step is to check whether the portal provides the form that you want. While most offer ITR 1 and ITR 2, few have the others. The next step is to see if the portal accounts for all the sections. For instance, a tax-filing site that we went through did not include the section on carrying forward losses from the previous years.

This is a glaring fault because if you do not include such information in this year's return, you will not be able to do so next year. Most portals usually charge a fee only when you have to submit the returns, so you can go through these and choose the one in which the user interface is the smoothest. A good portal will prompt you to fill up a slot you have missed or ask you to rectify a mistake. This reduces the chances of making errors.

The third and most important step is to go through the site's security and privacy policy. "You must check that the portal encrypts the saved and transmitted data and is protected from hackers. Also, a good portal will not carry advertisements or use the client database to market other financial products, such as insurance," says a senior official at Taxshax.com. To check the authenticity of the portal, you can access the list of e-return intermediaries (ERI) on incometaxindiaefiling.gov.in.

All about Form 16

All salaried employees have to file their income-tax returns by July 31. For tax calculations, it is necessary to have form 16, issued by your employer. Form 16 has details of the tax deducted and the branch of the bank where it is deposited into the central government account. For example, if a TDS of Rs 2,000 was deduced from your April salary, form 16 will have its gives. Form 16 is the final certificate issued by your employer giving details of the salary you have earned and the tax deducted on your behalf and paid to the government.


It is given at the end of the financial year, generally by April 30. If there has been no TDS on your salary, you just get a salary certificate and not the Form 16. FORM 16A AND FORM 16: If you are not a salaried employee and work as a professional for an organisation earning fees, then the certificate that shows TDS details deducted while making payments to you is called Form 16A.

WHAT IF YOU HAVE CHANGED JOBS?

At the end of the year, you need to collect the Form 16 from both your employers as that is the basis on which you would file your returns. When you join a new organisation, you should furnish your TDS details from the previous employer to your current employer. This will help your current employer in deducting tax accordingly. If you do not mention your previous organization details to your new employer, then you are liable to show the total income from both employees and calculate your tax liability accordingly.

WHAT IF YOU CANNOT GET FORM 16 FROM MY PREVIOUS EMPLOYER?

Your best option then is to fill Form 12B and submit it to your new employer. The employer will take into account the previous salary you earned while deducting tax.

DO YOU HAVE TO ATTACH FORM 16 WITH IT RETURNS?

As per the IT department, it is not necessary to attach the original form 16 with your income-tax returns. However, in your interest, you could attach a photo copy of form 16, while retaining the original with you.


WHAT OTHER PARTICULARS SHOULD BE CHECKED IN FORM 16?

The first thing you need to confirm in Form 16 is the PAN number. If it is wrong, you have to ask your employer to rectify it and give you a new Form 16. Besides this, the employer needs to make correction at their end by filing revised return of TDS to credit the TDS proceeds to the correct PAN number.

WHAT IF THERE IS AN ERROR IN FIGURES IN FORM 16?

You need to tally the figures in Form 16 with the tax declaration statement provided by you to your organisation at the beginning of the year. It's possible that the figures mentioned are either wrong, or not considered at all. The result would be that fewer deductions would have been shown, resulting in higher tax liability. You might not have submitted the proofs of all investments, or could have forgotten to submit some bills. If there is an error by the employer, you could request them to rectify it and issue a revised Form 16. If a higher tax has been deducted, you can claim a tax refund while filing your returns.

How to claim refund while filing income tax return

Have you failed to reporting some tax saving investment to your employer or did you make the investment after submitting your investment declaration to the employer? Then there is a possibility of you being eligible for a tax refund.

"A tax refund could be due to the following: tax deduction at source at a rate higher than the actual tax payable; wrong (ie, higher) estimation of income while computing advance tax liability; not reporting all investments to the employer while the employer deducts taxes on salary; and claim of exemption in tax returns," says Sonu Iyer, tax partner, Ernst & Young.

Most companies require employees to declare at the beginning of the financial year their proposed investments for tax exemptions/deductions. House rent and leave travel allowances are the common exemptions that can be claimed, while interest on housing loan, investments in PPF, NSC, ELSS, life insurance premiums, home loan principal repayment, stamp duty/registration fee, and long-term infrastructure bonds come under common deductions. Other deductions include medical insurance premium (section 80D), interest on education loan (section 80E), maintenance of disabled dependent (section 80DD), etc.

"Some employees fail to make the declaration, while some may give the details but fail to provide the relevant documentary proof within the time frame prescribed by the employer. In either case, employees can claim tax exemptions/deductions only while filing tax returns.

This results in a tax refund," says Vaibhav Sankla executive director, Adroit Tax Services. "The deduction on interest on the housing loan, based on the provisional certificate obtained from the housing finance company/bank during the financial year, is reflected in Form 16. For FY 2010-11, since the rates were on the rise, the final certificate would show a higher amount of interest for those who took loan on a variable rate. This, too, can be a reason for a tax refund claim," Sankla says. In the case of retired individuals/senior citizens, banks deduct income-tax at source if they fail to furnish declaration in Form 15G/15H for non-deduction of tax on their interest income. Further, if PAN is not provided, the deduction rate goes up to 20% from 10%.

For non-residents, banks often deduct taxes at 30.9% (or lower as per India's tax treaty with the country they reside in) on the interest earned by NRO accounts. Even tenants of non-resident landlords deduct income tax at 30.9% on the rent paid. Most nonresidents fall in either the 0% or 10% tax slab as their Indian income is limited. This means, nonresidents often claim refund of the excess tax deducted.

Some individuals pay advance tax on the capital gains they expect during the year. This can be adjusted against any capital loss they may incur later in the year. The amount of capital gain could also be lower due to indexation, deductions u/s 54/54EC/54F, incorrect cost calculation etc.

ELIGIBILITY FOR REFUND

"Taxpayers should first calculate their final tax liability in accord-inance with the tax slabs applicable to them. If the total tax liability is less than the taxes paid or deducted during the year, they would be eligible for a tax refund," says Vineet Agarwal, director - tax and regulatory services, KPMG. Ensure tax exemptions and/or deductions are mentioned correctly. In the case of a home loan, for instance, ensure the amount on the final certificate from the housing finance company is the same as in the provisional certificate you submitted to the employer.

CALCULATING REFUND

"For calculating refund, you have to calculate taxes on income after applying the applicable income tax rates. Once you arrive at the total tax payable, deduct all the tax deducted at source and advance taxes and self assessment tax paid (if any). The balance (if negative) is the refund amount," Iyer adds.

REJECTION OF TAX REFUND

The most common reason is incorrect calculation of tax payable by the taxpayer. "Refund can also be rejected if the amount shown as TDS in the returns does not match with the details in the database of the income-tax department," Agarwal of KPMG says. If you have mentioned the PAN or assessment year wrongly, then, unless corrective action is taken, the refund claim will be rejected.

TRACKING REFUND

If you filed returns online, visit tin.tin.nsdl.com/oltas/refundstatuslogin. html to know the refund status. Enter your PAN, select the assessment year and click submit to get the details. You can also send an email to itro@sbi.co.in or refunds@i ncometaxindia.gov.in for refund related queries. If you have filed the returns through a chartered accountant, you can check the refund status by contacting the SBI helpdesk or the aaykar sampark. It would be advisable to follow up with the assessing officer of the jurisdiction where the return was filed to get the correct status.

PROCESSING TIME FOR REFUND
E-filing results in quicker refunds. "Taxpayers should mention the correct bank account number if they want the refund cheque to be deposited in their account. If a taxpayer wants the refund directly credited to the bank account, then he/she should provide the MICR of the bank's branch as well," Sankla says. If you opt to receive the refund by way of cheque, ensure that you mention your permanent address in the tax return form. Else, in case you change the address before receiving the refund, the refund cheque would be returned undelivered to the I-T department. If the cheque is invalid/expired by the time it reaches you, intimate the jurisdictional office and send the cheque back to the refund banker for re-issue.

In cases of e-filing, the refund is received within two to seven months. For offline returns, it often takes anywhere between one and two years. In case you haven't received your tax refund, file an application with the grievance cell or the income-tax ombudsman. "The taxpayer should visit the tax office for follow-up action on the refund and enquire about the reasons for it not being processed. The taxpayer may also approach the assessing officer ('AO') concerned, with necessary documents. However, if no action is taken by the AO, the taxpayer can write to the jurisdictional chief commissioner with copies of the letter/s written to the assessing officer and with a copy of the tax return filed," says Agarwal.

How to make sure your e-return is not rejected

In the previous issue of ET Wealth, we laid out a systematic approach to filing tax returns. However, your return can be rejected if the guidelines laid down by the Income Tax Department are not followed while filing returns, be it physically or online. If you are e-filing and not using the digital signature, you will have to print out the acknowledgement form, ITR V. Here are the things you should keep in mind while using this option.


Printing ITR V

Printing the ITR V form correctly is critical. Avoid using the dot matrix printer if you want your return to be processed faster. This is because the bar code on the ITR V should be clearly visible for quicker processing, and this can be done only by using the ink jet or laser printers. Take the printout in black ink only. If you are sending two returns, don't print them back to back. Use a fresh A4 size sheet to print each time. Perforated paper or of any other size is not acceptable.

Signing

The signature on the form must be clear and legible. For this, use a ball-point pen in blue ink only. "The document that is mailed to the Central Processing Centre (CPC) in Bangalore should be signed in blue ink," says Parizad Sirwalla, executive director, tax, KPMG.

Also, if you are taking photocopies, make sure you send out the original one signed in blue ink. A photocopy of the signature is not accepted. "As per the guidelines issued by the Income Tax Department, the ITR V should carry the signature in ink and should not be a photocopy of the signature," says Sonu Iyer from Ernst & Young.

Sending

"The filing of non-digitally signed returns is completed only when the ITR V reaches the CPC in Bangalore," says Sirwalla. So, make sure that your ITR V reaches the destination within 120 days of e-filing. In case it does not reach CPC Bangalore within the stipulated period, you will have to go through the agony of filing your tax return again. Earlier, you could not send more than one ITR V per envelope, but now, you can include more than one such form. Do not attach other documents, such as photocopies of Form 16 or TDS certificates along with the ITR V. Even annexure documents don't need to be attached. Dispatch it in an envelope that can hold an A4 size paper without folding it.

Other filing errors

Taxpayers often make mistakes that lead to deduction or incorrect calculation of taxes. One of these is not declaring the correct break-up of deductions under Section VIA, which includes tax-saving investments in life and health insurance policies, mutual funds, bank fixed deposits, etc. Iyer points out, "It is essential to have the tax filing details like deductee's PAN details, PAN & TAN of the deductor, total amount paid, total taxes deducted and deposited in Form 16/ Form 26AS."

In case of a change in the residential address, make the necessary alterations in the PAN database since the IT Department refers to it for correspondence. Do not mention bank accounts that are closed or even dormant because refunds are unlikely to reach you in such a case. "The circles in the Sahaj and Sugam forms must be shaded, not ticked," says Ameet Patel, partner at Sudit K Parekh & Co.


No response from CPC

The CPC dispatches an acknowledgement on receiving the ITR V. Ideally, it should reach you within three days. If you don't receive it, consider sending it again. You can send it through regular postal service or speed post. Do not use the courier or deliver it personally. You can call 1800-425-2229 and 080-22546500 from 9 am to 8 pm on working days to check its status. It can also be done online at www.incometaxindiaefiling.gov.in.


E-filing checklist

Avoid copy-pasting information while e-filing.

Take printouts using ink jet or laser printer on A4 size paper in black ink.

Sign on the ITR V acknowledgement form in blue ink only.

Avoid the use of staplers in ITR V.

You can send more than one ITR V form in the same envelope.

Do not attach any other document with the ITR V.

ITR V should only be sent via speed post or ordinary post to Bangalore CPC within 120 days of e-filing.

Do not courier or deliver the ITR V by hand. It will not be accepted.

File income tax returns online using the right form

The time to file your income tax returns is here. Every individual whose total income before allowing deductions under Chapter VI-A of the Income Tax Act exceeds the limit is required to furnish his returns of income.

The limit in case of individuals below the age of 65 years (other than women) is Rs 1,60,000. In case of women below the age of 65 years, the limit is Rs 1,90,000. In case of individuals who are of the age of 65 years or more at any time during the financial year 2010-11, the limit is Rs 2,40,000.

You need to file the returns on the correct form, as is applicable. The forms have been revised this year, so you need to ensure you use the current year's forms only. Or else the returns will not be accepted by the Income Tax Department.

ITR I

In lieu of the earlier Saral form, this time, the Sahaj form has been introduced. ITR I (Sahaj) is the form to be used by most individual tax payers. This is just a two-page form. This is meant for the individuals who have income from salary, property (not brought-forward loss from the previous years), and other sources (except income from winnings).

This returns form is not for an individual whose total income for the assessment year 2011-12 includes income from more than one property, income through capital gains which are not exempted from tax, income from agriculture in excess of Rs 5000, or income from business or profession.

No documents (including TDS certificates ) should be attached to this returns form.

For most individuals, ITR I will be applicable. The form has four parts. Part A is general information. Part B is for gross total income. Part C is for deductions and total taxable income. Part D is for the tax computation.

ITR II

This form is for individuals and Hindu Undivided Families (HUFs) without any income from business or profession. This form is for individuals and HUFs with income from salary, house property, capital gains, and other sources.

ITR III

This form is for individuals and HUFs who are partners in firms and not carrying out a business or profession under any proprietorship.

ITR IV or Sugam

This form is for small businessmen and commission agents. This is for individuals and HUFs with income from a proprietary business or profession.

Bank account number

While filling in the form, you should mention your bank account number to enable the Income Tax Department to make a refund in a stipulated period of time if applicable. Not mentioning the bank account number will result in a delay in refund.

Filing returns

The returns can be filed with the Income Tax Department in any of these ways:

In paper form

Electronically with a digital signature

Transmit the returns electronically

and then submit the verification of

the returns on ITR V

Bar-coded returns form

Where the returns is transmitted electronically, you should printout two copies of Form ITR V. One copy, duly signed, has to be sent by ordinary post to Post Box No 1, Electronics City Office, Bangalore 560 100. The other copy should be retained by you for your records. Only one copy of the returns form is required to be filed.

In case the returns is furnished in paper form, electronically with a digital signature, or in a bar-coded format, you should fill up the required information in the verification. Strike out whatever is not applicable. You need to ensure the verification has been signed before furnishing the returns.

E-filing income tax returns is simple, try it

You have just three more days to file your income-tax returns. If you want to do it without much bother, you should consider efiling. It's simple if you take care of a few things.

You need to go to the website incometaxindiaefiling .gov.in, and download the relevant returns form (ITR 1 to 7) based on your sources of income. For instance, if your only sources of income are salary /pension, interest income and income/loss from one house property, then you can use ITR 1.

The website explains who should use which. Select the Excel version of the form. Very importantly, enable Macros in the form. People often fail to do that because the 'Enable Macros' messaging is not very clear on the website/form. A help file that gets downloaded with the Excel form explains how to enable Macros. If Macros are not enabled, many of the required fields in the form do not perform their required functions.

Read other instructions on the website and then fill up all the mandatory fields in all the forms. Particularly ensure that you have written your PAN number correctly. Pressing the 'Calculate Tax' button on the form tells you how much tax you need to pay or how much you need to be refunded (you don't need to know anything about tax rates).

If you have taxes to pay, then these can be paid online through the incometaxindia .gov.in website. Once that's done, details of the counterfoil of the tax paid challan must be entered in the Excel form.

Pressing the 'Validate' button on top of each form tells you whether you have filled up the forms correctly. Once validated , press the 'Generate XML' button on the top right of the form, and an XML version of the form gets created on your PC.

Now go once again to the efiling website, and choose the assessment year for which you are filing (it will be AY 11-12, if you are filing for financial year 2010-11 ). You will be asked to register yourself, which again is a simple process. Once registered, use your login and password to login again, you will be asked to upload the XML file. The moment you upload and send it, you will have access to an ITR-V form, which is the acknowledgement form.

You need to take a print out of this on a laser printer (so that the barcode on it is printed properly), you need to sign it and then send it to the Centralized Processing Center (address provided on website) by ordinary post within 120 days.

"Efiling is one of the best things to have happened," says Sunil Birla, partner in chartered accountancy firm BDO India. "You can do everything from home. No running around to income tax offices. It's possible to complete the entire process in 10-12 minutes. In our firm, what took 15 people to do now takes just 3 people."

If you file online, tax refunds will also happen much faster (within three months) than if you file paper returns. But for refunds, ensure that you fill up your address, email id and bank account details accurately. As per data provided by the Centralized Processing Center that is managed jointly by the I-T department and Infosys Technologies, more than 4.28 lakh refunds for assessment years 2009-10 and 2010-11 have not happened because of wrong address or bank account details.