Thursday, July 9, 2015

How to Setup High-Availability Load Balancer with ‘HAProxy’ to Control Web Server Traffic

http://www.tecmint.com/install-haproxy-load-balancer-in-linux/

HAProxy stands for High Availability proxy. It is a Free and open source application written in C programming Language. HAProxy application is used as TCP/HTTP Load Balancer and for proxy Solutions. The most common use of the HAProxy application is to distribute the workload across multiple servers e.g., web server, database server, etc thus improving the overall performance and reliability of server environment.
The highly efficient and fast application is used by many of the world’s reputed organization which includes but not limited to – Twitter, Reddit, GitHub and Amazon. It is available for Linux, BSD, Solaris and AIX platform.

Install HAProxy in Linux
Install HAProxy Load Balancer in Linux
In this tutorial, we will discuss the process of setting up a high availability load balancer using HAProxy to control the traffic of HTTP-based applications (web servers) by separating requests across multiple servers.
For this article, we’re using the most recent stable release of HAProxy version i.e. 1.5.10 released on December 31st 2014. And also we’re using CentOS 6.5 for this setup, but the below given instructions also works on CentOS/RHEL/Fedora and Ubuntu/Debian distributions.

My Environment Setup

Here our load-balancer HAProxy server having hostname as websrv.tecmintlocal.com with IP address192.168.0.125.
HAProxy Server Setup
Operating System : CentOS 6.5
IP Address  :  192.168.0.125
Hostname  :  websrv.tecmintlocal.com
Client Web Servers Setup
The other four machines are up and running with web servers such as Apache.
Web Server #1 : CentOS 6.5 [IP: 192.168.0.121] - [hostname: web1srv.tecmintlocal.com]
Web Server #2 : CentOS 6.5 [IP: 192.168.0.122] - [hostname: web2srv.tecmintlocal.com]
Web Server #3 : CentOS 6.5 [IP: 192.168.0.123] - [hostname: web3srv.tecmintlocal.com]
Web Server #4 : CentOS 6.5 [IP: 192.168.0.124] - [hostname: web4srv.tecmintlocal.com]

Step 1: Installing Apache on Client Machines

1. First we have to install Apache in all four server’s and share any one of site, for installing Apache in all four server’s here we going to use following command.
# yum install httpd  [On RedHat based Systems]
# apt-get install apache2 [On Debian based Systems]
2. After installing Apache web server on all four client machines, you can verify anyone of the server whether Apache is running by accessing it via IP address in browser.
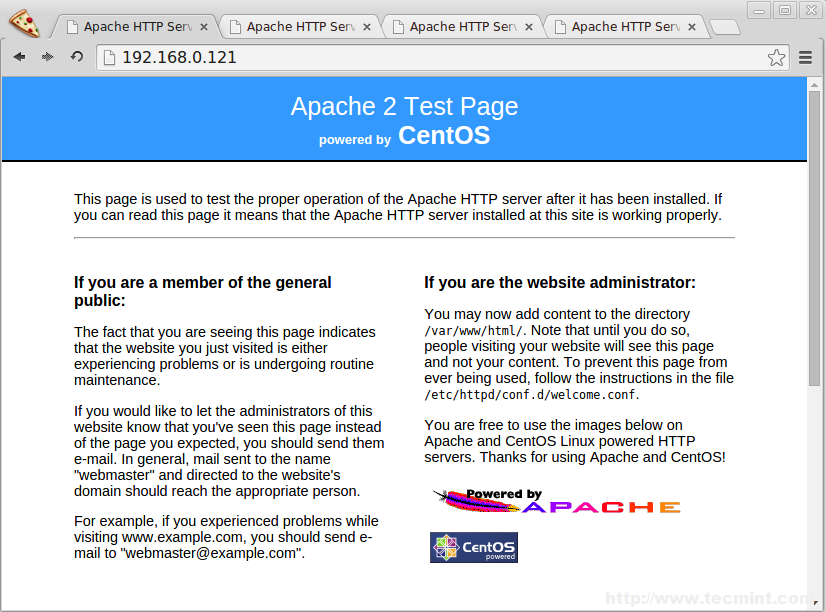
http://192.168.0.121
Check Apache Status
Check Apache Status

Step 2: Installing HAProxy Server

3. In most of the today’s modern Linux distributions, HAPRoxy can be easily installed from the default base repository using default package manager yum or apt-get.
For example, to install HAProxy on RHEL/CentOS/Fedora and Debian/Ubuntu versions, run the following command. Here I’ve included openssl package too, because we’re going to setup HAProxy with SSL and NON-SSL support.
# yum install haproxy openssl-devel [On RedHat based Systems]
# apt-get install haproxy  [On Debian based Systems]
Note: On Debian Whezzy 7.0, we need to enable the backports repository by adding a new file backports.listunder “/etc/apt/sources.list.d/” directory with the following content.
# echo "deb http://cdn.debian.net/debian wheezy-backports main" >> /etc/apt/sources.list.d/backports.list
Next, update the repository database and install HAProxy.
# apt-get update
# apt-get install haproxy -t wheezy-backports

Step 3: Configure HAProxy Logs

4. Next, we need to enable logging feature in HAProxy for future debugging. Open the main HAProxy configuration file ‘/etc/haproxy/haproxy.cfg‘ with your choice of editor.
# vim /etc/haproxy/haproxy.cfg
Next, follow the distro-specific instructions to configure logging feature in HAProxy.
On RHEL/CentOS/Fedora
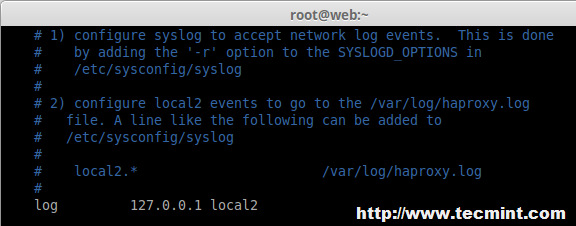
Under #Global settings, enable the following line.
log         127.0.0.1 local2
On Ubuntu/Debian
Under #Global settings, replace the following lines,
log /dev/log        local0
log /dev/log        local1 notice 
With,
log         127.0.0.1 local2
Enable HAProxy Logging
5. Next, we need to enable UDP syslog reception in ‘/etc/rsyslog.conf‘ configuration file to separate log files for HAProxy under /var/log directory. Open your your ‘rsyslog.conf‘ file with your choice of editor.
# vim /etc/rsyslog.conf
Uncommnet ModLoad and UDPServerRun, Here our Server will listen to Port 514 to collect the logs into syslog.
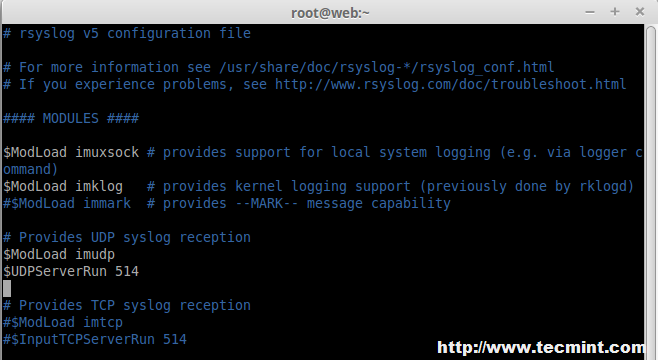
# Provides UDP syslog reception
$ModLoad imudp
$UDPServerRun 514
Configure HAProxy Logging
6. Next, we need to create a separate file ‘haproxy.conf‘ under ‘/etc/rsyslog.d/‘ directory to configure separate log files.
# vim /etc/rsyslog.d/haproxy.conf
Append following line to the newly create file.
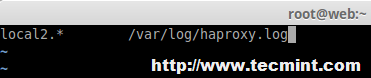
local2.* /var/log/haproxy.log
HAProxy Logs
HAProxy Logs
Finally, restart the rsyslog service to update the new changes.
# service rsyslog restart 

Step 4: Configuring HAProxy Global Settings

7. Now, here we need to set default variables in ‘/etc/haproxy/haproxy.cfg‘ for HAProxy. The changes needs to make for default under default section as follows, Here some of the changes like timeout for queue, connect, client, server and max connections need to be defined.
In this case, I suggest you to go through the HAProxy man pages and tweak it as per your requirements.
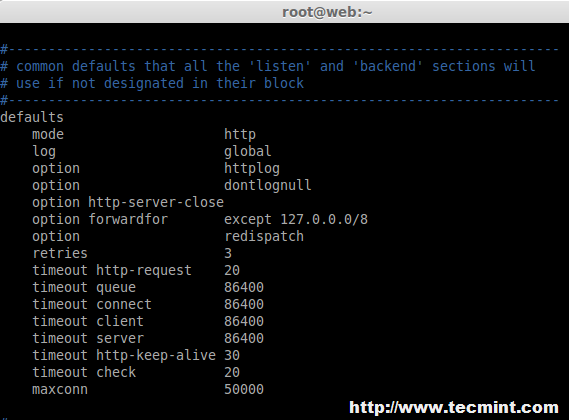
#---------------------------------------------------------------------
defaults
    mode                    http
    log                     global
    option                  httplog
    option                  dontlognull
    option http-server-close
    option forwardfor       except 127.0.0.0/8
    option                  redispatch
    retries                 3
    timeout http-request    20
    timeout queue           86400
    timeout connect         86400
    timeout client          86400
    timeout server          86400
    timeout http-keep-alive 30
    timeout check           20
    maxconn                 50000
HAProxy Default Settings
8. Then we need to define front-end and back-end as shown below for Balancer in ‘/etc/haproxy/haproxy.cfg‘ global configuration file. Make sure to replace the IP addresses, hostnames and HAProxy login credentials as per your requirements.
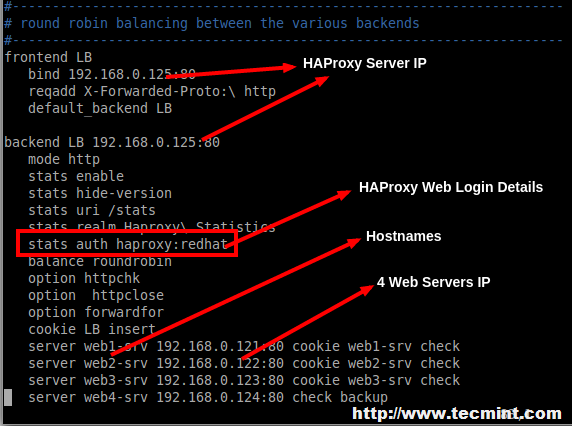
frontend LB
   bind 192.168.0.125:80
   reqadd X-Forwarded-Proto:\ http
   default_backend LB

backend LB 192.168.0.125:80
   mode http
   stats enable
   stats hide-version
   stats uri /stats
   stats realm Haproxy\ Statistics
   stats auth haproxy:redhat  # Credentials for HAProxy Statistic report page.
   balance roundrobin   # Load balancing will work in round-robin process.
   option httpchk
   option  httpclose
   option forwardfor
   cookie LB insert
   server web1-srv 192.168.0.121:80 cookie web1-srv check  # backend server.
   server web2-srv 192.168.0.122:80 cookie web2-srv check  # backend server.
   server web3-srv 192.168.0.123:80 cookie web3-srv check  # backend server.
   server web4-srv 192.168.0.124:80 check backup   # backup fail-over Server, If three of the above fails this will be activated.
HAProxy Global Configuration
9. After adding above settings, our load balancer can be accessed at ‘http://192.168.0.125/stats‘ with HTTP authentication using login name as ‘haproxy‘ and password ‘redhat‘ as mentioned in the above settings, but you can replace them with your own credentials.
10. After you’ve done with the configuration, make sure to restrat the HAProxy and make it persistent at system startup on RedHat based systems.
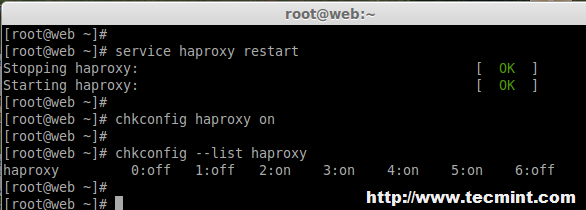
# service haproxy restart
# chkconfig haproxy on
# chkconfig --list haproxy
Start HAProxy
Start HAProxy
For Ubuntu/Debian users to need to set “ENABLED” option to “1” in ‘/etc/default/haproxy‘ file.
ENABLED=1

Step 5: Verify HAProxy Load Balancer

11. Now it’s time to access our Load balancer URL/IP and verify for the site whether loading. Let me put one HTML file in all four servers. Create a file index.html in all four servers in web servers document root directory and add the following content to it.


  Tecmint HAProxy Test Page


My HAProxy Test Page

Welcome to HA Proxy test page! There should be more here, but I don't know what to be write :p.
Made 11 January 2015 by Babin Lonston.
12. After creating ‘index.html‘ file, now try to access the site and see whether I can able access the copied html file.
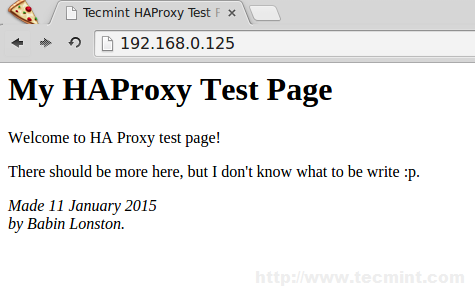
http://192.168.0.125/
Verify HAProxy Load Balancer
Site has been successfully accessed.

Step 6: Verify Statistic of Load Balancer

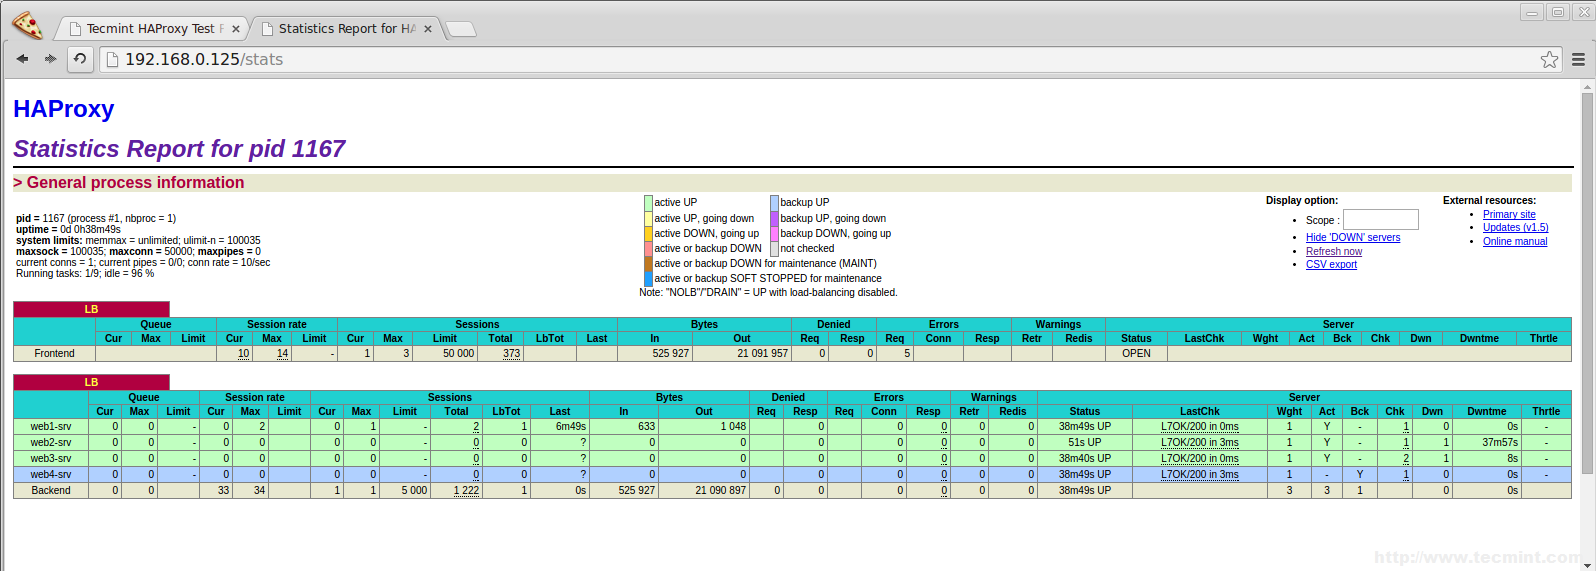
13. To get the statistic page of HAProxy, you can use the following link. While asking for Username and password we have to provide the haproxy/redhat.
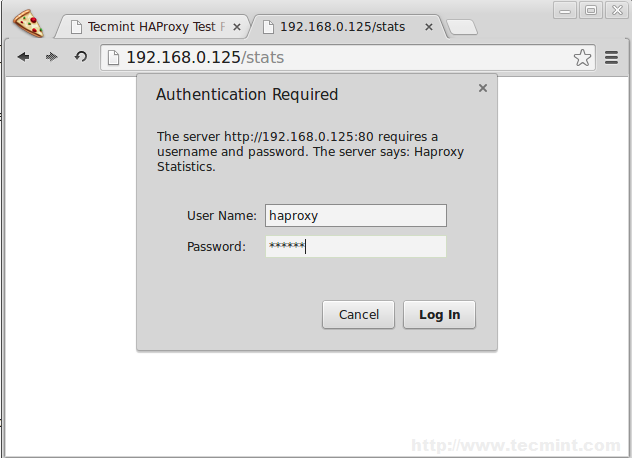
http://192.168.0.125/stats
HAProxy Statistics Login
HAProxy Statistics
HAProxy Statistics

Step 7: Enabling SSL in HAProxy

14. To enable SSL in HAProxy, you need to install mod_ssl package for creating SSL Certificate for HAProxy.
On RHEL/CentOS/Fedora
To install mod_ssl run the following command
# yum install mod_ssl -y
On Ubuntu/Debian
By default under Ubuntu/Debian SSL support comes standard with Apache package. We just need to enable it..
# a2enmod ssl
After you’ve enabled SSL, restart the Apache server for the change to be recognized.
# service apache2 restart
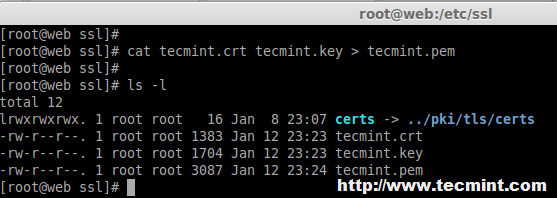
15. After restarting, Navigate to the SSL directory and create SSL certificate using following commands.
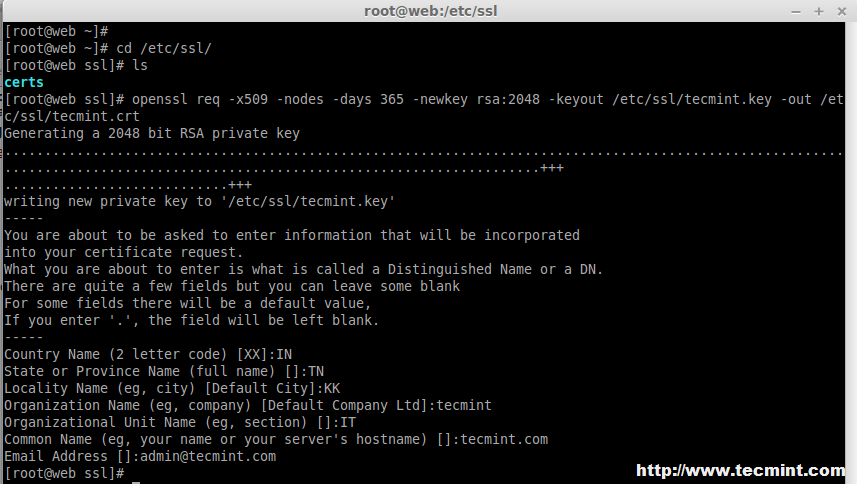
# cd /etc/ssl/
# openssl req -x509 -nodes -days 365 -newkey rsa:2048 -keyout /etc/ssl/tecmint.key -out /etc/ssl/tecmint.crt
# cat tecmint.crt tecmint.key > tecmint.pem
Create SSL for HAProxy
SSL Certificate for HAProxy
16. Open and edit the haproxy configuration and add the SSL front-end as below.
# vim /etc/haproxy/haproxy.cfg 
Add the following configuration as frontend.
frontend LBS
   bind 192.168.0.125:443 ssl crt /etc/ssl/tecmint.pem
   reqadd X-Forwarded-Proto:\ https
   default_backend LB
17. Next, add the redirect rule in backend configuration.
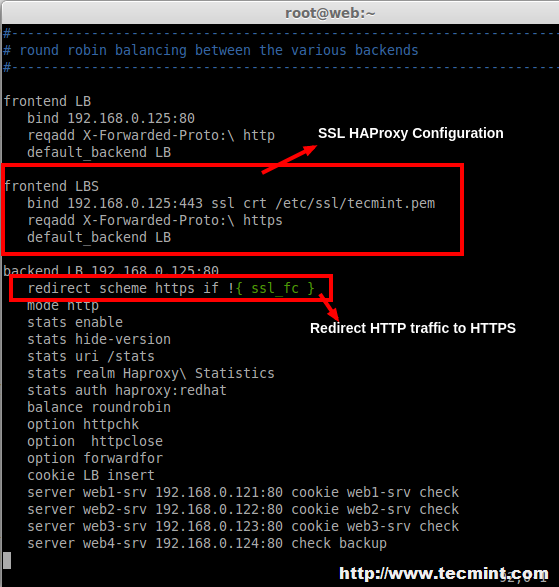
redirect scheme https if !{ ssl_fc }
Enable SSL on HAProxy
18. After making above changes, make sure to restart the haproxy service.
# service haproxy restart
While restarting if we get the below warning, we can fix it by adding a parameter in Global Section of  haproxy.

SSL HAProxy Error
SSL HAProxy Error
tune.ssl.default-dh-param 2048
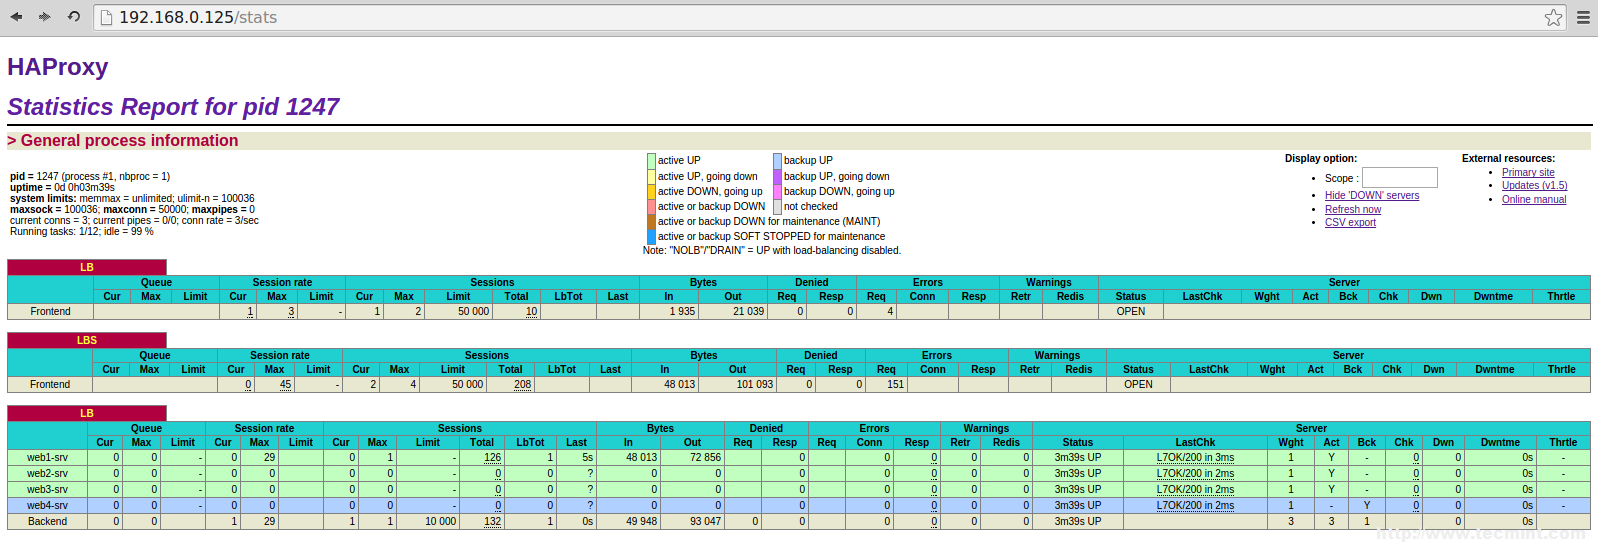
19. After restarting, try to access the site 192.168.0.125, Now it will forward to https.
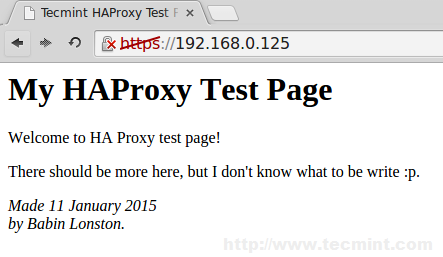
http://192.168.0.25
Verify SSL HAProxy
Verify SSL HAProxy
SSL Enabled HAProxy
SSL Enabled HAProxy
20. Next, verify the haproxy.log under ‘/var/log/‘ directory.
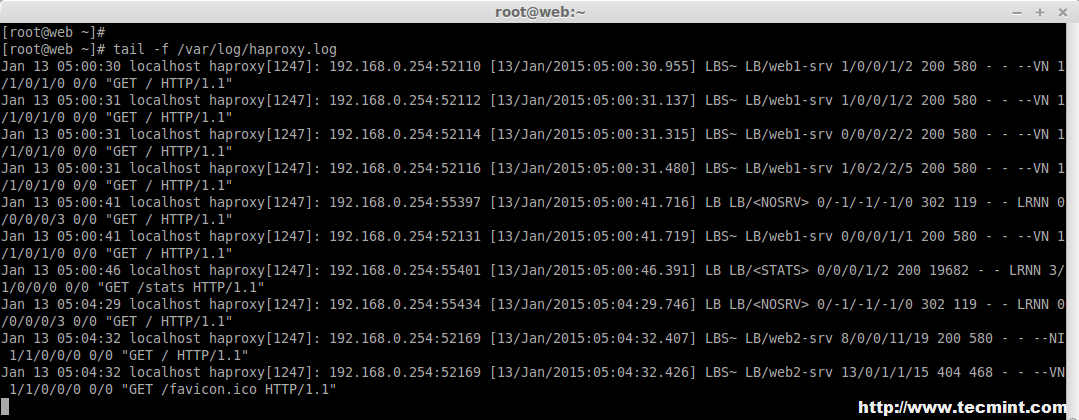
# tail -f /var/log/haproxy.log
Check HAProxy Logs
Check HAProxy Logs

Step 8: Open HAProxy Ports on Firewall

21. Open the port’s for web service and Log reception UDP port using below rules.
On CentOS/RHEL 6
iptables -A INPUT -m state --state ESTABLISHED,RELATED -j ACCEPT
iptables -A INPUT -i eth0 -p udp --dport 514 -j ACCEPT
iptables -A INPUT -i eth0 -p tcp --dport 80 -m state --state NEW,ESTABLISHED -j ACCEPT
iptables -A INPUT -i eth0 -p tcp --dport 443 -m state --state NEW,ESTABLISHED -j ACCEPT
On CentOS/RHEL 7 and Fedora 21
# firewall­cmd ­­permanent ­­zone=public ­­add­port=514/tcp
# firewall­cmd ­­permanent ­­zone=public ­­add­port=80/tcp
# firewall­cmd ­­permanent ­­zone=public ­­add­port=443/tcp
# firewall­cmd ­­reload 
On Debian/Ubuntu
Add the following line to ‘/etc/iptables.up.rules‘ to enable ports on firewall.
A INPUT ­p tcp ­­dport 514 ­j ACCEPT 
A INPUT ­p tcp ­­dport 80 ­j ACCEPT 
A INPUT ­p tcp ­­dport 443 ­j ACCEPT 

Conclusion

In this article, we’ve installed Apache in 4 server’s and shared a website for reducing the traffic load. I Hope this article will help you to setup a Load Balancer for web server’s using HAProxy and make your applications more stable and available

Wednesday, July 8, 2015

Using DSH (Distributed Shell) to Run Linux Commands Across Multiple Machines

http://www.tecmint.com/using-dsh-distributed-shell-to-run-linux-commands-across-multiple-machines/

Systems Administrators know all too well the importance of being able to monitor and administer numerous machines in a short time, and preferably, with as little running around as possible. Whether it is a small cloud environment, or an enormous server cluster, the ability to centrally manage computers is essential.

To partly accomplish this, I am going to show you how to use a nifty little tool called DSH that allows a user to run commands over multiple machines.

What is DSH?

DSH is short for “Distributed Shell” or “Dancer’s Shell” it is freely available on most major distributions of Linux, but can easily be built from source if your distribution does not offer it in its package repository. You can obtain the source at.
  1. http://www.netfort.gr.jp/~dancer/software/dsh.html.en

Install DSH (Distributed Shell) in Linux

We are going to assume a Debian / Ubuntu environment for the scope of this tutorial. If you are using another distribution, please substitute the appropriate commands for your package manager.
On Debian / Ubuntu
First, let’s install the package via apt:
$ sudo apt-get install dsh
On RHEL / CentOS / Fedora
This method is for those who are not using Debian, and want to compile it from source tar balls. First you need to compile “libdshconfig” and install.
# wget http://www.netfort.gr.jp/~dancer/software/downloads/libdshconfig-0.20.10.cvs.1.tar.gz
# tar xfz libdshconfig*.tar.gz 
# cd libdshconfig-*
# ./configure ; make
# make install
Then compile dsh and install.
# wget http://www.netfort.gr.jp/~dancer/software/downloads/dsh-0.22.0.tar.gz
# tar xfz dsh-0.22.0.tar.gz
# cd dsh-*
# ./configure ; make 
# make install
The main configuration file “/etc/dsh/dsh.conf” (For Debian) and “/usr/local/etc/dsh.conf” (for Red Hat) is pretty straightforward, but since rsh is an unencrypted protocol, we are going to use SSH as the remote shell. Using the text editor of your choice, find this line:
remoteshell =rsh
And change it to:
remoteshell =ssh
There are other options you can pass in here, if you choose to do so, and there are plenty of them to find on thedsh man page. For now, we are going to accept the defaults and have a look at the next file,/etc/dsh/machines.list (for Debian).
For Red Hat based systems you need to create a file called “machines.list” in “/usr/local/etc/” directory.
The syntax here is pretty easy. All one has to do is to enter in a machine’s credentials (HostnameIP Address, orFQDN) one per line.
Note: When accessing more than one machine simultaneously, it would behove you to set up key-based password-less SSH on all of your machines. Not only does this provide ease of access, but security wise, it hardens your machine as well.
My “/etc/dsh/machines.list” or “/usr/local/etc/machines.list” file says:
172.16.25.125
172.16.25.126
Once you have entered in the credentials of the machines you wish to access, let’s run a simple command like `uptime` to all of the machines.
$ dsh –aM –c uptime
Sample Output
172.16.25.125: 05:11:58 up 40 days, 51 min, 0 users, load average: 0.00, 0.01, 0.05
172.16.25.126: 05:11:47 up 13 days, 38 min, 0 users, load average: 0.00, 0.01, 0.05

So what did this command do?

Pretty simple. First, we ran dsh and passed the “–a” option to it, which says to send the “uptime” command to “ALL” of the machines listed in “/etc/dsh/machines.list“.
Next, we specified the “–M” option, which says to return the “machine name” (specified in “/etc/dsh/machines.list“) along with the output of the uptime command. (Very useful for sorting when running a command on a number of machines.)
The “–c” option stands for “command to be executed” in this case, “uptime“.
DSH can also be configured with groups of machines in the “/etc/dsh/groups/” file, where is a file with a list of machines in the same format as the “/etc/dsh/machines.list” file. When running dsh on a group, specify thegroupname after the “-g” option.
For Red Hat based systems you need to create a folder called “groups” in “/usr/local/etc/” directory. In that “groups” directory you create a file called “cluster“.
For example, run the “w” command on all machines listed in the “cluster” group file “/etc/dsh/groups/cluster” or “/usr/local/etc/groups/cluster“.
$ dsh –M –g cluster –c w
DSH provides much more flexibility, and this tutorial only scratches the surface. Aside from executing commands, DSH can be used to transfer files, install software, add routes, and much more.
To a Systems Administrator tasked with the responsibility of a large network, it is invaluable.


Saturday, June 27, 2015

Monitor Server Resources with Collectd-web and Apache CGI in Linux

http://www.tecmint.com/monitor-linux-server-resources-with-collectd-web-and-apache-cgi/?utm_source=feedburner&utm_medium=email&utm_campaign=Feed%3A+tecmint+%28Tecmint%3A+Linux+Howto%27s+Guide%29


This tutorial will discuss how you can install and run Collectd-web interface, which is a front-end web monitoring tool for Collectd daemon, in conjunction with Apache CGI interface in order to produce graphical html outputs in order to monitor Linux boxes.
Monitor Linux Server Resources
At the end of the article we will, also, present how you can protect Collectd-web interface using .hpasswdApache Authentication mechanism.

Requirements

The requirement of this article is, you must have Collectd and Collectd-Web installed on your Linux system. To install these packages, you must follow Steps #1 and #2 from the previous article of this series at:
  1. Install Collectd and Collectd-Web in Linux
Only Follow following two steps from the above link:
Step 1: Install Collectd Service 
Step 2: Install Collectd-Web and Dependencies 
Once these two required things completed successfully, you can continue further instructions in this article to configure Collectd-web with Apache CGI.

Step 1: Installing Apache Web Server

1. Assuming that you already have installed Apache web server on your system, if not you can install using following command according to your Linux distribution.
# apt-get install apache2 [On Debian based Systems]
# yum install httpd  [On RedHat based Systems]
2. After Apache installed, change the directory to your default web server document root (which is located under/var/www/html/ or /var/www system path and clone the Collectd-web Github project by issuing the below commands:
# cd /var/www/html
# git clone https://github.com/httpdss/collectd-web.git
Also, make the following Collectd-web script executable by issuing the following command:
# chmod +x /var/www/html/collectd-web/cgi-bin/graphdefs.cgi

Step 2: Enable Apache CGI (.cgi scripts) for Default Host

3. In order for Apache to run the CGI scripts located under the default host HTML Collectd-web cgi-bin directory, you need to explicitly enable Apache CGI interface for Bash scripts (with .cgi extension) by altering the sites-available default host and adding the below statements block.

On Debian Systems

First open Apache default host configuration file for editing with nano editor:
# nano /etc/apache2/sites-available/000-default.conf
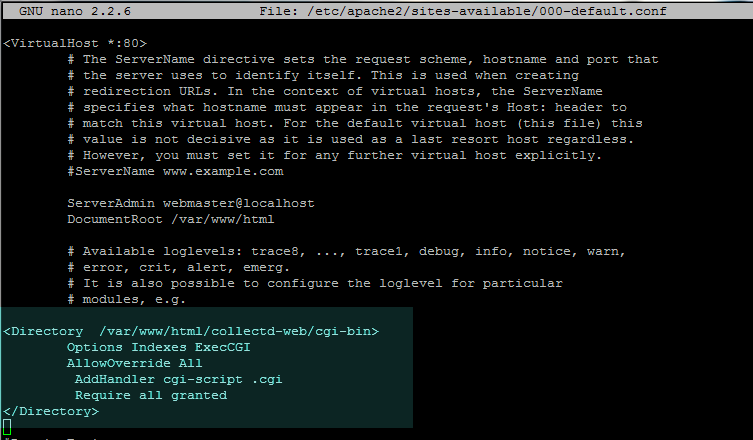
While the file is opened for editing add the following directive block below the Document Root directive as illustrated on the below image:

                Options Indexes ExecCGI
                AllowOverride All
                AddHandler cgi-script .cgi
                Require all granted

Enable CGI in Debian
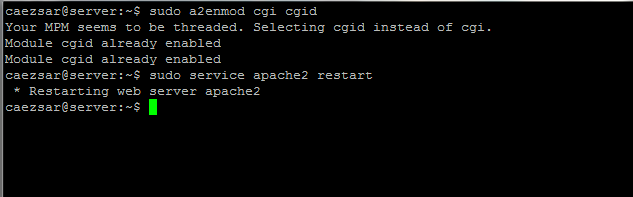
After you’re done editing the file, close it with CTRL + o and exit nano editor (CTRL+x), then enable Apache CGI module and restart the server in order to apply all the changes made so far by issuing the below commands:
# a2enmod cgi cgid
# service apache2 restart
OR
# systemctl restart apache2.service     [For systemd init scripts]
Enable Apache CGI
Enable Apache CGI

On RedHat Systems

4. To enable Apache CGI interface for CentOS/RHEL, open httpd.conf Apache configuration file and add the following lines at the bottom of the file:
# nano /etc/httpd/conf/httpd.conf
Add following excerpt to httpd.conf file.
ScriptAlias /cgi-bin/ “/var/www/html/collectd-web/cgi-bin"
Options FollowSymLinks ExecCGI
AddHandler cgi-script .cgi .pl
In order to apply changes, restart httpd daemon by issuing the following command:
# service httpd restart
OR
# systemctl restart httpd        [For systemd init scripts]

Step 3: Browse Collectd-web Interface

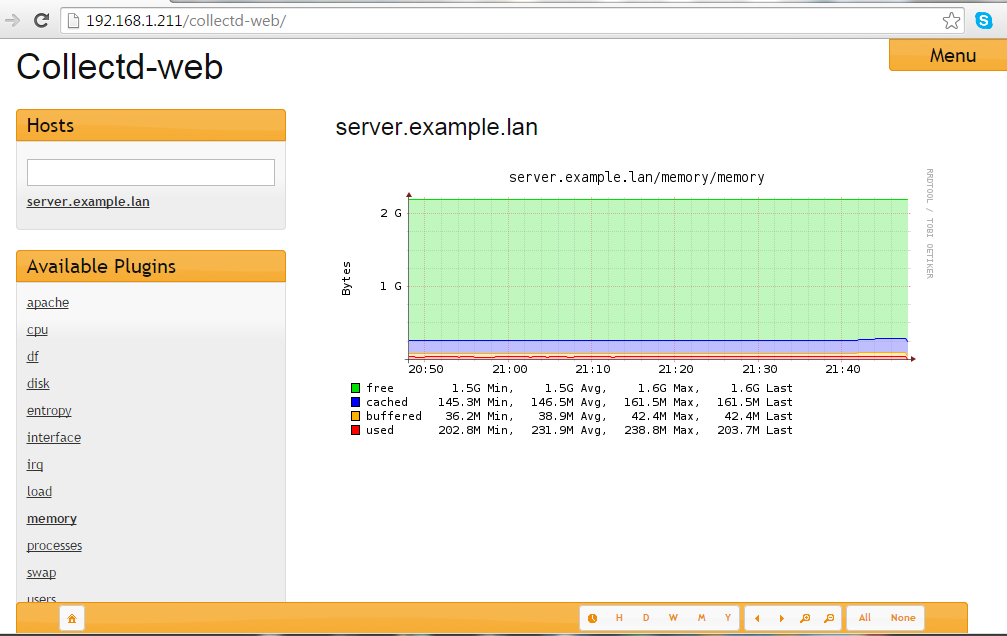
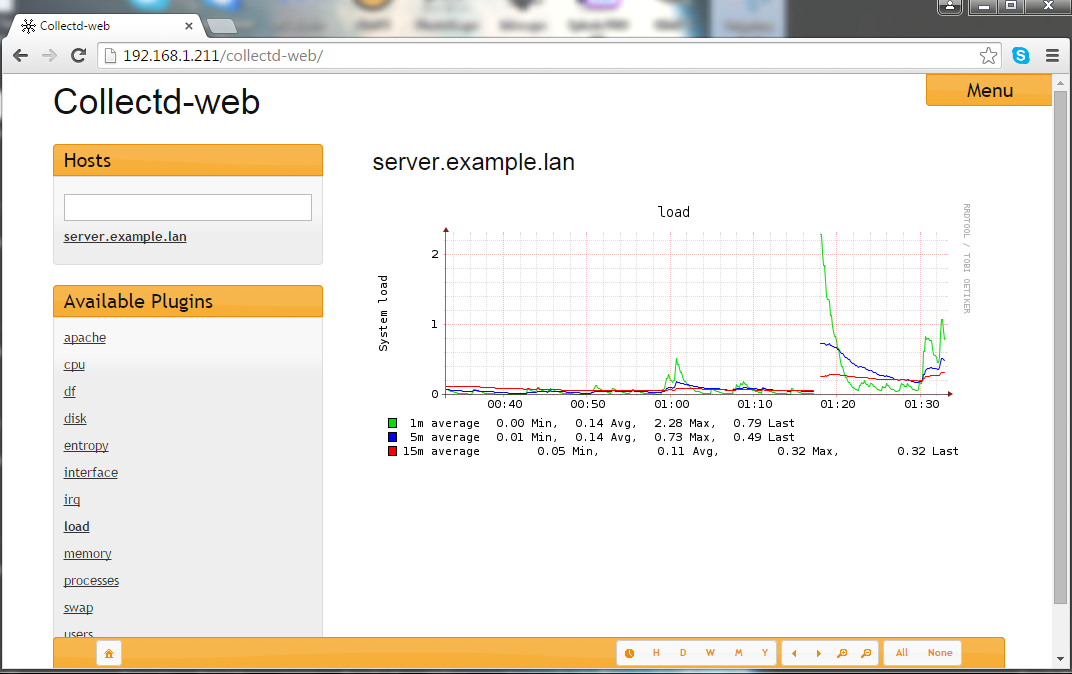
5. In order to visit Collectd-web interface and visualize statistics about your machine collected so far, open a browser and navigate to your machine IP Address/collectd-web/ URI location using the HTTP protocol.
http://192.168.1.211/collect-web/
Collectd-Web Dashboard

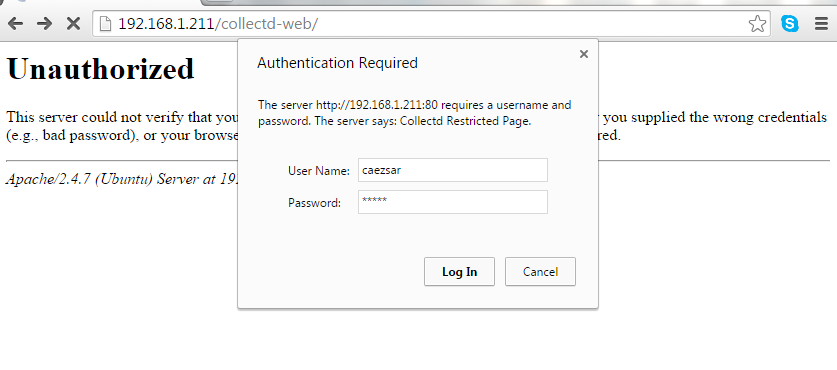
Step 4: Password Protect Collectd-web URL using Apache Authentication

6. In case you want to limit access to Collectd-web interface by protecting it using Apache Authentication mechanism (.htpasswd), which requires visitors to enter a username and a password in order to access a web resource.
To do so, you need to install apache2-utils package and create a set of credentials for local authentication. To achieve this goal, first issue the following command to install apache2-utils package:
# apt-get install apache2-utils         [On Debian based Systems]
# yum install httpd-tools  [On RedHat based Systems]
7. Next, generate a username and a password which will be stored on a hidden local .htpass file located under Apache default host Collectd-web path by issuing the below command:
# htpasswd -c /var/www/html/collectd-web/.htpass  your_username
Try to protect this file by assigning the following permissions:
# chmod 700 /var/www/html/collectd-web/.htpass
# chown www-data /var/www/html/collectd-web/.htpass
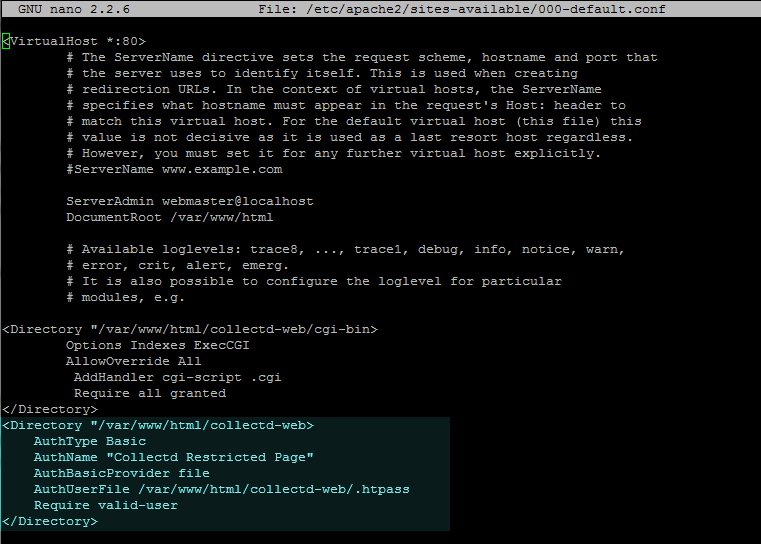
8. On the next step, after you have generated .htpass file, open Apache default host for editing and instruct the server to use htpasswd basic server-side authentication by adding the following directive block as illustrated on the below screenshot:

                AuthType Basic
                AuthName "Collectd Restricted Page"
                AuthBasicProvider file
                AuthUserFile /var/www/html/collectd-web/.htpass 
                Require valid-user

Apache Password Protect Directory
9. The last step in order to reflect changes is to restart Apache server by issuing the below command and visit the Coollectd-web URL page as described above.
A pop-up should appear on the web page requesting for your authentication credentials. Use the username and password created earlier to access Collectd web interface.
# service apache2 restart  [On Debian based Systems]
# service httpd restart   [On RedHat based Systems]

OR
---------------- For systemd init scripts ----------------
# systemctl restart apache2.service  
# systemctl restart http.service  
Apache Password Authentication
Collectd-Web Panel

Wednesday, June 24, 2015

7 must-know tips to help you create better, stronger passwords

http://www.ibnlive.com/news/india/7-must-know-tips-to-help-you-create-better-stronger-passwords-706315.html

The hacking misdeeds were described in a New York Times story based on the findings of Hold Security, a Milwaukee firm that has a history of uncovering online security breaches.
Hold Security, called the data "the largest known collection of stolen Internet credentials." Hold's researchers did not identify the origins of the data or name the victim websites, citing nondisclosure agreements. The company also said it didn't want to name companies whose websites are still vulnerable to hacking, according to the Times report.
Hold Security didn't immediately respond to inquiries from The Associated Press.
If there's reason to believe any of your passwords might have been compromised, change them immediately. One of the best things you can do is to make sure your passwords are strong.
Here are seven ways to fortify them:
- Make your password long. The recommended minimum is eight characters, but 14 is better and 25 is even better than that. Some services have character limits on passwords, though.
-Use combinations of letters and numbers, upper and lower case and symbols such as the exclamation mark. Some services won't let you do all of that, but try to vary it as much as you can. "PaSsWoRd!43" is far better than "password43."
-Avoid words that are in dictionaries, even if you add numbers and symbols. There are programs that can crack passwords by going through databases of known words. One trick is to add numbers in the middle of a word - as in "pas123swor456d" instead of "password123456." Another is to think of a sentence and use just the first letter of each word - as in "tqbfjotld" for "the quick brown fox jumps over the lazy dog."
-Substitute characters. For instance, use the number zero instead of the letter O, or replace the S with a dollar sign.
-Avoid easy-to-guess words, even if they aren't in the dictionary. You shouldn't use your name, company name or hometown, for instance. Avoid pets and relatives' names, too. Likewise, avoid things that can be looked up, such as your birthday or ZIP code. But you might use that as part of a complex password. Try reversing your ZIP code or phone number and insert that into a string of letters. As a reminder, you should also avoid "password" as the password, or consecutive keys on the keyboard, such as "1234" or "qwerty."
-Never reuse passwords on other accounts - with two exceptions. Over the years, I've managed to create hundreds of accounts. Many are for one-time use, such as when a newspaper website requires me to register to read the full story. It's OK to use simple passwords and repeat them in those types of situations, as long as the password isn't unlocking features that involve credit cards or posting on a message board. That will let you focus on keeping passwords to the more essential accounts strong.
The other exception is to log in using a centralized sign-on service such as Facebook Connect. Hulu, for instance, gives you the option of using your Facebook username and password instead of creating a separate one for the video site. This technically isn't reusing your password, but a matter of Hulu borrowing the log-in system Facebook already has in place. The account information isn't stored with Hulu. Facebook merely tells Hulu's computers that it's you. Of course, if you do this, it's even more important to keep your Facebook password secure.
-Some services such as Gmail even give you the option of using two passwords when you use a particular computer or device for the first time. If you have that feature turned on, the service will send a text message with a six-digit code to your phone when you try to use Gmail from an unrecognized device. You'll need to enter that for access, and then the code expires. It's optional, and it's a pain - but it could save you from grief later on. Hackers won't be able to access the account without possessing your phone. Turn it on by going to the account's security settings.

Tips & Tricks: Here's how you should create, manage, and store your passwords

http://www.ibnlive.com/news/tech/tips-tricks-heres-how-you-should-create-manage-and-store-your-passwords-1007892.html

So many online accounts, so many passwords. No wonder it's tempting to turn to apps and services that promise to keep track of your passwords. But these password managers are like treasure chests for hackers. If your master password is compromised, all your accounts potentially go with it.
One such service, LastPass, says it has detected "suspicious activity." Although it says it found no evidence that individual passwords or user accounts were breached, it's advising users to change their LastPass master password.
I advise users instead to rely less on just passwords.
Here are some tips:
All accounts aren't equal
Instead of having to remember dozens of complex passwords, maybe you need to remember only a half-dozen.
Focus on accounts that are really important:
— Bank accounts, of course, along with shopping services with your credit card information stored.
— Don't forget email. Who would want your mundane chatter? Well, email accounts are important because they are gateways for resetting passwords for other services, such as your Amazon account to go on a shopping spree.
— As for social-media accounts and discussion forums, maybe there are some you value more than others. You might not care if someone posts on your behalf to a discussion board offering tech support. But if it's a forum you value, and you've established a reputation under that identity, you might want to prioritise that, too.
For these highly sensitive ones, choose a unique password and remember it. Write it down by hand and keep it in a safe place. If you must store it electronically, use password-protected files kept on your device — not online. And don't name that file "password." Use something boring, like "chores."
Lower priority
For the rest of your accounts, it's not as bad to turn to a password manager, but it might not be necessary.
Web browsers from Apple and Google have built-in mechanisms for storing frequently used passwords. You even have options to sync those online if you use multiple devices. Google's new Smart Lock feature extends that to Android apps, too, so you're not limited to Web browsing.
Many services also let you sign in with your Facebook or other ID instead of generating new passwords each time. Make sure the ID service offers two-step verification, as I'll explain later. Turn that on.
Phones and fingerprints
If you haven't protected your phone with a passcode, tsk tsk! Someone can easily swipe your phone and get to your email account to unlock all sorts of other accounts.
Fortunately, the latest iPhones and Samsung Galaxy phones have fingerprint IDs that make it easier to unlock phones. Instead of typing in the four-digit passcode each time, you can tap your finger on the home button.
Apple now allows other app developers to use that fingerprint ID, too. So you can unlock banking apps with just a tap of your finger. In its upcoming Android update, called M, Google is also promising to make it easier for app makers to incorporate fingerprint ID. And Microsoft plans support for biometrics — such as a fingerprint or iris scan — in the upcoming Windows 10 system.
Double security
Major services including Apple, Google, Facebook, Microsoft and Dropbox offer a second layer of authentication, typically in the form of a numeric code sent as a text message. After you enter your regular password, you type in the code you receive on your phone to verify that it's really you. A hacker wouldn't have access to your phone.
You need to go into the account settings to turn on this feature, which goes by such names as two-factor authentication or two-step verification.
It's a hassle, but it keeps your accounts safer. Just assume that your password will get compromised at some point. This extra layer will keep the hacker from doing anything with it.
Even safer ...
When given a choice, consider signing in with your mobile number rather than your email address. It's much easier to hack into an email account to reset passwords. Of course, you'll have to trust the service not to use your mobile number for marketing. (I don't like to share my mobile number, so in many cases, I still use my email — knowing I have protection with two-step verification turned on.)
Also be careful when creating security questions to reset passwords. Your dog's name? Your first school? These are things someone might find on your social-media page or elsewhere online. I make up answers and make them as strong as my regular passwords.