Sunday, August 14, 2011

Osi Layers


Open system Interconnection-Created by ISO(International Organization for Standardization) in 1970 .

* OSI layer helps to communicate two different vendor network devices using common set of rules.
*That rules are very difficult to understand vendors.So that rules are separate seven groups,each group called    layers. In this method is called layered approach model.
* Types of Seven Layers: Application,Presentation,Session,Transport,Network,Data link,Physical.
* First three top layers(Application,Presentation and Session) managed application process(host layers) and bottom  four layers(Transport,Network,Data link,Physical) are manged communication process(media layers). 


Application Layers:

* Application layer provides interface between user and that particular application.
* Application layer responsible for establishing and identifying intended communication partner(User).
*Application layer choose actual  application (using port no) and  give to next  layer using protocol stack. 
* Application layer acting to network related applications and also desktop related applications.


Example:
                   * In my system,i removed my NIC card and TCP/IP settings,network drivers.At a time open my Internet explore the html web page document opened and retrieve HTTP protocol and getting some error message.In these case user opened html page and using http protocol and create Application layer PDU (Protocol data unit)and give to next layer using via port no(HTTP port no-80).And also added Presentation and Session layer PDU's finally comes to network layer finding source and destination ip address,But system don't have NIC card so encapsulation failed and lost the data  finally getting some error message.In this cause user connected to application and getting replay message.

Presentation Layer:

* Presentation layer  responsible present the data and data translation and code formatting for Application  layer entities(Application layer PDU).
*Presentation layer also responsible for data compression,decompression and data encryption,decryption.  
*Presentation layer responsible for general format to ASCII format.It means sender data to translate to any format and then re translate to that format in destination system. 

Session Layer: 

*Transport layer responsible for  setting up (connecting)and managing and tear down (disconnect)session between presentation layer entities.
*Transport layer dialog control (end to end connection control)between two devices or end to end nodes and also organize the server to client or between two nodes using different modes.
Simplex-This is one way communication.(sender transmit the data and receiver received that data but receiver can't communicate to sender)
Half duplex- In this method sender to send the data to receiver after received the data then receiver replay back(At the same time can't communicate sender and receiver)
Full duplex-In this method at the same time communicate sender and receiver.
* And the main work for session layer different application data keeps and communicate to that exact that application for destination. 

Transport Layer: 

* Transport layer responsible create segments(break the big data to small small segments) for session layer data entries and reassemble the segments to data and give to session layer.
*Transport layer gives End to End Transport services and create logical connection between sending host to receiving host. 
*Transport layer works with TCP and UDP protocols. 
 
TCP(Transmission control protocol)
*

rsync command with examples

rsync: Remote Sync.

Description: rsync utility is used to synchronize the files and directories from one location to another in an effective way. Backup location could be on local server or on remote server.

Features:
(*).One of the main feature of rsync is that it transfers only the changed block to the destination, instead of sending the whole file.

Syntax:
rsync options source destination (or)
rsync [OPTION]... SRC [SRC]... [USER@]HOST:DEST (or)
rsync [OPTION]... [USER@]HOST:SRC [DEST]

a - Archive same -rptgolD, [Its enough to copy entire folder of file even with out changing file permission]
-r - Recursive [Copy entire directive]
-p, --perms preserve(Unalter) permissions
-t, --times preserve times
-o, --owner preserve owner (super-user only)
-g, --group preserve group
-l, --links copy symlinks as symlinks
-D same as --devices --specials
--devices preserve device files (super-user only)
--specials preserve special files

-z, --compress - Compress file data during the transfer.

-v - verbose, Explain what happen in view

-u - Do Not Overwrite the Modified Files at the Destination [if the file in the destination in modified and if u use -u option in rsync, the modified file wont be overwritten].

--rsh=COMMAND -- specify the remote shell to use. (e.g) --rsh='ssh -p1055' to login to remote system.

--progress - View the rsync Progress during Transfer

--stats - give some file-transfer stats

--delete - This tells rsync to delete extraneous files from the receiving side (ones that aren’t on the sending side), but only for the directories that are being synchronized.

--exclude - This option is used to exclude some certain files

--max-size=SIZE - This tells rsync to avoid transferring any file that is larger than the specified SIZE

--max-size=SIZE - This tells rsync to avoid transferring any file that is smaller than the specified SIZE


Examples:

1.rsync Command to copy only Files from a folder

#rsync -avz doc/ Desktop/welcome/
#ls Desktop/welcome/
taglist.txt

===>taglist.txt is the file present in the folder doc

2.rsync command to copy entire folder to the destination

#rsync -avz doc Desktop/welcome/
#ls Desktop/welcome/
doc

===>doc is the folder we copied.

3.rsync command with --progress option

#rsync -avz --progress doc Desktop/welcome/
building file list ...
2 files to consider
doc/
doc/taglist.txt
69366 100% 11.63MB/s 0:00:00 (xfer#1, to-check=0/2)

sent 18509 bytes received 48 bytes 37114.00 bytes/sec
total size is 69366 speedup is 3.74

===> --progress option gives you a progress meter of data send to the destination.

4.rsync command with --progress and --stats options

#rsync -avz --progress --stats doc Desktop/welcome/
building file list ...
2 files to consider
doc/
doc/taglist.txt
69366 100% 11.63MB/s 0:00:00 (xfer#1, to-check=0/2)

Number of files: 2
Number of files transferred: 1
Total file size: 69366 bytes
Total transferred file size: 69366 bytes
Literal data: 69366 bytes
Matched data: 0 bytes
File list size: 83
File list generation time: 0.001 seconds
File list transfer time: 0.000 seconds
Total bytes sent: 18509
Total bytes received: 48

sent 18509 bytes received 48 bytes 37114.00 bytes/sec
total size is 69366 speedup is 3.74

===> --stats option tells you a status information of file transfered.

5.rsync command with --delete option

#cd Desktop/welcome/
#cat > hi
#hello
#rsync -avz --delete doc Desktop/welcome/
building file list ... done
deleting doc/hi
doc/

sent 105 bytes received 26 bytes 262.00 bytes/sec
total size is 69366 speedup is 529.51

===> --delete command is used to delete files in the destination if the source doesn't have the file.

#cd Desktop/welcome/
#ls
taglist.txt

6.rsync command with --exclude option.

#cd doc
#cat hello
this is hello file

#rsync -avz --exclude doc/hi doc Desktop/welcome/
building file list ... done
doc/

sent 105 bytes received 26 bytes 262.00 bytes/sec
total size is 69366 speedup is 529.51

#cd Desktop/welcome/
#ls
taglist.txt

7.rsync command to transfer file from Source system to Destination system.

#rsync -avz --progress --stats --delete --rsh='ssh -Xp36985' doc rajm@192.168.1.5:Desktop/

===> The above command is used to copy file from source system to Desktop of destination system .

8.rsync command to transfer file from destination system to source system.


#rsync -avz --progress --stats --rsh='ssh -Xp36985' rajm@192.168.1.5:Desktop/doc .

===> The above command is used to copy files from Desktop system to source of destination system .

Sed command with examples

Sed stands for stream editor. A stream editor performs the text transformation from input stream and the input stream may be a file or input from a pipeline.

cat editing
hi
hello
welcome
how are you
hope you are fine

. . .Sed command to print lines. . .

1.#sed '1p' editing
hi
hi
hello
welcome
how are you
hope you are fine

==> 1p which tells that print the first line and show the remaining lines. so we can see from the output hi is priented twice.

2.#sed -n '1p' editing
hi

===> -n options is nothing but noprint, (i.e) It prints only the first line and didn't show the other lines.

3.#sed -n '2,4p' editing
hello
welcome
how are you

===> The above command is used to print only a certain range of lines.

4.#sed -n '$p' editing
hope you are fine

===> The above command displays only the last line. The '$' symbol indicated the last line and '-n'is used for no print and it combines with option 'p' to displays only the last line .

. . .Sed Command to delete lines. . .

1. #sed '1d' editing
hello
welcome
how are you
hope you are fine

===> The above command used to delete only the fisrt line and display the remaining lines.

2. #sed '2,4d' editing
hi

===> The above command is used to delete a range of lines.

. . .Sed Command for search and replace. . .

1.#sed 's/hi/changed/' editing
changed
hello
welcome
how are you
hope you are fine

==> The above command search for hi and replace to changed and print the remaining lines

2.#sed -n 's/hi/changes/p' editing
changes

===> The above command search for hi and replace to changed and don't print the remaining lines

3.#sed '1,4s/are/is/' editing
hi
hello
welcome
how is you
hope you are fine

===> The above command used to do search and replace only for a range of lines.

. . .How to delete empty lines using sed command. . .

#cat new_file
hi

The above line is empty

1.#cat new_file | sed -e '/^$/d'
hi
The above line is empty

2.#sed -e '/^$/d' new_file
hi
The above line is empty

===> The above two commands produce the same results, It search for empty line and delete it. '^' is nothing but starting of the line and '$' tells the end of the line, so from the starting to ending of the line is empty means delete it.

. . .How to remove space from a word. . .

#cat remove
s p a c e.

#cat remove | sed 's/ //g'
space
# sed 's/ //g' remove
space

===> It nothing but search and replace, the above command search for empty space and replace it with nothig, so then space becomes nospace.

. . .How to remove a lines permanently from a file. . .

#cat new_file
hi

The above line is empty

#sed -i '2d' new_file

===> This above command will delete the line number 2 permanently from the file new_file.

. . .How to assign numbers for lines using sed command. . .
#cat editing
hi
hello
welcome

#sed '=' editing
1
hi
2
hello
3
welcome


===> In the above command '=' symbol is used to assign number for each lines, it works like as same as 'nl' command.

. . .How to use Word Boundaries using sed command. . .

Word Boundaries - \<\>

#cat first_text
raj
rajkumar
i am rajkumar

#sed -e 's/\/kumar/g' first

kumar
kumarkumar
i am kumarkumar

===> Normally if u use search and replace it will replace any word which contains raj to kumar, if 'g' is specified.
#sed -e 's/\/kumar/g' first_text
kumar
rajkumar
i am rajkumar

===> If u use Word Boundaries means the only exact work will be searched and get replaced.(Its same like as 'grep -w' command)

. . .How to include files in sed command. . .

#cat commands
raj
linux

#vim lol
{
s/raj/kumar/g
s/linux/linuzzzzzzzz/g
}

#sed -f lol commands
kumar
linuzzzzzzzz
===> The '-f' option is used to include files in command prompt.

Special Characters with uses

Ctl-A       Moves cursor to beginning of line of text (on the command-line).
Ctl-B       Backspace (nondestructive).
Ctl-C       Break. Terminate a foreground job.
Ctl-D       Log out from a shell (similar to exit).
Ctl-E       Moves cursor to end of line of text (on the command-line).
Ctl-F       Moves cursor forward one character position (on the command-line).
Ctl-G       BEL. On some old-time teletype terminals, this would actually ring a bell.In an xterm it might beep.
Ctl-H       Rubout (destructive backspace). Erases characters the cursor backs over while  backspacing.
Ctl-I        Horizontal tab.
Ctl-J        Newline (line feed). In a script, may also be expressed in octal notation -- '\012' or in   hexadecimal -- '\x0a'.
Ctl-K       Vertical tab.  When typing text on the console or in an xterm window, Ctl-K erases  from the character under the cursor to end of line. Within a script, Ctl-K may behave  differently, as in Lee Lee Maschmeyer's example, below
Ctl-L       Formfeed (clear the terminal screen). In a terminal, this has the same effect as the  clear  command. When sent to a printer, a Ctl-L causes an advance to end of the paper sheet.
Ctl-N       Erases a line of text recalled from history buffer [20] (on the command-line).
Ctl-O       Issues a newline (on the command-line).
Ctl-P       Recalls last command from history buffer (on the command-line).
Ctl-Q       Resume (XON). This resumes stdin in a terminal.
Ctl-R       Backwards search for text in history buffer (on the command-line).
Ctl-S       Suspend (XOFF). This freezes stdin in a terminal. (Use Ctl-Q to restore input.)
Ctl-T       Reverses the position of the character the cursor is on with the previous character  (on the      command-line).
Ctl-U       Erase a line of input, from the cursor backward to beginning of line. In some settings, Ctl-U     erases the entire line of input, regardless of cursor position.
Ctl-X       In certain word processing programs, Cuts highlighted text and copies to clipboard.
Ctl-Y       Pastes back text previously erased (with Ctl-U or Ctl-W).
Ctl-Z       Pauses a foreground job.

How to Encrypt a file in Linux

root@user:~# vim test.txt (write something here)

This is a Test file

:wq
=====Now see the Content of the file using cat command=====
#root@user:~# cat test.txt
This is Test file

=====Now we are going to Encrypt the file with gpg======
root@user:~# gpg -c test.txt

Enter Pass-phrase :

Repeat Pass-phrase :

====You can see one more file create.=====
root@user:~# ls -l test*

-rw-rr 1 root root 59 2011-03-02 17:20 test.txt
-rw-rr 1 root root 97 2011-03-02 17:23 test.txt.gpg

=====Lets try to see encrypt file with cat command=====
root@user:~# cat test.txt.gpg

i+`P$@CoEkW%>o
8*zbB`EA9{7
IW

=====Delete original File=====
root@user:~# rm test.txt
=====Now we are going to decrypt the encrypted file=====
root@user:~# gpg test.txt.gpg

Enter Pass-phrase :
=====See decrypted file content=====
root@user:~# cat test.txt
This is a Test file

Adding User and their respective Password through Shell Script

. . .List of Users to be Added . . .
#cat list
ravi
deepak

. . .Script to automate User and their Password Adding . . .
#vim auto.sh
#!bin/bash
cat /dev/urandom | tr -cd "a-zA-Z0-91234567890-=\`" | fold -w 9 | head -n 2 > pass
cp pass check
u=`cat list`
for j in $u
do
useradd $j
echo "User $j Added"
echo "=================================="
done
for i in $u
do
echo "User Name is :$i"
p=`cat pass`
echo "$p" | passwd --stdin "$i"
sed -i '1d' /home/rajm/script/blog/auto/pass
#sed -i '1d' $p
echo "User $i ’s password changed!"
echo "=============================="
done


. . .Give permisson and run the script. . .
#chmod +x auto.sh
sh auto.sh
User ravi Added
==================================
User deepak Added
==================================
User Name is :ravi
Changing password for user ravi.
passwd: all authentication tokens updated successfully.
User ravi ’s password changed!
==============================
User Name is :deepak
Changing password for user deepak.
passwd: all authentication tokens updated successfully.
User deepak ’s password changed!
==============================

. . .The File check used to check the password. . . .
#cat check
5

Some Scripting Tricks

. . .Uses of some Build in Variables. . .

1. echo $LOGNAME and echo $USER -----> show's who is the logged in user
2. echo $HOSTNAME               -----> show's the Hostname of the Linux Box
3. echo $PPID  ----> show's the Process ID of Shell's Parent Directory ( If u kill this every logged in terminal will be closed)
4. echo $PWD            ----> show's the Present Working Directory
5. echo $UID              -----> show's the UserID of the currently Logged in user
6. echo $MAIL          -----> Show's the Mail Path       
7. echo $HISTFILE   -----> Show's the file's which stores the history details
8. echo $HOME        -----> show's the users HOME Directory
9. echo $PATH         -----> A colon-separated list of directories in which the shell looks for commands.
10.echo $BASH The full pathname used to execute the current instance of Bash.
11.echo $HISTSIZE  ----> This will show you the HISTORY size
12  $?   ------> Expands to the exit status of the most recently executed foreground pipeline.
13. $$   -----> Shows to the process ID of the shell and if it used inside a script it shows the process ID of the script.
14. $!   -----> Expands to the process ID of the most recently executed background command(&).
15. $0  -----> Expands to the name of the shell or shell script.
16. $_  -----> It will show you what is the Last Argument used [ like esc (.) or alt (.) ]

How to set a value for a variable in single command?

#echo ${raj:=rajkumar}
#echo $raj

How to assign o/p value of a command to a variable?
Syntax:

1. $(command)
2. `command`

#echo `date`
Sun May 1 13:12:31 IST 2011
#echo $(date)
Sun May 1 13:12:40 IST 2011

cat first.sh

#!bin/bash
a=`du -sh /home/rajm | awk {'print $1'}`
echo "I am User $USER and I am running this script"
echo "The UserID of $USER is $UID"
echo "The name of the Script is $0"
echo "The processID of the script $0 is: $$"
echo "The Script is running from $PWD directory"
echo "Size of User $LOGNAME Home directory($HOME) is :$a"
echo "Status of Previously executed command is: $?"
echo "The script $0 contains $LINENO Lines"

#sh first.sh
I am User rajm and I am running this script
The UserID of rajm is 516
The name of the Script is first.sh
The processID of the script first.sh is: 5096
The Script is running from /home/rajm/script/blog directory
Size of User rajm Home directory(/home/rajm) is :696M
Status of Previously executed command is: 0
The script first.sh contains 10 Lines

How Linux Boots

When we install Linux we basically do more number of partitions. When allocating disk space for the partitions, the first sector(One Sector = 512 Bytes), or data unit, for each partition is always reserved for programmable code used in booting. The very first sector of hard disk is reserved for booting purpose and is called Master Boot Record(MBR).

Step:1 POST (Power On Self Test)

Step:2 BIOS (Basic Input Output System)

Step:3 MBR (Master Boot Record), after opening MBR the boot loader code in MBR is executed. Then the MBR needs to know which partitions on the disk have boot loader code specific to their operating systems in their boot sectors and then attempts to boot one of them.

Step:4 Select's the particular boot partition(basically /boot), then it need to select the boot loader. Their are two types of boot loader in linux LILO(LInox LOader, / etc/lilo.conf) and GRUB (Grand Unified Boot Loader).LILO is not in use now a days.

Step:5 Then the data in /boot/grub/grub.conf is readed, which list all the available operating  system and their booting parameters.

Step:6 When Linux begins to boot with its kernel, it first runs the /sbin/init program, which does some system checks.

Step:7 Then the /etc/inittab file is opened this will tell us which runlevel should be used.

Step:8 Based on the Selected runlevel the init process then executes start up scripts located in subdirectory of /etc/rc.d/*. If the runlevel 5 is chosen means then the scripts in /etc/rc.d/rc5.d is executed.

Step:9 cd /etc/rc.d/rc5.d . The files inside in the directory are Start up with two things "S" and"K". The scripts starting with "S" are executed when System starts and the Scripts starting with "K" are executed when the system shutdowns. The Number that follows the K and S specifies the position in which the scripts should be run in ascending order.

Step:10 Then the scrips inside the /etc/rc.d/rc.local are executed, if u manually added any.

Friday, August 12, 2011

Managing links in Linux

Hard and Symbolic links are the two types of files that exist in a Unix Operating System to point to another file.
Hard Links: They are a pointer that is exactly as the same than the file it points to, no mather if it has a different name, any modification done to the pointer are also done to the target file. The hard links can only point to other files, but not directories (though directories are a special kind of files). And the other main difference with Symbolic Links is that hard links MUST reside in the same filesystem than the file they point to, because they have the same inode number.
Symbolic liks: The are a pointer to another file but they contain the name of the file they point to, it can span filesystems (they have a different inode number), and they can point to files or direcoties.
Creating Hard and Symbolic Links:
ln -fs []

By default ln (without arguments) it creates hard links.
-f, --force : Remove existing destination files.
-s, --symbolic : Make symbolic links instead of hard links.

Analysing logs in Linux

Part of the security and sysadmins tasks is the log analysis and decision taking. There is plenty of information in http://www.linux.org/apps/all/Administration/Log_Analyzers.html.

The tools i recommend is called "Lire", this tool permits the creation of several reporting formats, including html, pdf, xml, between others. It also permits to analyze many log file formats, which include MySQL, Iptables, BIND, Apache, Qmail, Postfix, Syslog and more. Lire is GPL'ed Free Software (and Open Source), built around the idea of extendibility.

This tool is available from http://www.logreport.org/lire, it has been deveploped in Perl and i recommend you to install all the dependence modules with CPAN (type "perl -M CPAN -e shell" on the command line as root).

Introduction to Iptables usage in Linux

I am going to explain the generic matches, the ones that apply to all the IP packets. In general, the patch pattern looks like "-s (--src, --source).

For example:
iptables -A INPUT -s 10.10.10.5 -j DROP

The IP address could also be a hostname, in that case it would be resolved to an ip address before being added to the chain. The field of the IP address could also be a range of addresses using a netmask. This instruction is applied in the INPUT chain, but it could be used also in the OUTPUT chain if the machine has more than one ip address.

iptables -A INPUT -s 10.10.10.0/24 -j DROP

This instructions matches the first 24 bits of the address. This means, it matches addresses between 10.10.10.0 - 10.10.10.255.

iptables -A INPUT -s ! 10.10.10.5 -j DROP

The exclamation mark negates the ipaddress, this matches the packets where the source IP is no 10.10.10.5

The "-d (--dst --destination)" matches the destination address of the packets and is used generaly on the OUTPUT chain. The same rules than in the -s option apply (address ranges can be specified as hostnames, a single IP address or a range, and negation of the addresses). For example:

iptables -A OUTPUT -d ! 10.10.10.4 -j REJECT

The "-i (--in-interface) " specify on which network interface the rule should take effect, for example "eth0". This options could be used in the FORWARD, INPUT and PREROUTING chains. The network interface also accepts wildcards, for example, if you want to filter all the traffic from a privat eaddress such as 10.10.10.2 in all the interfaces:

iptables -A INPUT -s 10.10.10.2 -i eth* -j DROP

This would drop all packets arriving on eth0, eth1, eth2, etc.

A final "-p" option allows to work with a specific protocol, for example, if you want to drop all the UDP packets:

iptables -A INPUT -p udp -j DROP

The protocols that can be used are:
TCP, UDP, ICMP, ALL (this is for all the protocols).

 i explained some general packet matching with Iptables, now i am going to explain the TCP packet matching generalities, where the commands displayed following, all match specific values from the TCP packet headers, for example the source and destination ports, tcp options, tcp flags (for example the syn, fin, etc).

You use the --protocol argument to match TCP packets, and optionally, the source port of the packet can be specified with "--sport (--source-port) ", the source port can be a numeric value or the name of the port, that should match the port number we want in the /etc/servicesfile.

Here are two examples:
iptables -A INPUT -p tcp --sport 23 -j REJECTiptables -A INPUT -p tcp --sport telnet -j REJECT

This rules do the same, they reject the inbound traffic from the TCP port 23 of the remote host). The usage of port names instead of the number, creates a little more cpu consume and could be told as "speed penalty" in large rulesets.

It is possible also to specify a range of ports in the rules, lower and upper port separated by a colon. Here i filter all the ports between 10 and 999:
iptables -A OUTPUT -p tcp --sport 10:999 -j REJECT

All TCP source ports except the 80 are accepted with this rule:
iptables -A INPUT -p tcp --sport ! 80 -j ACCEPT

The same can be done with a range of ports:
iptables -A INPUT -p tcp --sport ! 1024:40000 -j LOG

If the first port is numerically higher than the second, iptables swaps both numbers around automatically.

To specify a TCP destination port, the "-dport (--destination-port) [port]" is used, and its rules are the same than in TCP source port matching.

For example, to stop users in your private network to connect to IRC, supposing that IRC uses the ports between 6667 to 66670, you may want to add this rule:
iptables -A OUTPUT -p tcp --dport 6667:6670 -j REJECT

To match a specific flag in the TCP header, you have to make use of "--tcp-flags [mask] [flags]".

The [mask] argument is a list of flags separated by commas, which should be matched.
The [flags] argument is a list of flags that must be set, any flag listed in the [mask] argument, but not in the second, this means that the flag must be unset.

The possible flags are: SYN, ACK, FIN, RST, PSH and URG. ALL and NONE are also possible.

In this example, the SYN,ACK and FIN flags are the mask, and the SYN flag is the one that has to be set:
iptables -A FORWARD -p tcp --tcp-flags SYN,ACK,FIN SYN -j ACCEPT

The mask can also be inverted, meaning that the ACK and FIN should be set, but not the SYN:
iptables -A FORWARD -p tcp --tcp-flags ! SYN,ACK,FIN SYN -j ACCEPT

Matching a particular TCP flag:
This is accomplished with the "--syn" flag, it is usefull because the SYN flag is the TCP start sequence also known as the "3 way handshake", explained in this picture:

iptables -A FORWARD -p tcp --syn -j ACCEPT iptables -A FORWARD -p tcp ! --syn -j ACCEPT


In this case i am going to explain some iptables features related with UDP. UDP (User Datagram Protocol) has the characteristic of being connectionless.

The packets format is this:
In this packet format can be seen that UDP has no flags like TCP. UDP cares only about the source and destination addresses.

In Iptables, udp is specified with the "-p udp" argument. Similar rules apply to udp than with TCP matching, negation and port ranges are allowed:

-sport (--source-port) 
--dport (--destination-port) 

This rule matches any UDP packet with source port of 161 (SNMP)
iptables -A INPUT -p udp --sport 161 -j ACCEPT

This rule logs all the packets with destination port with range from 161 to 180
iptables -A INPUT -p udp --dport 161:180 -j LOG

To learn more about UDP, see the RFS 768

10 most important Unix Security issues

1. Web Server. One of the places that an intruder is going to check first is for vulnerabilities in your Apache version and in you cgi-scripts.

2. Remote Procedure Calls. RPC Services should be down if they are not required, they allow a remote user to execute instructions in your computer; the intruder usualy gains root access this way.
3. SNMP (Simple Network Management Protocol). This protocol is known to have had its vulnerabilities and their password can be easily cracked and more easier captured from the network.
4. SSH (Secure Shell). SSH has been exploited before, if you do not need it then you can turn it off, or filter the source ip addresses with TCP Wrapper.

5. Remote Services (Trusted host). This was a setup in the machines based on the rely of other machines IP address, and leaved access without asking password. Their binaries are "rsh", "rcp", "rlogin" and "rexec". They exist and can be used also today, the attacked can do a party with your machine if they use a technique known as "ip spoofing".

6. FTP (File Transfer Protocol). Many vulnerabilities have been found in FTP, as exploits and protocol weaknesses, like clear text password transfer (resolved in SFTP).

7. LPD (Line Printer Daemon). This daemon is also remotely exploitable with help of an overflow and a shellcode, gaining root access if the server is running as root.

8. BIND/DNS (Dynamic Name Server). DNS Flooding, exploits and other attacks are available, if you are going to set up a DNS, use a firewall to filter any port that you do not want.

9. Sendmail. This mail transfer agent is known for its buffer overflows and remote exploits, though it has resolved its issues, always appears something new. It is recommended to use qmail.

10. Weak Password / No Passwords in the system. I do not need to explain this.

Many people that talk about security talk about a false sense of security that one can have in the cyberspace, i do not totaly agree with them, i see very often thay it is created a false sense of insecurity also. The items i have listed before create some sense of insecurity and alert; but do not worry, if you are going to run one of this critical services, just keep in mind:

* Use a well configured firewall (pay more attention to "well configured" than "firewall")
* Set up correctly an Intrusion Detection and Prevention System.
* Ask for help a security professional

How to do an secure tunel with ssh in Linux

You may know that ssh is a secure way to connect, remember those old days when telnet was used and the passwords just flew through the network and any person with a sniffer could capture it ?

With ssh you can create a secure connection from one point to anther, going through a middle point, like the figure shows:
The tunnel is an cyphered connection from A to B, and from B to C the connection is not cyphered (almost not by ssh that we are using). B acts as a gateway to C.
In A you would write:
$ ssh -g -L [port in A]:[C address]:[port in C] [b address]
Example of doing a tunnel to a webpage:
$ ssh -g -L 8000:www.gmail.com:80 sureshkumarpakalapati.in

You would connect with your browser to www.gmail.com:8000.
This would create a tunnel from A to B and B to gmail, this way nobody in A's network will be able to sniff the gmail traffic, only in B's network would that be possible.

Limit users access to Linux in a time range

In the cases when you want to limit the access to a Linux operating system in a time range, you would like to use pam_time.so. pam_time was written by Andrew G. Morgan.

Take a look at /etc/security/time.conf

To limit for example ssh access from 23:00 PM and 08:00 AM.
sshd;*;*;!Al2300-0800

The format of the file is:
Service;ttys;users;time

the !Al means, anything except "All the days".

If you would like to permit people from 4 to 8 PM all the days, except root:
login;*;!root;!Al1600-2000

Further reading:man time.conf

Disable users from loggin into the server, except the administrator

In cases where you have to disable the login to all users,except root, for example when you have to do a backup, you have to use pam_nologin.so (man nologin).

1) Edit the pam file for the service you want to control, in this example i modify ssh pam control file, located in /etc/pam.d/sshd

Add this line
account required pam_nologin.so


2) Create the /etc/nologin file, just do "touch /etc/nologin"

This should disable the login from ssh. If you want to disable the login from terminal, modify the /etc/pam.d/login file.

3) To re-enable the login just remove /etc/nologin

How to control which files have been deleted and by who ?

 This is a hack you can use to control file deletion and know exactly who deleted a file.

The trick is to add into the /etc/profile file this script:

[walter@walter ~]$ rm () { echo `id` deleted the file $1 at `date` >> /tmp/.log; /bin/rm $1; }

The log file will show you this:

uid=500(walter) gid=500(walter) groups=500(walter) deleted the file test at Mon Nov 26 10:31:16 ART 2007 
To print also the hostname where the deletion has come from:
$ rm() { i=`tty | cut -d / -f 3,4`;host=`w | grep $i | awk '{print $3}'`;echo -e `id` deleted the file $1 at `date` comming from "$host\n" >> /tmp/.log;/bin/rm "$@";}
The output would be:
uid=0(root) gid=0(root) groups=0(root),1(bin),2(daemon),3(sys),4(adm),6(disk),10(wheel),503(devel) deleted the file at Tue Nov 27 15:09:14 ART 2007
The problem of this solution is that if the user is some curious, he could know about this "set" variable, and:

* Unset the variable
* Execute the binary calling it directly

So, if you need the best way, you will have to write a little C script that replaces the original "rm" binary and rename the original "rm" binary to "rm.orig". Now, the "rm" binary should log the deletion of the file and then execute the "rm.orig", obviously, changing the process name to "rm", so the user do not suspects.

Advantages of Linux over its commercial competitors

Linux is free.
You can install a complete Unix system at no expense other than the hardware.

Linux is fully customizable in all its components.
Thanks to the General Public License (GPL), you are allowed to freely read and modify the source code of the kernel and of all system programs.

Linux runs on low-end, cheap hardware platforms.
You can even build a network server using an old Intel 80386 system with 4 MB of RAM.

Linux is powerful.
Linux systems are very fast, since they fully exploit the features of the hardware components. The main Linux goal is efficiency, and indeed many design choices of commercial variants, like the STREAMS I/O subsystem, have been rejected by Linus because of their implied performance penalty.

Linux has a high standard for source code quality.
Linux systems are usually very stable; they have a very low failure rate and system maintenance time.

The Linux kernel can be very small and compact.
It is possible to fit both a kernel image and full root filesystem, including all fundamental system programs, on just one 1.4 MB floppy disk. As far as we know, none of the commercial Unix variants is able to boot from a single floppy disk.

Linux is highly compatible with many common operating systems.
It lets you directly mount filesystems for all versions of MS-DOS and MS Windows, SVR4, OS/2, Mac OS, Solaris, SunOS, NeXTSTEP, many BSD variants, and so on. Linux is also able to operate with many network layers, such as Ethernet (as well as Fast Ethernet and Gigabit Ethernet), Fiber Distributed Data Interface (FDDI), High Performance Parallel Interface (HIPPI), IBM's Token Ring, AT&T WaveLAN, and DEC RoamAbout DS. By using suitable libraries, Linux systems are even able to directly run programs written for other operating systems. For example, Linux is able to execute applications written for MS-DOS, MS Windows, SVR3 and R4, 4.4BSD, SCO Unix, XENIX, and others on the 80 x 86 platform.

Linux is well supported.
Believe it or not, it may be a lot easier to get patches and updates for Linux than for any other proprietary operating system. The answer to a problem often comes back within a few hours after sending a message to some newsgroup or mailing list. Moreover, drivers for Linux are usually available a few weeks after new hardware products have been introduced on the market. By contrast, hardware manufacturers release device drivers for only a few commercial operating systems — usually Microsoft's. Therefore, all commercial Unix variants run on a restricted subset of hardware components.

With an estimated installed base of several tens of millions, people who are used to certain features that are standard under other operating systems are starting to expect the same from Linux. In that regard, the demand on Linux developers is also increasing. Luckily, though, Linux has evolved under the close direction of Linus to accommodate the needs of the masses.

Thursday, August 4, 2011

How to Setup GFS2 or GFS in Linux Centos

It has been a nightmare for me setting up GFS2 with my 3 shared hosting servers and 1 SAN Storage. I have been reading all over the internet and the solutions to this is either outdated or contains bug that cannot make my SAN storage SAN to work. Finally, i managed to setup my GFS2 on my Dell MD3200i with 10TB of disk space.


GFS2/GFS Test Environment


Here is the test environment equipment that i utilized for this setup.
3 Centos Web Server
1 MD3200i Dell SAN Storage
1 Switch to connect all these equipment together


Assumption


I will assume you would have setup all your 3 Centos servers to communicate with your SAN ISCSI storage. This means that all your 3 Centos servers will be able to view your newly created LUN using iscsiadmn. And you have switch off your iptabls and selinux. If your iscsi storage hasn’t configure, you can do so at cyberciti.


Setup GFS2/GFS packages


On all of your 3 Centos servers, you must install the following packages:


cman
gfs-utils
kmod-dlm
modcluster
ricci
luci
cluster-snmp
iscsi-initiator-utils
openais
oddjobs
rgmanager


Or you can simple type the following yum on all 3 Centos machine view sourceprint?

1 yum install -y cman gfs-utils kmod-gfs kmod-dlm modcluster ricci luci cluster-snmp iscsi-initiator-utils openais oddjob rgmanager


Or even simplier, you can just add the cluster group via the following line view sourceprint?

1 yum groupinstall -y Clustering
2 yum groupinstall -y "Storage Cluster"


Oh, remember to update your Centos before proceeding to do all of the above.

1 yum -y check-update
2 yum -y update


After you have done all of the above, you should have all the packages available to setup GFS2/GFS on all your 3 Centos machine.


Configuring GFS2/GFS Cluster on Centos


Once you have your required centos packages installed, you would need to setup your Centos machine. Firstly, you would need to setup all your hosts file with all 3 servers machine name. Hence, i appended all my 3 servers machine name across and in each machine i would have the following additional line in my /etc/hosts file.

1 111.111.111.1 gfs1.hungred.com
2 111.111.111.2 gfs2.hungred.com
3 111.111.111.3 gfs3.hungred.com

where *.hungred.com is each machine name and the ip beside it are the machine ip addresses which allows each of them to communicate with each other by using the ip stated there.

Next, we will need to setup the cluster configuration of the server. On each machine, you will need to execute the following instruction to create a proper cluster configuration on each Centos machine.
view sourceprint?
1 ccs_tool create HungredCluster
2 ccs_tool addfence -C node1_ipmi fence_ipmilan ipaddr=111.111.111.1 login=root passwd=machine_1_password
3 ccs_tool addfence -C node2_ipmi fence_ipmilan ipaddr=111.111.111.2 login=root passwd=machine_2_password
4 ccs_tool addfence -C node3_ipmi fence_ipmilan ipaddr=111.111.111.3 login=root passwd=machine_3_password
5 ccs_tool addnode -C gfs1.hungred.com -n 1 -v 1 -f node1_ipmi
6 ccs_tool addnode -C gfs2.hungred.com -n 2 -v 1 -f node2_ipmi
7 ccs_tool addnode -C gfs3.hungred.com -n 3 -v 1 -f node3_ipmi


Next, you will need to start cman.view sourceprint?

1 service cman start
2 service rgmanager start
cman should starts without any error. If you have any error while starting cman, your GFS2/GFS will not work. If everything works fine, you should see the following when you type the command as shown below,


view sourceprint?

1 [root@localhost ]# cman_tool nodes
2 10.0.0.1
3 Node Sts Inc Joined Name
4 1 M 16 2011-1-06 02:30:27 gfs1.hungred.com
5 2 M 20 2011-1-06 02:30:02 gfs2.hungred.com
6 3 M 24 2011-1-06 02:36:01 gfs3.hungred.com

If the above shows, this means that you have properly setup your GFS2 cluster. Next we will need to setup GFS2!


Setting up GFS2/GFS on Centos


You will need to start the following services.


service gfs start
service gfs2 start

Once, this two has been started. All you need to do is to partition your SAN storage LUN. If you want to use GFS2, partition it with gfs2


view sourceprint?1 /sbin/mkfs.gfs2 -j 10 -p lock_dlm -t HungredCluster:GFS /dev/sdb


Likewise, if you like to use gfs, just change it to gfs instead of gfs2


view sourceprint?1 /sbin/mkfs.gfs -j 10 -p lock_dlm -t HungredCluster:GFS /dev/sdb


A little explanation here. HungredCluster is the one we created while we were setup out GFS2 Cluster. /dev/sdb is the SAN storage lun space which was discovered using iscsiadm. -j 10 is the number of journals. each machine within the cluster will require 1 cluster. Therefore, it is good to determine the number of machine you will place into this cluster. -p lock_dlm is the lock type we will be using. There are other 2 more types beside lock_dlm which you can search online.


P.S: All of the servers that will belong to the GFS cluster will need to be located in the same VLAN. Contact support if you need assistance regarding this.


If you are only configuring two servers in the cluster, you will need to manually edit the file /etc/cluster/cluster.conf file on each server. After the tag, add the following text:


If you do not make this change, the servers will not be able to establish a quorum and will refuse to cluster by design.


Setup GFS2/GFS run on startup


Key the following to ensure that GFS2/GFS starts everytime the system reboot.


view sourceprint?
1 chkconfig gfs on
2 chkconfig gfs2 on
3 chkconfig clvmd on //if you are using lvm
4 chkconfig cman on
5 chkconfig iscsi on
6 chkconfig acpid off
7 chkconfig rgmanager on
8 echo "/dev/sdb /home gfs2 defaults,noatime,nodiratime 0 0" >>/etc/fstab
9 mount /dev/sdb


Once this is done, your GFS2/GFS will have mount on your system to /home. You can check whether it works using the following command.


view sourceprint?

1 [root@localhost ~]# df -h


You should now be able to create files on one of the nodes in the cluster, and have the files appear right away on all the other nodes in the cluster.


Optimize clvmd


We can try to optimize lvmd to control the type of locking lvmd is using.


view sourceprint?

1 vi /etc/clvmd/clvmd.conf
2 find the below variables and change it to the variable as shown below
3 locking_type = 3
4 fallback_to_local_locking = 0
5 service clvmd restart
credit goes to http://pbraun.nethence.com/doc/filesystems/gfs2.html


Optimize GFS2/GFS
There are a few ways to optimize your gfs file system. Here are some of them.
Set your plock rate to unlimited and ownership to 1 in /etc/cluster/cluster.conf
view sourceprint?1
Set noatime and nodiratime in your fstab.
view sourceprint?1 echo "/dev/sdb /home gfs2 defaults,noatime,nodiratime 0 0" >>/etc/fstab
lastly, we can tune gfs directy by decreasing how often GFS2 demotes its locks via this method.
view sourceprint?
1 echo "
2 gfs2_tool settune /GFS glock_purge 50
3 gfs2_tool settune /GFS scand_secs 5
4 gfs2_tool settune /GFS demote_secs 20
5 gfs2_tool settune /GFS quota_account 0
6 gfs2_tool settune /GFS statfs_fast 1
7 gfs2_tool settune /GFS statfs_slots 128
8 " >> /etc/rc.local


credit goes to linuxdynasty.
iptables and gfs2/gfs port
If you wish to have iptables remain active, you will need to open up the following ports.


view sourceprint?
1 -A INPUT -i 10.10.10.200 -m state --state NEW -p udp -s 10.10.10.0/24 -d 10.10.10.0/24 --dport 5404, 5405 -j ACCEPT
2 -A INPUT -i 10.10.10.200 -m state --state NEW -m multiport -p tcp -s 10.10.10.0/24 -d 10.10.10.0/24 --dports 8084 -j ACCEPT
3 -A INPUT -i 10.10.10.200 -m state --state NEW -m multiport -p tcp -s 10.10.10.0/24 -d 10.10.10.0/24 --dports 11111 -j ACCEPT
4 -A INPUT -i 10.10.10.200 -m state --state NEW -m multiport -p tcp -s 10.10.10.0/24 -d 10.10.10.0/24 --dports 14567 -j ACCEPT
5 -A INPUT -i 10.10.10.200 -m state --state NEW -m multiport -p tcp -s 10.10.10.0/24 -d 10.10.10.0/24 --dports 16851 -j ACCEPT
6 -A INPUT -i 10.10.10.200 -m state --state NEW -m multiport -p tcp -s 10.10.10.0/24 -d 10.10.10.0/24 --dports 21064 -j ACCEPT
7 -A INPUT -i 10.10.10.200 -m state --state NEW -m multiport -p tcp -s 10.10.10.0/24 -d 10.10.10.0/24 --dports 41966,41967,41968,41969 -j ACCEPT
8 -A INPUT -i 10.10.10.200 -m state --state NEW -m multiport -p tcp -s 10.10.10.0/24 -d 10.10.10.0/24 --dports 50006,50008,50009 -j ACCEPT
9 -A INPUT -i 10.10.10.200 -m state --state NEW -m multiport -p udp -s 10.10.10.0/24 -d 10.10.10.0/24 --dports 50007 -j ACCEPT


Once these ports are open on your iptables, your cman should be able to restart properly without getting start either on fencing or cman starting point. Good Luck!


Troubleshooting


You might face some problem setting up GFS2 or GFS. Here are some of them which might be of some help


CMAN fencing failed
You get something like the following when you start your cman
view sourceprint?
1 Starting cluster:
2 Loading modules... done
3 Mounting configfs... done
4 Starting ccsd... done
5 Starting cman... done
6 Starting daemons... done
7 Starting fencing... failed


One of the possibility that is causing this is that your gfs2 has already been mounted to a drive. Hence, fencing failed. Try to unmount it and start it again.


mount.gfs2 error
if you are getting the following error
view sourceprint?

1 mount.gfs2: can't connect to gfs_controld: Connection refused
you need to try to start the cman service

Clearing kernel cache in linux

This is about the drop_caches tunability. It's available in kernel 2.6.16 and above, and exists in /proc/sys/vm.

If you echo various values to it, various kernel cache data structures are dropped. This is a non-destructive operation, so if you still see stuff hanging out after it, it's likely that it was dirty cache. Anyhow, on to the values:

1 - drop the pagecache

2 - drop the dentry and inode caches

3 - drop both the dentry and inode caches, as well as the pagecache.

echo 3 > /proc/sys/vm/drop_caches as a root or admin user
A gateway is a node that allows you to gain entrance into a network and vice versa. On the Internet the node which is the stopping point can be a gateway or a host node. A computer that controls the traffic your network or your ISP (Internet Service Provider) receives is a node. In most homes a gateway is the device provided by the Internet Service Provider that connects users to the internet. We can find the gateway IP address on Windows, Linux and Mac as below.

On Windows :

Click Start -> Run -> Type cmd to launch command prompt.

In command prompt type :

route PRINT

The output will have a list of gateway addresses for the particular system.

On Lunux :

Start Terminal and Run ,

$ route -n

This will display the routing table as below

Kernel IP routing table

Destination Gateway Genmask Flags Metric Ref Use Iface

192.168.31.0 192.168.1.1 255.255.255.0 UG 0 0 0 eth0 127.0.0.0 0.0.0.0 255.0.0.0 U 0 0 0 lo In the above output the default gateway for the system is 192.168.1.1 as the flag is set as G (refers to gateway) for this ip adress.

On Mac :

Open Terminal and Type : $ netstat -rn The output will look like as below. Routing tables

Internet:

Destination Gateway Flags Refs Use Netif Expire

default 192.168.1.1 UGSc 7 0 en0

127 localhost UCS 0 0 lo0

localhost localhost UH 1 7373 lo0

The output shows the default gateway for the mac as 192.168.1.1 a the flag for default network connection is set as "G".

How to erase the harddisk completly using linux ?

Erasing the entire hard disk using Linux:

Run the following command to fill your entire hard disk with zeros

$ dd if=/dev/zero of=/dev/sda bs=1M

The above command will whole hard disk with zeros. Note: this will take long time to complete.

Erasing/filling the hard Disk with random data:

We can fill the hard disk with random data in case of any security requirement to prevent data loss. Run the below

$ dd if=/dev/random of=/dev/sda bs=1M

Erasing the MBR(Master Boot Record) of the Hard Disk.

To Erase only code area in your MBR:

Run

$ dd if=/dev/zero of=/dev/sda bs=446 count=1

To Erase entire MBR :

Run

$ dd if=/dev/zero of=/dev/sda bs=512 count=1

Note : If linux is not installed, Boot into Linux image from Live CD to perform above operations on the hard disk.


How to setup Redhat cluster and GFS2 on RedHat Enterprise Linux 6 on Vmware ESXi

1) Installing RHEL6 on Vmware esxi with clustering packages.


a) Creating a RedHat Enterprise Linux 6.0 Virtual image.

i) Open vSphere Client by connecting to a Vmware ESXi Server.

ii) Login into your vSphere Client

iii) Goto File -> New -> Virtual Machine (VM).

iv) Select Custom option in Create New Virtual Machine Window and click Next

v) Give a name to the virtual machine(VM) ( In my case name of my virtual machine is – RHEL6-ClusterNode1) and click next.

vi) Select a resource pool where you want your VM to reside ( In my case , I have created a resource pool named RHEL6-Cluster.) and click Next.

vii) Select a datastore to store your VM files and Click Next.

viii) Select VM version which is suitable for your environment.( In my case VM version is 7) and click Next.

ix) Specify the guest operating system type as Linux and select version as RedHat Enterprise Linux 6.0 -32 bit. Click Next.

x) Select number of CPU for the VM ( you can assign multiple CPU if your processor is multicore.) (in my case : I had assigned 1 cpu) and Click Next.

xi) Configure the memory for your VM (assign the memory wisely, so that VM performance is not degraded when multiple VM’s run in parallel). Click Next.

xii) Create Network Connection for your VM ( generally do not change the default connection ) . Click Next.

xiii) Select SCSI controller as LSI Logic Parallel , Click Next.

xiv) Select “Create New Virtual Disk” and Click Next.

xv) Allocate virtual disk capacity for the VM as needed.( In my case : virtual disk size was assigned as 10GB. Select “Support Clustering features such as fault tolerance. Select “ Specify a datastore “ and assign a datastore to store the VM. Click Next

xvi) Under Advanced options, Let the Virtual Device Node be SCSI(0:0). Click Next.

xvii) On “the Ready to Complete” window select “Edit the virtual machine settings before completion “ and Click continue.

xviii) On the “ RHEL6-Cluster1 – VM properties window”, select New SCSI controller and change the SCSI bus sharing type from None to “Virtual” so that virtual disks can be shared between VM’s

xix) Similarly for “New CD/DVD” supply either client device or host device or Operating system installer ISO file located on the datastore to start the installation of the operating system. Note: do not forget to enable “Connect at power on “ option for Host Device or Datastore ISO device option.

xx) Now Click Finish, No you are ready to start the installation of the RHEL6 operating system on Virtual Machine.

2) Installing RedHat Enterprise for Linux 6.0 on the Virtual Machine.

a) File System Partitioning for the RHEL6.0 VM.

i) Start the RHEL Installation.

ii) Select custom partitioning for disk.

iii) Create a /boot partition of 512MB

iv) Create physical LVM Volume from remaining free space on the virtual disk.

v) Create logical volume group and create a logical volume for swap and “/” on the available LVM disk space.

vi) Apply the above changes to create the partition structure.

b) Selecting the packages required for clustering

i) Select the packages to be installed on to the disk by selecting custom package selection ( Enable additional repository High Availability, Resilient storage

ii) Select all packages under High Availability, Resilient storage. Click next to start installation of the operating system.

Note : At the end of the installation cman, luci, ricci, rgmanager, clvmd, modclusterd, gfs2-tools packages will get installed onto the system.

iii) After the operating system is installed, Restart the VM to boot into the VM and perform post installation tasks and shutdown the guest RHEL6.0 VM.


3) Cloning the RHEL6.0 VM image into two copies named as RHEL6-Cluster2 and RHEL6-Cluster3.

i) Open the datastore of your VMware ESXi by right clicking and selecting “Browse Datastore” on the datastore in the summary page of the ESXi console.

ii) Create two directories RHEL6-Cluster2 and RHEL6-Cluster3

iii) Copy the VM image files from RHEL6-Cluster1 directory to above two directories i.e., RHEL6-Cluster2 and RHEL6-Cluster3.

iv) Once you have copied the all the files to respective directory, browse to RHEL6-Cluster2 directory under datastore and locate “RHEL6-Cluster1.vmx” file, right click on it and select “Add to Inventory”.

v) In the “Add to Inventory” window add the VM as RHEL6-Cluster2 and finish the process

vi) Similarly perform previous step to add RHEL6-cluster3 to the inventory.

4) Adding a shared harddisk to all the 3 VM’s

a) Adding a hard disk for clustering to RHEL6-Cluster1 VM/node.

i) In vSphere Client select RHEL6-Cluster1 VM , Open Virtual Machine Properties window by right clicking and selecting “Edit Settings”.

ii) Click on “Add” in Virtual Machine Properties window , Add hardware window pops up.

iii) Select Hard Disk as device type, Click Next.

iv) Select “ Create a new virtual disk” and click Next.

v) Specify the required disk size and select Disk Provisioning as “Support clustering features such fault tolerance” and Location as “Store with the virtual machine” Click Next.

vi) In the Advanced Options window, Select the Virtual Device Node as : SCSI (1:0). Click Next. Complete the “Add hardware “ process.

vii) On the “ RHEL6-Cluster1 – VM properties window”, select SCSI controller 1 and change the SCSI bus sharing type from None to “Virtual” so that virtual disks can be shared between VM’s.

b) Sharing the RHEL6-Cluster1 node’s additional hard disk with other two VM/cluster nodes.

i) In vSphere Client select RHEL6-Cluster2 VM , Open Virtual Machine Properties window by right clicking and selecting “Edit Settings”.

ii) Click on “Add” in Virtual Machine Properties window , Add hardware window pops up.

iii) Select Hard Disk as device type, Click Next.

iv) Select “Use an existing virtual disk” and click Next.

v) Browse the datastore, locate RHEL6-cluster1’ directory and select RHEL6-Cluster1_1.vmdk ( Note : Additional hardisk will named as VMname _1 or 2 or 3.vmdk . Do not select RHEL6-Cluster1.vmdk as this your VMimage file) to add as second hard disk to the VM. Click Next.

vi) In the Advanced Options window, Select the Virtual Device Node as : SCSI (1:0). Click Next. Complete the “Add hardware “ process.

vii) On the “ RHEL6-Cluster2 – VM properties window”, select SCSI controller 1 and change the SCSI bus sharing type from None to “Virtual” so that virtual disks can be shared between VM’s.

c) Similarly perform the above steps described under section (b) for the 3rd node.

5) Configuring the static IP address, hostname and /etc/hosts file on all three nodes.

Assign the static IP addresses to all the three VM as below

Ex :

192.168.1.10 RHEL6-Cluster1

192.168.1.11 RHEL6-Cluster2

192.168.1.12 RHEL6-Cluster3

Gateway in this case is :192.168.1.1

DNS in this case is : 192.168.1.1

DOMAIN in this case is: linuxlabs.com

i) To Assign above IP and hostname Start all the three VM’s

ii) Note : When you have started the VM, The network manager daemon/service on RHEL6 would have started the network by getting an ipaddress from DHCP and assigning it to eth0 or eth1. Note down the hardware address of your Active Ethernet by running ifcfg command ( The HWaddr would be like 00:0C:29:86:D3:E6 etc as this needed to added into “/etc/sysconfig/network-scripts/ifcfg-eth0” depending upon which Ethernet port is active on your image.).

iii) Disable and stop the Network Manager daemon as other cluster related daemons require this daemon to be off.

To stop the network manager daemon, run:

/etc/init.d/NetworkManager stop

To disable the network manager daemon service , run:

Chkconfig –level 345 NetworkManager off

iv) Add the following details to “/etc/sysconfig/network-scripts/ifcfg-eth0” file

DEVICE="eth0"

NM_CONTROLLED="no"

ONBOOT="yes"

HWADDR=00:0C:29:96:D3:E6

TYPE=Ethernet

BOOTPROTO=none

IPADDR=192.168.1.10

PREFIX=24

GATEWAY=192.168.1.1

DNS1=192.168.1.1

DOMAIN=linuxlabs.com

DEFROUTE=yes

IPV4_FAILURE_FATAL=yes

IPV6INIT=no

NAME="System eth0"

UUID=5fb06bd0-0bb0-7ffb-45f1-d6edd65f3e03


Note : HWADDR and DEVICE may change from VM to VM.

v) Now add hostnames as RHEL6-cluster1 or RHEL6-Cluster2 or RHEL6-Cluster3 to “/etc/sysconfig/network” file inside each VM.

After adding the hostname the “/etc/sysconfig/network” file will look like as below:

NETWORKING=yes

HOSTNAME=RHEL6-Cluster1

vi) Now add hostname resolution information to /etc/hosts file. As below.


#192.168.1.232 RHEL6-Cluster1 # Added by NetworkManager

192.168.1.10 RHEL6-Cluster1.linuxlabs.com

#127.0.0.1 localhost.localdomain localhost

#::1 RHEL6-Cluster1 localhost6.localdomain6 localhost6

192.168.1.11 RHEL6-Cluster2.linuxlabs.com

192.168.1.12 RHEL6-Cluster3.linuxlabs.com

Note : Similarly perform the above steps on the other two VM’s .

vii) After configuring all the 3 VM’s , Restart the VM’s and Verify the network connection by pinging each other VM to confirm the network configuration is correct and working fine.


6) Configuring the cluster on RHEL6.0 with High Availability Management web UI.

i) Start the luci service on all the 3 nodes by running command in terminal.
service lcui start

ii) Start the ricci service on all the 3 nodes by running the command in terminal. Ricci daemon runs on 11111 port.

service ricci start

iii) Open the browser, type https://rhel6-cluster1.linuxlabs.com:8084/ to High Availability Management Console.

iv) Login into the console with your root user credentials.

v) Create a cluster as “mycluster”

vi) Add All the 3 client nodes to the cluster as below:

Node Host name Root Password Ricci Port

RHEL6-Cluster1.linuxlabs.com ********* 11111

RHEL6-Cluster2.linuxlabs.com ********* 11111

RHEL6-Cluster3.linuxlabs.com ********* 11111

Click on “Create Cluster” to create and Add all the nodes to the cluster.

By performing above action , the all the 3 nodes are now part of the cluster “mycluster” . cluster.conf under “/etc/cluster/cluster.conf “ on all the three nodes gets populated like some thing as below.

[root@RHEL6-Cluster1 ~]# cat /etc/cluster/cluster.conf


7) Creating GFS2 file system with clustering.

a) Once you have created a cluster and added all the 3 nodes as cluster member. Run the following command on all three nodes to verify the cluster node status.

ccs_tool lsnode

the output will be

[root@RHEL6-Cluster1 ~]# ccs_tool lsnode

Cluster name: mycluster, config_version: 1

Nodename Votes Nodeid Fencetype

RHEL6-Cluster1.linuxlabs.com 1 1

RHEL6-Cluster2.linuxlabs.com 1 2

RHEL6-Cluster3.linuxlabs.com 1 3


b) Now start the cman and rgmanager service on all 3 nodes by running command

service cman start

service rgmanager start

c) now check the status of your cluster by running the commands below.

clustat

cman_tool status

The output of the clustat command would be something like:


[root@RHEL6-Cluster1 ~]# clustat

Cluster Status for mycluster @ Wed Jul 6 16:27:36 2011

Member Status: Quorate

Member Name ID Status

------ ---- ---- ------

RHEL6-Cluster1.linuxlabs.com 1 Online, Local

RHEL6-Cluster2.linuxlabs.com 2 Online

RHEL6-Cluster3.linuxlabs.com 3 Online

The output of the cman_tool status command would be something like:


[root@RHEL6-Cluster1 ~]# cman_tool status

Version: 6.2.0

Config Version: 1

Cluster Name: mycluster

Cluster Id: 65461

Cluster Member: Yes

Cluster Generation: 48

Membership state: Cluster-Member

Nodes: 3

Expected votes: 3

Total votes: 3

Node votes: 1

Quorum: 2

Active subsystems: 9

Flags:

Ports Bound: 0 11 177

Node name: RHEL6-Cluster1.linuxlabs.com

Node ID: 1

Multicast addresses: 239.192.255.181

Node addresses: 192.168.1.10

d) Now we need enable clustering on LVM2 by running the command as below:

lvmconf –enable-cluster

e) Now we need to create the LVM2 volumes on the additional hard disk attached to the VM. Follow below commands exactly.

pvcreate /dev/sdb

vgcreate –c y mygfstest_gfs2 /dev/sdb

lvcreate –n mytestGFS2 –L 7G mygfstest_gfs2

Note : By executing the above list of commands serially we would have created physical lvm volume, volume group and logical volume.

f) Now start clvmd service on all 3 nodes by running:

service clvmd start

g) Now we have to create a GFS2 file system on the above LVM volume. To create the GFS2 file system , run the command as below:

Format of the command is as below.

mkfs -t -p -t : -j

mkfs -t gfs2 -p lock_dlm -t mycluster:mygfs2 -j 4 /dev/mapper/mygfstest_gfs2-mytestGFS2

this will format the LVM device and create a GFS2 file system .

h) Now we have to mount the GFS2 file system on all the 3 nodes by running the command as below:

mount /dev/mapper/mygfstest_gfs2-mytestGFS2 /GFS2

where /GFS2 is mount point. You might need to create /GFS2 directory to create a mount point for the GFS2 file system.

i) Congrats, your GFS2 file system setup with cluster is ready for use.

Run the below command to know the size and mount details of the file system by running:

mount

df -kh

8) Now that we have a fully functional cluster and a mountable GFS2 file system, we need to make sure all the necessary daemons start up with the cluster whenever VM are restarted.

chkconfig --level 345 luci on

chkconfig --level 345 ricci on

chkconfig --level 345 rgmanager on

chkconfig --level 345 clvmd on

chkconfig --level 345 cman on

chkconfig --level 345 modclusterd on

chkconfig --level 345 gfs2 on

a) If you want the GFS2 file system to be mounted at startup you can add the filesytem and mount point details to /etc/fstab file

echo "/dev/mapper/mygfstest_gfs2-mytestGFS2 /GFS2 gfs2 defaults,noatime,nodiratime 0 0" >> /etc/fstab


Wednesday, August 3, 2011

Make multiple phone calls using Gmail

Log in to your Gmail account.

On the left side of the screen, you should see a link named "Call Phone" in the Chat section. Click on that link, and a small dialer window will pop up in the lower right of your screen.

Before you can make your first call, you'll first need to download Google's voice plug-in, which you can do by clicking on the link for it in the dialer window.

You'll see a screen asking you to install voice and video chat. Install the plugin.

After the plug-in is installed, just reopen the voice dialer on your Gmail page and you can now make a call.


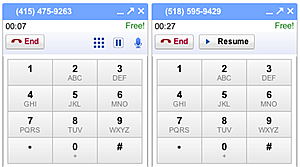
If you wish to make a second call and not lose the first one, simply click on the "Call Phone" link in the Chat section again. Your first call will automatically switch to hold. And as explained in the Picture, clicking on the Resume button will let you switch back and forth from one call to another.

Personality Development Notes