Managing Disk space on live servers is often a complex and also a time and energy consuming job. It can be made a lot more easier with use of Logical Volume Manager, or better known as LVM in short. This article is a complete guide on managing your disk space using LVM, its requirements and also some of the most commonly used LVM commands and files.
I came to face a situation in which a VDS - Virtual Dedicated Server (similar to VPS) master server had 100% disk space usage for “/” partition and the users were not able to upload files even of KB size to theirsites. The server had lots of nodes and it might have taken at-least 2 hours for it to come back online, if we reboot the server, as per its own custom settings. I was in a situation to solve that problem as quickly as possible.
Luckily the server had ‘Logical Volume Manager’ or ‘LVM’. I created a logical volume of 20GB size and moved some files to the newly created logical volume. The issue was solved instantly and I got hooked into LVM.
I researched about the technology in more depth and thought of sharing the LVM techniques I learned with you.
Introduction to LVM
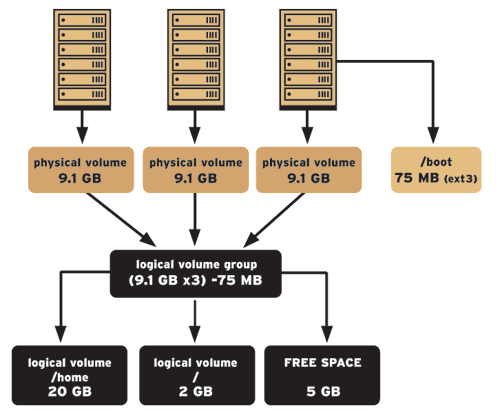
LVM stands for “Logical Volume Manager” which helps to manage the UNIX/Linux storage systems in a flexible way. LVM combines multiple hard drives into pools of storage space called Volume Groups. These volume groups are further subdivided into virtual hard disks which are called Logical Volumes. The logical volumes are used just like hard disk partitions in the non-LVM systems. The file systems will be created on these logical volumes and it will be mounted in the server. After mounting the logical volumes, we can use that logical partition. Unlike the normal hard disk partitions, the logical volumes can be expanded and shrunk without any problem, while the system is running.LVM was added to the Linux kernel from the 2.4.x series, so it is supported by almost all Linux distributions. Basically there are 2 versions of LVM. They are LVM1 and LVM2, LVM2 being the latest. It is also the most commonly used and more efficient version of LVM. LVM 2 needs the linux kernel module “device-mapper”. Device mapper support is present in the linux 2.6 kernel tree and there are patches for the 2.4 kernels. This article mainly describes the LVM2 tools.
LVM Benefits
- Fault tolerance can be achieved along scalability by using LVM in combination with RAID. It also provides for easy disk management.
- It Can create a logical volume and filesystem which spans multiple disks.
- Administrators can create different file systems for the logical volumes and can use that small partitions for different projects.
- You can easily add the free space to the logical volume group any time without distracting the current partition setup of the server.
Terminologies Used in LVM
Every technology have their own terms and definitions. LVM has also some terms in order to define its functions. I will briefly explain LVM terms in this session.- Physical Partitions or Physical Volume(PV) Physical volume (PV) are hard drives which is used as the base of LVM. It is the storage medium of LVM.
- Volume Group(VG) A group of “Physical Volume” is called “Volume Group”. It is the storage pool.
- Logical Volume(LV) Logical Volume is equivalent to a disk partition “/dev/sda” or “/dev/hda” in the non-LVM system. We have to mount the “Logical Volumes” in the server.
LVM Setup Order
The LVM setup order is given below. It starts from top to bottom.- Physical Drives (sda, sdb,sdc etc)
- Physical Volumes created from the Physical Drives(/dev/sda1, /devsdc2 etc)
- Volume Group comprising the physical volumes
- Logical Volumes (Thease are similar to the partitions in the non-LVM system)
- Mount points for the logical volumes(/home, /usr/, etc)
Requirements
If you need to use LVM, make sure the following support are present in your Linux system kernel.- Device-mapper Device-mapper is a generic framework to map one block device into another. It forms the foundation of LVM2. Device mapper support is present in the 2.6 linux kernel tree and there are patches available for current 2.4 linux kernels. If your Linuxsystem kernel does not have the device-mapper support, you have to install device-mapper and have to recompile the Linux kernel to enable the device-mapper support.
- LVM LVM must be installed in the server. Once installed, there are lot of commands to manage the logical volumes in the server.
- Device-mapper and LVM support in Linux Kernel You must ensure that the LVM support is enabled in your kernel. If the support is not enabled, you have to recompile the Linux kernel to enable that support.
Device-mapper Installation
These steps will help you to install device-mapper in your server.- Change the directory to /usr/src and get the device-mapper source code from the following link. ftp://sources.redhat.
- Untar the source code
- Change to the device-mapper source directory
- Configure device-mapper
- Compiling the device-mapper
- Install device-mapper
bash-3.1$ cd /usr/src/ bash-3.1$ wget ftp://sources.redhat.com/pub/dm/device-mapper.1.00.21.tgz –18:01:36– ftp://sources.redhat.com/pub/ dm/device-mapper.1.00.21.tgz => `device-mapper.1.00.21.tgz&aps Resolving sources.redhat.com… 209.132.176.174 Connecting to sources.redhat.com|209.132. 176.174|:21… connected. Logging in as anonymous … Logged in! ==> SYST … done. ==> PWD … done. ==> TYPE I … done. ==> CWD /pub/dm … done. ==> SIZE device-mapper.1.00.21.tgz … 875083 ==> PASV … done. ==> RETR device-mapper.1.00.21.tgz … done. Length: 875083 (855K) 100%[========================= =========>] 875,083 115K/s in 7.4s 18:01:48 (115 KB/s) - `device-mapper.1.00.21.tgz saved [875083]
bash-3.1$ tar -zxvf device-mapper.1.00.21.tgz
bash-3.1$ cd device-mapper.1.00.21
bash-3.1$ ./configure –with-kernel-dir=/usr/src/kernels/2.6.18-1.2798.fc6-i686
bash-3.1$ make
bash-3.1$ make installNow confirm the installation by checking for the module “libdevmapper.so” in the server.
LVM Installation
There are the steps to install LVM tool in the server.- Change the directory to /usr/src and get the LVM source code from the following link: ftp://sources.redhat.
- Untar the source code
- Change to the LVM source directory
- Configure LVM
- Compiling LVM
- Install LVM
bash-3.1$ cd /usr/src/ bash-3.1$ wget ftp://sources.redhat.com/pub/lvm2/LVM2.2.02.29.tgz –18:08:21– ftp://sources.redhat.com/pub/ lvm2/LVM2.2.02.29.tgz => `LVM2.2.02.29.tgz&aps Resolving sources.redhat.com… 209.132.176.174 Connecting to sources.redhat.com|209.132. 176.174|:21… connected. Logging in as anonymous … Logged in! ==> SYST … done. ==> PWD … done. ==> TYPE I … done. ==> CWD /pub/lvm2 … done. ==> SIZE LVM2.2.02.29.tgz … 537138 ==> PASV … done. ==> RETR LVM2.2.02.29.tgz … done. Length: 537138 (525K) 100%[========================= ==========================>] 537,138 140K/s in 3.7s 18:08:30 (140 KB/s) - `LVM2.2.02.29.tgz saved [537138]
bash-3.1$ tar -zxvf LVM2.2.02.29.tgz
bash-3.1$ cd LVM2.2.02.29
bash-3.1$ ./configure
bash-3.1$ make
bash-3.1$ make install
Recompiling Kernel
Now we have to configure and recompile kernel in order to enable the device-mapper support and LVM support in the kernel.You have to apply patch for the device-mapper in the current kernel if that does not have device-mapper support.
- Applying Device-mapper patch
- Change to linux kernel directory.
- Apply patch.
bash-3.1$ cd /usr/src/kernels/2.6.18-1.
2798.fc6-i686/ bash-3.1$ patch -p1 < /usr/src/device-mapper.1.00.
19/patches/kernelversion-rc1 -devmapper-ioctl.patch - Getting the menuconfig interface
- Enable the following options in the kernel configuration
- Recompile the kernel
bash-3.1$ make menuconfig
Multi-device support (RAID and LVM)
 [*] Multiple devices driver support (RAID and LVM)
 [] RAID support
 [ ] Linear (append) mode
 [ ] RAID-0 (striping) mode
 [] RAID-1 (mirroring) mode
 [ ] RAID-4/RAID-5 mode
 [ ] Multipath I/O support
 [*] Logical volume manager (LVM) support
 [*] Device-mapper support (NEW)
bash-3.1$ make dep clean bzImage
Using LVM
- Creating Physical Partition You can start partitioning by running the command fdisk on the target hard drive (for example, /dev/sda or /dev/sdc). Note that you should use ‘8e’ type of physical partition for LVM rather that than the normal ‘83′ type. In this example, I used the target hard drive as “dev/sdc”.
- Creating Physical Volume(PV) Now we have to create PV. PV can be created by “pvcreate” command. Lets assume that we have 2 physical partitions /dev/sdc1 and /dev/sde1.
- Creating Volume Group Now we need to create the Volume Group(VG) from the newly setup physical volumes.
- Create Logical Volume We are one step shot to create the logical volume which is similar to the physical partition in the non-LVM system. It can be created by the command “lvcreate”.
- File system for logical volume You have to add the file system in the newly created logical volume in order to use that.
- Mount the logical volume Create the mount point for the logical volume and then mount the logical volume.
- Add entry in the “/etc/fstab” file You have to add the following entry in the file “/etc/fstab” in order to enable that device even after the server boot.
bash-3.1$ fdisk /dev/sdcAfter executing the above command, you will get a command prompt with the message including the number of cylinders of the disk like this:
The number of cylinders for this disk is set to 1958.
 There is nothing wrong with that, but this is larger than 1024,
 and could in certain setups cause problems with:
 1) software that runs at boot time (e.g., old versions of LILO)
 2) booting and partitioning software from other OSs
 (e.g., DOS FDISK, OS/2 FDISK)
 Command (m for help):
You have to enter “n” (without quotes) in the prompt in order to create a new partition on the target hard drive. Enter ‘p’ to create a primary partition. Then you have to specify the size of the new partition in terms of cylinders within the specified limit. For that you have to enter the values which are within the specified limit. A primary partition is now created. Next we have to change the partition type of that partition. That is, change the partition’s system id value to 8e, instead of the default 83. You have to enter “t” to change the partition type. After changing the partition type of the selected partition, enter “w” for altering the partition table.
bash-3.1$ pvcreate /dev/sdc1 /dev/sdeNow the physical volumes are ready.
bash-3.1$ vgcreate test_vgname /dev/sdc1 /dev/sde
bash-3.1$ lvcreate -L 200 -n my_test_lv test_vgnameIt will create a logical volume with name “my_test_lv” in the volume group “test_vgname” and size will be 200MB.
bash-3.1$ mkfs -t ext3 /dev/test_vg/my_test_lv
bash-3.1$ mkdir /usr/test
bash-3.1$ mount /dev/test_vgname/my_test_lv /usr/test
/dev/test_vgname/my_test_lv /usr/test ext3 0 0You will be able to see the newly created logical volume in the result of the command “df -h”.
[root@localhost /]# df -h
 Filesystem Size Used Avail Use% Mounted on
 /dev/hdc2 15G 7.0G 6.6G 52% /
 /dev/hdc1 190M 32M 149M 18% /boot
 tmpfs 501M 0 501M 0% /dev/shm
 /dev/mapper/my_test_lv
 200M 177M 38G 1% /usr/test
 [root@localhost /]#
Resizing Logical Volumes
Extend Logical Volume
There are the steps to be taken in order to extend the size of the existing logical volumes.I will explain the steps with an example. Suppose the logical volume name is “/dev/test_vgname/my_test_lv” and the mount point is “/usr/test”.- Unmount the mount point directory for the logical volume “/dev/test_vgname/my_test_lv” which you want to extend.
- Extend the size of the logical volume “/dev/test_vgname/my_test_lv”.
- Apply the changes to the file system in the logical volume.
- Re-size the logical volume
- Mount the extended logical volume again
umount /usr/test
lvextend -L500 /dev/test_vgname/my_test_lv
e2fsck -f /dev/test_vgname/my_test_lv
resize2fs /dev/test_vgname/my_test_lv
mount /dev/test_vgname/my_test_lv /usr/test
Shrinking/Reducing Logical Volume
First we have to shrink the filesystem of the logical volume before we reduce the logical volume’s size.I am also explaining this section with an example. Suppose the logical volume name is “/dev/test_vgname/my_test_lv” and the mount point is “/usr/test”.
- Unmount the mount point directory for the logical volume “/dev/test_vgname/my_test_lv” which you want to extend.
- Apply the changes to the file system in the logical volume.
- Re-size the file system in the logical volume.
- Shrink the logical volume.
- Mount the reduced logical volume again
umount /usr/test
e2fsck -f /dev/test_vgname/my_test_lv
resize2fs /dev/test_vgname/my_test_lv blocksize
lvreduce -L200 /dev/test_vgname/my_test_lv
mount /dev/test_vgname/my_test_lv /usr/test
LVM commands and Examples
- pvcreate pvcreate command initializes entire hard disk or the physical partitions for the LVM usage. Syntax :
- vgcreate vgcreate will create a logical volume from the physical partitions which are already initialized by the pvcreate command. Syntax :
- lvcreate lvcreate will create the logical volumes from the newly created volume group. These are similar to the physical partitions in the non-LVM systems. Syntax :
- pvdisplay pvdisplay displays the physical partition details. Syntax :
- vgdisplay vgdisplay displays the volume group details in the server, ie the container for the logical volumes. Syntax:
- lvdisplay lvdisplay displays the logical volume details of the server. Syntax :
- vgextend vgextend command extends the size of the volume group by adding new physical partitions or hard disks to the already created volume group. Syntax:
- lvextend lvextend command extends the logical volume size in the server. Syntax :
- lvremove lvremove command removes the existing logical volumes from the server. Syntax :
- lvreduce lvreduce command will reduce the size of the logical volumes. Syntax:
- pvmove The above command will move the data from one physical volume to another. Syntax :
pvcreate partition partition .....Example:
[root@localhost ~]# pvcreate /dev/hdc4
 Physical volume “/dev/hdc4″ successfully created
 [root@localhost ~]#
The above command will initializes the 4th partition on the third hard disk for LVM usage.
vgcreate volume_group_name partition partition ...Example :
[root@localhost ~]# vgcreate test_vgname /dev/hdc4
 Volume group “test_vgname” successfully created
 [root@localhost ~]#
The above command will create a volume group with the 4th partition on the third hard disk. The name for the volume group will be “test_vgname”.
lvcreate -L size -n logical_volume_name volume_group_nameExample :
[root@localhost ~]# lvcreate -L100 -n test_lv test_vgname
 Logical volume “test_lv” created
 [root@localhost ~]#
The above command will create a logical volume from the volume group “test_vgname” with a size 100MB. You have to create file system on the newly created logical volume in order to mount that newly created logical volumes. The command will be like this.
[root@localhost ~]# mkfs -t ext3 /dev/test_vgname/test_lv
 mke2fs 1.39 (29-May-2006)
 Filesystem label=
 OS type: Linux
 Block size=1024 (log=0)
 Fragment size=1024 (log=0)
 25688 inodes, 102400 blocks
 5120 blocks (5.00%) reserved for the super user
 First data block=1
 Maximum filesystem blocks=67371008
 13 block groups
 8192 blocks per group, 8192 fragments per group
 1976 inodes per group
 Superblock backups stored on blocks:
 8193, 24577, 40961, 57345, 73729
 Writing inode tables: done
 Creating journal (4096 blocks): done
 Writing superblocks and filesystem accounting information: done
 This filesystem will be automatically checked every 32 mounts or
 180 days, whichever comes first. Use tune2fs -c or -i to override.
 [root@localhost ~]#
Mount command will be like the following.
[root@localhost ~]# mount /dev/test_vgname/test_lv /usr/local/test
 [root@localhost ~]#
You have to add the following entry in the file “/etc/fstab” in order to make the logical volume active in the server even after the server reboot.
/dev/test_vgname/test_lv /usr/local/test ext3 0 0
pvdisplayExample : [
root@localhost ~]# pvdisplay --- Physical volume --- PV Name /dev/hdc4 VG Name test_vgname PV Size 59.59 GB / not usable 0 Allocatable yes PE Size (KByte) 4096 Total PE 15254 Free PE 15229 Allocated PE 25 PV UUID MUc2av-FrNc-iqQM-60aQ-5LX5-The main variables in the pvdisplay command result are given below.4LQt-0FfjG3 [root@localhost ~]#
PV Name : Name of the physical partition
 VG Name : Volume group name in which the specified physical partition contains
 PV Size : Size of the physical partition
vgdisplayExample:
[root@localhost ~]# vgdisplay
 — Volume group —
 VG Name test_vgname
 System ID
 Format lvm2
 Metadata Areas 1
 Metadata Sequence No 2
 VG Access read/write
 VG Status resizable
 MAX LV 0
 Cur LV 1
 Open LV 1
 Max PV 0
 Cur PV 1
 Act PV 1
 VG Size 59.59 GB
 PE Size 4.00 MB
 Total PE 15254
 Alloc PE / Size 25 / 100.00 MB
 Free PE / Size 15229 / 59.49 GB
 VG UUID 63hHkT-HWEG-Gz5C-yzu0-nm1D-D2BV-xFMVnU
 [root@localhost ~]#
VG Name : Volume group name
 VG Size : Size of the volume group
 Cur LV : Number of LV&apss created from that Volume Group
 Open LV : Number of active LV&apss of that Volume Group
 Cur PV : Number of Physical Volumes contained in the Volume Group
 Act PV : Active Physical Volume of that Volume Group
 Format : This is the type of LVM
lvdisplayExample :
[root@localhost ~]# lvdisplay — Logical volume — LV Name /dev/test_vgname/test_lv VG Name test_vgname LV UUID 6FKjS4-cusv-zXRH-Zjmx-Qi6T-The main variables in the pvdisplay result are given below.tAoO-SZhKVw LV Write Access read/write LV Status available # open 1 LV Size 100.00 MB Current LE 25 Segments 1 Allocation inherit Read ahead sectors 0 Block device 253:0 [root@localhost ~]#
LV Name : Logical volume name
 VG Name : The volume group from which that logical volume is created
 LV Status : The status of the logical volume
 LV Size : Size of the logical volume
vgextend volume_group new_physical_ partitionExample :
[root@localhost ~]# vgdisplay — Volume group — VG Name new System ID Format lvm2 Metadata Areas 1 Metadata Sequence No 1 VG Access read/write VG Status resizable MAX LV 0 Cur LV 0 Open LV 0 Max PV 0 Cur PV 1 Act PV 1 VG Size 100.00 MB PE Size 4.00 MB Total PE 25 Alloc PE / Size 0 / 0 Free PE / Size 25 / 100.00 MB VG UUID oAzDGc-InRZ-6HCn-EnJ2-Hkk9-[root@localhost ~]# vgextend new /dev/hdc4 Volume group “new” successfully extended [root@localhost ~]#0pL2-e7jKNE
[root@localhost ~]# vgdisplay
 — Volume group —
 VG Name new
 System ID
 Format lvm2
 Metadata Areas 2
 Metadata Sequence No 2
 VG Access read/write
 VG Status resizable
 MAX LV 0
 Cur LV 0
 Open LV 0
 Max PV 0
 Cur PV 2
 Act PV 2
 VG Size 59.68 GB
 PE Size 4.00 MB
 Total PE 15279
 Alloc PE / Size 0 / 0
 Free PE / Size 15279 / 59.68 GB
 VG UUID oAzDGc-InRZ-6HCn-EnJ2-Hkk9-0pL2-e7jKNE
lvextend -L+size logical_volume_nameExample :
[root@localhost ~]# umount /root/test
 [root@localhost ~]# df -h
 Filesystem Size Used Avail Use% Mounted on
 /dev/hdc2 15G 7.0G 6.6G 52% /
 /dev/hdc1 190M 32M 149M 18% /boot
 tmpfs 501M 0 501M 0% /dev/shm
 [root@localhost ~]#
[root@localhost ~]# lvextend -L+30G /dev/test_vgname/test_lv
 Extending logical volume test_lv to 40.00 GB
 Logical volume test_lv successfully resized
 [root@localhost ~]#
[root@localhost ~]# e2fsck -f /dev/test_vgname/test_lv
 e2fsck 1.39 (29-May-2006)
 Pass 1: Checking inodes, blocks, and sizes
 Pass 2: Checking directory structure
 Pass 3: Checking directory connectivity
 Pass 4: Checking reference counts
 Pass 5: Checking group summary information
 /dev/test_vgname/test_lv: 11/1310720 files (9.1% non-contiguous),
 46895/2621440 blocks
 [root@localhost ~]#
[root@localhost ~]# resize2fs /dev/test_vgname/test_lv
 resize2fs 1.39 (29-May-2006)
 Resizing the filesystem on /dev/test_vgname/test_lv to 10485760 (4k) blocks.
 The filesystem on /dev/test_vgname/test_lv is now 10485760 blocks long.
 [root@localhost ~]#
[root@localhost ~]# mkdir test2
 [root@localhost ~]# mount /dev/test_vgname/test_lv test2
 [root@localhost ~]#
[root@localhost ~]# df -h
 Filesystem Size Used Avail Use% Mounted on
 /dev/hdc2 15G 7.0G 6.6G 52% /
 /dev/hdc1 190M 32M 149M 18% /boot
 tmpfs 501M 0 501M 0% /dev/shm
 /dev/mapper/test_vgname-test_lv
 40G 30M 38G 1% /root/test2
 [root@localhost ~]#
lvremove logical_volume_nameExample :
[root@localhost ~]# df -h Filesystem Size Used Avail Use% Mounted on /dev/hdc2 15G 7.0G 6.6G 52% / /dev/hdc1 190M 32M 149M 18% /boot tmpfs 501M 0 501M 0% /dev/shm /dev/mapper/test_vgname-hello 20M 172K 19M 1% /root/test /dev/mapper/test_vgname-test_lv 49G 5.1M 46G 1% /usr/local/test [root@localhost ~]# [root@localhost ~]# umount /root/test [root@localhost ~]# lvremove /dev/test_vgname/hello Do you really want to remove active logical volume “hello”? [y/n]: y Logical volume “hello” successfully removed [root@localhost ~]# df -h Filesystem Size Used Avail Use% Mounted on /dev/hdc2 15G 7.0G 6.6G 52% / /dev/hdc1 190M 32M 149M 18% /boot tmpfs 501M 0 501M 0% /dev/shm /dev/mapper/test_vgname-test_ lv 49G 5.1M 46G 1% /usr/local/test [root@localhost ~]#
lvreduce -Lsize logical_volume_nameExample :
[root@localhost ~]# df -h
 Filesystem Size Used Avail Use% Mounted on
 /dev/hdc2 15G 7.0G 6.6G 52% /
 /dev/hdc1 190M 32M 149M 18% /boot
 tmpfs 501M 0 501M 0% /dev/shm
 /dev/mapper/test_vgname-hello
 20M 172K 19M 1% /root/test
 [root@localhost ~]#
 [root@localhost ~]# umount /root/test
 [root@localhost ~]#
 [root@localhost ~]#
 [root@localhost ~]# e2fsck -f /dev/test_vgname/hello
 e2fsck 1.39 (29-May-2006)
 Pass 1: Checking inodes, blocks, and sizes
 Pass 2: Checking directory structure
 Pass 3: Checking directory connectivity
 Pass 4: Checking reference counts
 Pass 5: Checking group summary information
 /dev/test_vgname/hello: 11/5136 files (9.1% non-contiguous), 825/20480 blocks
 [root@localhost ~]# lvreduce -L10M /dev/test_vgname/hello
 Rounding up size to full physical extent 12.00 MB
 WARNING: Reducing active logical volume to 12.00 MB
 THIS MAY DESTROY YOUR DATA (filesystem etc.)
 Do you really want to reduce hello? [y/n]: y
 Reducing logical volume hello to 12.00 MB
 Logical volume hello successfully resized
 [root@localhost ~]# mount /dev/test_vgname/hello test
 [root@localhost ~]# df -h
 Filesystem Size Used Avail Use% Mounted on
 /dev/hdc2 15G 7.0G 6.6G 52% /
 /dev/hdc1 190M 32M 149M 18% /boot
 tmpfs 501M 0 501M 0% /dev/shm
 /dev/mapper/test_vgname-hello
 10M 172K 19M 1% /root/test
 [root@localhost ~]#
pvmove physical_volume1 physical_volume2Example :
pvmove /dev/sdc1 /dev/sdc2This will move the data from the physical volume /dev/sdc1 to /dev/sdc1
LVM Files
- Configuration File The lvm configuration file is “lvm.conf” and it is located in “/etc/lvm”.
- LVM archive directory The archive directory is located in “/etc/lvm”.
- Backup Directory Backup directory is “/etc/lvm/backup“. It contains the details about the volume groups which we create in the server.
[root@localhost lvm]# pwd
 /etc/lvm
 [root@localhost lvm]# ll lvm.conf
 -rw-r–r– 1 root root 10538 May 13 01:33 lvm.conf
 [root@localhost lvm]#
[root@localhost archive]# pwd
 /etc/lvm/archive
 [root@localhost archive]# ls
 myvgm_00000.vg new_00000.vg
 test_vgname_00001.vg test_vgname_00006.vg test_vgname_00011.vg
 myvgm_00001.vg new_00001.vg
 test_vgname_00002.vg test_vgname_00007.vg test_vgname_00012.vg
 myvgm_00002.vg new_00002.vg
 test_vgname_00003.vg test_vgname_00008.vg test_vgname_00013.vg
 myvgm_00003.vg new_00003.vg
 test_vgname_00004.vg test_vgname_00009.vg test_vgname_00014.vg
 myvgm_00004.vg test_vgname_00000.vg
 test_vgname_00005.vg test_vgname_00010.vg test_vgname_00015.vg
 [root@localhost archive]#
LVM Options
By default some of the options for LVM are not enabled. You can change the options in the configuration file “/etc/lvm.conf” to change the default values. Some of the important variables are given below.- The volume group location The volume groups are creates in the location “/dev” by default. You can change that settings by changing the value of the variable “dir” in the configuration file.
- LVM log file By defult there will not be any log file for the LVM. You can enable the log file for LVM by adding the log file location to the variable “file” in the configuration file. Example:
- Log file Overwrite You can overwrite or append the details to the LVM file. The variable is “overwrite”. Its a binary variable. If the valuse is “0″, the contents will be appended to the log file. If it is “1″, the log file will be overwritten.
- Level of log file. The level of lvm log message can be determined by the variable “level”. The level ranges from 0-7. The most verbose level is 7.
- Metadata Backup You can enable the backup for the metadata of the lvm using the variable “backup”. Its also a binary variable. If the value is “0″, backup will not be there. If the value is “1″, backup will be kept in the server.
- Backup Directory The backup directory can be added to the variable “backup_dir”. By default the location will be “/etc/lvm/backup”.
- Metadata Archive You can enable archive for the metadata of lvm using the variable “archive”. Its also a binary variable. If the value is “0″, archive will not be there. If the value is “1″, archive will be kept in the server.
- Metadata Directory The archive directory can be added to the variable “archive_dir”. By default the location will be “/etc/lvm/archive”.
- Minimum Number of Archive Files You can set the minimum number of archive files in the variable “retain_min”.
- Minimum time of Archive Files You can set the minimum number of days in which archive files can be kept in the server by changing the value of the variable “retain_days”.
file = "/var/log/lvm2.log
Conclusion
We usually give large space for the partitions which we use more and give less space to the partitions which we do not use regularly. In some situations, the disk space for the regularly using partition will be filled up quickly even though there are lot of space in the hard disk. LVM helps to shrink the space of the unused partitions and to extend the space filled partitions easily and effectivelyLVM also helps to manage the disk space utilization by combining the space of all the hard disks of the server. So its time to start your experiments with LVM.
References:
http://www.ibm.com/http://www.netadmintools.com/
http://howtoforge.com/linux_