This Blog is intended to collect information of my various Intrests,pen my opinion on the information gathered and not intended to educate any one of the information posted,but are most welcome to share there view on them
The leading configuration management and orchestration tools take different paths to server automation
Puppet or Chef? Ansible or Salt? Whereas Puppet and Chef will appeal to developers and development-oriented shops, Salt and Ansible are much more attuned to the needs of system administrators. Ansible's simple interface and usability fit right into the sys admin mindset, and in a shop with lots of Linux and Unix systems, Ansible is quick and easy to run right out of the gate.
Salt is the sleekest and most robust of the four, and like Ansible it will resonate with sys admins. Highly scalable and quite capable, Salt is hamstrung only by the Web UI.
Puppet is the most mature and probably the most approachable of the four from a usability standpoint, though a solid knowledge of Ruby is highly recommended. Puppet is not as streamlined as Ansible or Salt, and its configuration can get Byzantine at times. Puppet is the safest bet for heterogeneous environments, but you may find Ansible or Salt to be a better fit in a larger or more homogenous infrastructure.
Chef has a stable and well-designed layout, and while it's not quite up to the level of Puppet in terms of raw features, it's a very capable solution. Chef may pose the most difficult learning curve to administrators who lack significant programming experience, but it could be the most natural fit for development-minded admins and development shops.
Orchestrators at a glance
Puppet 3.0
Chef 11.4
Ansible 1.3
Salt 0.17
Pros
Modules can be written in Ruby or a simpler, Puppet-specific subset of Ruby
Push commands let you trigger modifications immediately
Web UI handles reporting, inventorying, and real-time node management
Detailed and in-depth reporting on agent runs and node configurations
Cookbooks and recipes can leverage the full power of Ruby
Centralized JSON-based "data bags" allow scripts to populate variables during runtime
Web UI lets you search and inventory nodes, view node activity, and assign Cookbooks, roles, and nodes
Modules can be written in nearly any language
No agent required on managed clients
Web UI lets you configure users, teams, and inventories, and apply Playbooks to inventories
Extremely simple to set up and get running
State files can be simple YAML configuration templates or complex Python or PyDSL scripts
Can communicate with clients through SSH or through a locally installed agent
Web UI offers views of running jobs, minion status, and event logs, and lets you execute commands on clients
Extremely scalable
Cons
Requires learning Puppet DSL or Ruby
Installation process lacking in error checking and error reporting
Requires knowledge of Ruby programming
Currently lacks functional push commands
Documentation is sometimes vague
Lacks support for Windows clients
Web UI doesn't tie into an existing Ansible deployment automatically; inventories must be imported
Web UI is not as mature or complete as competitors
Lacks deep reporting capabilities
Pricing
Free open source version; Puppet Enterprise costs $100 per machine per year
Free open source version; Enterprise Chef free for 5 machines, $120 per month for 20 machines, $300 per month for 50 machines, $600 per month for 100 machines, and so on
Free open source version; AWX free for 10 machines, then $100 or $250 per machine per year depending on support
Free open source version; SaltStack Enterprise costs $150 per node per year, with volume discounts and site licenses available
Look to these automation, orchestration, and configuration management tools to keep your server farms running smoothly..
Clever cloud tools
Was it only a few years ago when deploying a single server was a big occasion? First we needed to unpack it, mount it, test it, and install the software. Then we could put it to work.
Today, we're asked to spin up 200 servers before lunch, configure them, crunch some numbers, and return them before the 1 p.m. staff meeting. Time is money, and servers are bought by the hour now.
That explains the explosion of interest in tools that let us manage hundreds of machines with a few quick clicks. Here's a list of some of the most intriguing new tools for making our server farms jump to attention in less time than it took to slice open the tape on a server box.
Ganglia
More than a dozen years ago, developers at U.C. Berkeley looked at the clusters of computers throughout the campus and realized they needed a way to keep track of them -- so they built and rebuilt Ganglia. Today, Ganglia is one of the most comprehensive sets of tools for monitoring a diverse cluster of machines. It collects statistics with a lightweight protocol and graphs them so that you can watch performance over time.
Distributed with the BSD license.
Graphite
There are hundreds of graphing libraries and visualization tools, but they're usually aimed at a fairly static collection of data. Graphite is designed to support real-time data from dozens of streams. The data goes in one side of the application, where it's stored in a real-time, scalable database optimized to handle the numerical streams of information. The system is designed to keep up with fast streams of data from multiple sources. There's even an elaborate caching system to make sure the graphs are up to date.
The back end is written in pure Python, and the Web app on top of Django. The graphing is done with the Cairo libraries. Orbitz built the software to handle internal monitoring, then released it with the Apache...
Tattle
Tools like Graphite and Ganglia may make it easier to monitor the state of the system, but they require someone to sit and watch the screen as the lines dance up and down. Tattle is designed to watch the graphs for you, then send off alerts if a line crosses over into some place it's not supposed to be. These alerts usually go out as text messages and emails, but you can configure them with a plug-in if you want special behavior like a warning siren and flashing red light connected to an Arduino controller.
Written in PHP for both Graphite and Ganglia.
Logstash
There are only three things that are certain for sys admins: death, taxes, and logs full of events. The earth goes 'round the sun, and the log files fill up with entries about visits to the websites and all of the random housekeeping around the stack.
Logstash is an open source package designed to put a pretty face on the endless streams of data. It parses the entries, segments them, and builds graphs so that you can drill down looking for items that need investigating, all through the Web interface. If you need to customize the system, you can write new filter plug-ins that fit into the flow of data.
Distributed under the Apache 2.0 license.
Kibana
Logstash may build elegant, rolling log files, but these can only be searched with basic queries. Kibana is glue between Logstash and Elasticsearch. It dumps Logstash log information into Elasticsearch so that you can write Lucene queries to find what you want. Not only can you use Boolean searches and wild cards to pick through the log files, but Kibana goes one step further by running these queries periodically and packaging the results into a dashboard that's also published with RSS and some other standards.
Available under the MIT license.
CloudVelocity
Everyone loves the idea of the cloud, but no one wants to let go of the security of owning the servers. CloudVelocitywants to ease companies into the cloud (specifically Amazon Web Services for now) by offering a hybrid that mixes the cloud machines with the private boxes. Moving data and operations between the two is meant to be as easy as possible, perhaps as easy as dragging some icons across a Web page. The company promises to let you test your operations with separate test rigs built by cloning existing machines. Now if only it would let us clone ourselves so we can get everything done that the management wants.
Ravello Systems
Another tool for easy cloud migration, Ravello is a layer that sits on top of the major clouds (Amazon, HP, Rackspace) and helps development teams deploy multitier apps into these clouds for testing. You upload the VMs into Ravello and use the drag-and-drop GUI to map out their relationships; Ravello spins them up in the cloud while preserving their network and storage configurations. It's one key feature lets you get several VMs running on just one cloud machine, a nice enhancement if you happen to have a bunch of lightweight VMs that don't need a full machine.
Vagrant
A long time ago, developing software was more straightforward. You had your favorite editor and the compiler. Your file either compiled or it didn't. Today, life is much more complex. There are libraries galore and extra tools for pre-processing or post-processing or housekeeping. All of these are updated periodically, ensuring that everyone on the development team ends up with diverging environments. Eventually, code will compile on some machines and not others, causing the developers to start pointing fingers.
Vagrant juggles all of the packages for all of the tools so that everyone is working with the same environment. It smooths out the differences and ensures that the libraries and dependencies are in sync, saving everyone the hair-pulling and blame-casting.
Available under the MIT license.
SaltStack
Keeping a cloud of machines working together is not so simple, especially if you want new machines to come and go on demand. Salt is an open source cloud management tool that offers a Python-based communications backbone that links together the "master" and "minion" nodes. The master issues orders, and the minions carry them out. SaltStack, a "branch" of Salt backed by professional support, boasts deployments of several hundred thousand managed machines.
Salt is developed under the Apache 2.0 license.
Ubuntu Juju
Ubuntu's Juju is a project that starts to hide the machines behind a wall of services. In Juju the façade is called a "charm," which is the packaging wrapped around the service. Behind the façade is a load balancer that can ask any number of machines to answer the request for data. If you need more power, you can add more machines to each charm without reconfiguring anything else. The load balancer inside the charm knows what to do with the extra help. Ubuntu already offers a number of standard charmsthat are ready to deploy, or you can customize them for your own needs.
Ubuntu Juju is released under the GNU Affero Public License.
Chef
Chef is one of the two big tools used for configuration management. If you like writing straightforward code in Ruby for installing the right packages for your new machines, Chef is the tool for you. You write the instructions for which packages should be installed in which order, then Chef does the work for you. There is a wide variety of plug-ins ready to install many common packages.
Puppet
The other major configuration management tool is Puppet. While many features are the same, the main language for specifying which packages are necessary is a bit different. Puppet asks you for a list of dependencies, then figures out how to install the right packages so that everything is ready to run. Puppet Labs maintains a large collection of plug-ins that simplify many chores.
National Train Enquiry System App
Official Indian Railways app for travelers using railways for taking holiday vacation trips, official trips, tours, and daily commute. Site provides train-running related and real-time status queries for all trains of India.
PlayOnLinux is a piece of software which allows you to easily install and use numerous games and apps designed to run with Microsoft® Windows®. Few games are compatible with GNU/Linux at the moment and it certainly is a factor preventing the migration to this system. PlayOnLinux brings a cost-free, accessible and efficient solution to this problem.
What are PlayOnLinux's features?
Here is a non-exhaustive list of the interesting points to know:
You don't have to own a Windows® license to use PlayOnLinux.
PlayOnLinux is based on Wine, and so profits from all its features yet it keeps the user from having to deal with its complexity.
PlayOnLinux is free software.
PlayOnLinux uses Bash and Python.
Nevertheless, PlayOnLinux has some bugs, as every piece of software:
Occasional performance decrease (image may be less fluid and graphics less detailed).
Not all games are supported. Nevertheless, you can use our manual installation module.
Run Windows Software on Linux the Simple Way
Whether you are new to Linux or an old pro, CrossOver can get your Windows productivity applications and PC games up and running on your Linux quickly and easily. Run the Windows software that you need on Linux at home, in the office or at school without purchasing a Windows license, without rebooting your computer and without having to use a virtual machine with CrossOver Linux today. CrossOver can run a wide range of Windows software and games. To see how your favorite application runs under CrossOver, please check What Runs, or search for it using the search tool at the top of this page. And be sure to download our risk free 14 day trial.
http://www.techrepublic.com/article/cloudmagic-email-for-the-highly-connected/#ftag=RSS56d97e7 CloudMagic. This app offers greater email options for those who need more.
There are so many email clients for Android that it's often hard to sift through the pile to find something the masses could really make use of. Thankfully, I came across CloudMagic. It's a Gmail-interface wanna be for any number of email accounts you might use. Out of the box, CloudMagic makes it simple to connect to services like:
Gmail
Google Apps
Office 365
Yahoo Mail
Hotmail/Outlook
Exchange
iCloud
Or you can opt to connect to an IMAP account (I'm glad to see they left POP out of the mix). CloudMagic also features:
Lightning fast, powerful email search
Unified inbox
Integrated with tools like: Salesforce.com, Zendesk, Pocket, Evernote, Trello, and MailChimp
Complete support for Microsoft Exchange (2003, 2007, 2010, and 2013 -- ActiveSync, EWS, IMAP)
Set reminders
Push notifications
Access your inbox, search, and preview your emails even when you are offline
Passcode lock
Move to folders/labels
Threaded conversation view
Quick swipe actions from inbox
As you can see, CloudMagic has plenty of features to make any Android user happy. Let's install this app and connect a few accounts.
Installation
The installation of CloudMagic is quite simple. Just follow these steps:
Open the Google Play Store on your Android device
Search for CloudMagic
Locate and tap the entry for CloudMagic (by CloudMagic, Inc)
Tap Install
Read through the permissions list
If you are okay with the permissions, tap Accept
Once the installation is complete, launch the app from either the home screen or the application drawer.
First run
When you first run CloudMagic, you'll be prompted to configure an email account (Figure A).
Figure A
CloudMagic on a Verizon-branded HTC One Max.
Let's connect a Gmail account first. To do this, tap the Gmail icon, and then enter your Gmail credentials. Note: If you have two-step verification, you'll be prompted for your verification code (so have one handy). You'll then be prompted to grant permissions for CloudMagic to work with your Gmail account. Tap Allow access, and you're finished.
Now, let's add an IMAP account. To do this, tap the IMAP icon, and then fill in the necessary information (Figure B).
Figure B
Setting up an IMAP account in CloudMagic.
After you fill out the necessary information, tap the ADD button at the bottom, and CloudMagic will attempt a connection to add the account. After accounts are added, they'll be listed at the top of the main screen. When you're done adding accounts, tap on the I'm done button at the bottom of the window. This will take you to the unified inbox for all of your accounts.
Cards
The Card system is pretty unique and allows you to easily connect to various services. With this, you can do things quickly, save something to Evernote, or interface your email to Zendeskor Tello.
Getting to the Card system is not very intuitive. You can look around the interface all day and not find a single clue. But if you open an email, you'll notice a small square icon (to the left of the Reply button -- Figure C).
Figure C
Finding the Card system in CloudMagic.
Tap that square icon to open up the Card system. When the Card window opens, tap on the plus sign [+] to add a new card. Scroll through the listing, and find the card you want to add. When you locate the card, tap the plus sign [+] associated with the card (Figure D). Once the card is added, tap the login button to login to that service.
Figure D
Adding MailChimp to the CloudMagic Card system.
A nice sample of how this works is having the ability to open up an email and then quickly add the sender's email address to MailChimp by tapping the Add to MailChimp button (Figure E). The MailChimp connection is something very handy for users like me who uses MailChimp to announce book releases). If the available Cards don't suit you, there are more on the way.
Figure E
Adding an email to your MailChimp mailing list.
CloudMagic is one of my new favorite Android email apps -- even if for only the Card system. This unique feature makes CloudMagic an email app that's worth checking out.
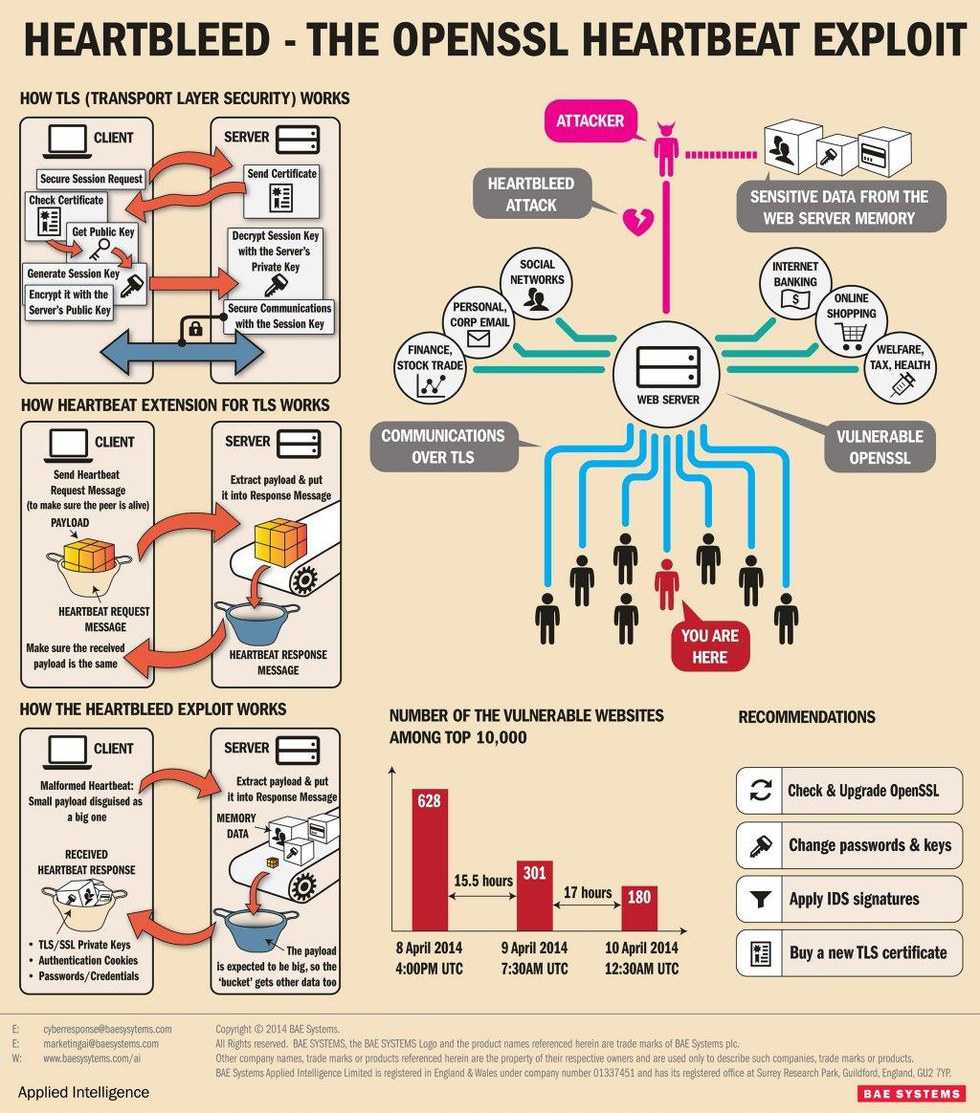
Heartbleed Detector, an app that will tell you if you’re running a vulnerable version of Android on your phone. While everyone has been talking about how Heartbleed affects servers and Internet infrastructure, it also affects mobile devices. Our detector app will help you figure out if your device is one of them.
The Heartbleed Bug is a serious vulnerability in the popular OpenSSL cryptographic software library. This weakness allows stealing the information protected, under normal conditions, by the SSL/TLS encryption used to secure the Internet. SSL/TLS provides communication security and privacy over the Internet for applications such as web, email, instant messaging (IM) and some virtual private networks (VPNs).
The Heartbleed bug allows anyone on the Internet to read the memory of the systems protected by the vulnerable versions of the OpenSSL software. This compromises the secret keys used to identify the service providers and to encrypt the traffic, the names and passwords of the users and the actual content. This allows attackers to eavesdrop on communications, steal data directly from the services and users and to impersonate services and users.
Image Resizer for Windows is a utility that lets you resize one or more selected image files directly from Windows Explorer by right-clicking. I created it so that modern Windows users could regain the joy they left behind with Microsoft's Image Resizer Powertoy for Windows XP. https://imageresizer.codeplex.com/
The tutorialspoint is an absolutely FREE website which has been created to provide quality online education to the people who are enthusiastic to study different technical and non-technical subjects in "Simply Easy Learning" way.... http://www.tutorialspoint.com/more.htm http://www.w3schools.com/
I've found three such services that warrant your time and effort. Each of them offer pretty much the same service:
Build an app that contains various types of pages
Include their ads (or pay a premium to remove the ads)
Publish the app to the Google Play Store
What's key to this is the type of pages these services offer. You won't be creating seriously in-depth, interactive tools. But you can add pages to your app like:
RSS feeds
Websites
YouTube channels
Photos
Videos
Social links
About
Audio player (with custom audio track)
PDF
Contact
Phone
SHOUTcast Radio
Custom pages
Let's examine each of these three services and see which one is best suited for creating your businesses Android app.
1. Andromo
The Andromo service is one that will allow you to pretty much customize your app how you want it, within some very tight limitations. You build your app by adding Activities. Once you've created a project (you can only create one with the free subscription), you then click the Activities drop-down (Figure A) and select which activity to add. Once you've added an Activity, you can then fill in the details (such as URL, RSS feed, images, audio, and more).
Figure A
The Andromo Activities list.
Once you've created all of your Activities, you can then:
Edit styles
Create a dashboard (with background image)
Set up monetization (displaying third-party ads)
Add services (such as Google Analytics)
Finally, with a single click, you build your app. After the app is built, it's up to you to get the app distributed. Besides the limitation of what you can add to the app, this is one of the biggest misses of Andromo. There's no facility within the service to help publish your app. You're on your own.
Andromo is the only service in the listing that has a paid offering, which allows you to create more than one app and rid your app(s) of ads.
2. AppsBar
The AppsBar app builder offers a bit more in the way of features. Your first step is to select a category. Depending on the category you choose, you'll have different options to add. Most every category offers the ability to add websites, contact info, and social networks. However, some categories allow for further additions. For example:
Real estate: Request info, properties, services
Online business: Employees, services, coupons
Restaurant: Menus, events, reservations
Salon: Staff, services, gallery, appointments
Author books: Schedule, release info
The list goes on (there are quite a few categories). You can also add forms and ecommerce to your app.
From the Page Manager (Figure B), you walk through the editing of each piece of your app (editing the name and information for each page).
Figure B
The Appsbar app manager page.
As you build the app, you can do real-time testing with the emulator on the right side of the window. This makes for a very simple process. Once you've completed adding and editing, click Publish. If there's any information missing from the various pages or app settings, you'll be prompted to made adjustments. If there are no problems, click Continue To Publish and then fill out the necessary information for the app (keywords, title, etc) and send the app off for review.
Appsbar has a significant review process in place. They'll comb through every aspect of your app and make sure it's modified to meet the needs of the app store. Once the app has passed review, it will be published to their Appcatch where they'll then help you get your app pushed to the app stores desired.
3. AppsGeyser
In similar fashion to both Andromo and Appsbar, AppsGeyser allows you to easily create an app for your business. However, unlike Appsbar, you're quite limited to what you can add. AppsGeyers allows the addition of:
Web pages
Offline content (like ebooks)
TV channels (there's an extensive listing of channels that can be added)
Social feeds
You won't be adding ecommerce or selecting from various categories to fine-tune your app. This one is very basic, but it can at least get you started. The one thing AppsGeyser does have is the ability to easily submit your app to the Google Play Store, to the AppsGeyser Market, and even using a QR code for easy download (Figure C).
Figure C
Publishing your app with AppsGeyser is simple.
AppsGeyser also allows you to edit the permissions your app needs, such as:
App can set wallpaper
App can add shortcut to home screen
App can write files to external storage
The truth about AppsGeyser is that its fit for business is slim. But if you're just looking to get an app that offers information about your company (and not much more), and you want an easier path to get your app into the Google Play Store, this is the service to start with.
Codeless app building for business has a ways to go. As it stands, it will never best having in-house staff to build your app. But if you're looking to get something out there (in some cases, something very basic), and you're willing to spend a bit of time and effort to do so, you should give one of these services a try.
For the time being, programmers have nothing to fear from these services. But if they continue to evolve, things could easily change.
WebScaleSQL is a collaboration among engineers from several companies that face similar challenges in running MySQL at scale, and seek greater performance from a database technology tailored for their needs.
Our goal in launching WebScaleSQL is to enable the scale-oriented members of the MySQL community to work more closely together in order to prioritize the aspects that are most important to us. We aim to create a more integrated system of knowledge-sharing to help companies leverage the great features already found in MySQL 5.6, while building and adding more features that are specific to deployments in large scale environments. In the last few months, engineers from all four companies have contributed code and provided feedback to each other to develop a new, more unified, and more collaborative branch of MySQL.
But as effective as this collaboration has been so far, we know we’re not the only ones who are trying to solve these particular challenges. So we will keep WebScaleSQL open as we go, to encourage others who have the scale and resources to customize MySQL to join in our efforts. And of course we will welcome input from anyone who wants to contribute, regardless of what they are currently working on.
http://www.techrepublic.com/article/secure-your-google-account-with-a-little-2-step-shuffle/#ftag=RSS56d97e7 Security has become issue number one for many companies, people, services, and devices. With more people hopping over to the cloud, having tight security could mean the difference between your data being secure and your data being stolen. This has become especially true with the massive use of mobile devices to connect to those accounts.
Your Google account is no exemption. If you have a simple password, that account will most likely get hacked. If you have a complex password, the possibility decreases. With 2-step verification, the likelihood of your account getting hacked is even further reduced (drastically even).
What is 2-step verification and how do you get it? Simple — after you set up 2-step verification, you enter your Google account password, and then you're prompted for a passcode that's sent to your mobile device (via text, voice call, or the mobile app).
“Mobile app,” you say? Why yes. Google has created an Android app, Google Authenticator, that makes 2-step authentication simple. Google Authenticator works like this:
Log into your Google account the standard way (again, on your PC)
When prompted, the 2-step code will be sent via the method you set up
Enter the code to authenticate your login
Enjoy your Google account with its new level of security
Setting up your account for 2-step
Before you can make use of the Google Authenticator app, let the 2-step verification wizard help you through the simple set up on your PC. The first step of the wizard requires you to log into your Google account. This is a standard login (your email address and password associated with that account). The second step (Figure A) prompts you to enter a mobile phone number so that Google can send an electronic message with the verification code. This code will be used to authenticate against untrusted computers.
Figure A
Setting up 2-step authentication for your Google Account.
You'll immediately receive either a text or voice message (whichever you chose to use) with a verification code. Enter that code and click Verify (in the 2-step wizard). The next step will ask if you want to trust the computer you’re on. If so, keep Trust this computer checked and click Next. If not, uncheck the Trust this computer box and click Next.
The final step of the wizard is to confirm the enabling of 2-step verification. All you have to do is click Confirm, and you’re done. 2-step verification is now activated for your Google account.
After 2-step is established, you have to reconnect all of your apps. You'll be prompted (once you’ve completed the last step of the 2-step setup) to click the Reconnect my apps button. After clicking this button, you'll be asked to log back into your account and retrieve the backup codes. You can refer to your phone for the backup codes, or you can retrieve them by following these steps:
Click on the Go to my settings button
Scroll down to Backup options
Follow the instructions for Backup codes
Either print those codes or save them as a text file. That's how you'll gain access to your account, should you ever not have your phone handy.
Google Authenticator
As I mentioned before, there are three ways to get your verification codes:
SMS
Voice message
Google Authenticator
The nice thing about the Google Authenticator app is that it can generate a code for you, even if you’re in Airplane mode. To install this app, do the following:
On your Android device, open the Google Play Store
Search for Google Authenticator
Locate and tap the entry for the official Google app
Tap Install
Tap Accept
Allow the installation to complete
Once the app is installed, you can launch it from within your app drawer. From the welcome screen (Figure B), tap the Begin Setup button.
Figure B
Google Authenticator running on a Verizon-branded Samsung Galaxy S4.
First, you'll be prompted to enter your Google account password. Do that, and tap Done. Next, you'll be required to OK the EULA. If you get a failure (and you most likely will), you'll be prompted to sign in via the web browser. Tap the Next button, and sign into your Google account when prompted. You'll then receive the verification code on your mobile device. Enter that code, and the verification will succeed.
The next step is to set up Google Authenticator. To do this, open up a web browser on your desktop and go to https://g.co/authenticator. You'll be prompted to log into your Google account. Upon successful login, a pop-up window will appear with a QR code. On your device, tap the account (from within Google Authenticator) that you want to set up. In the resulting window, tap Scan barcode. You may be prompted to install the ZXing barcode scanner (if so, tap Install). Hold the device up to the screen so ZXing can scan the code. Upon successful scanning, you'll see the Google Authenticator app display a verification code. The code will only last a short time. You must enter that code into the required text area (within the web browser). When that step is complete, the Google Authenticator will be officially set up.
Now, when you want to log into your 2-step enabled Google account, you can get your verification code for that account from the Google Authenticator app (no more need to get the code sent via SMS or voice message). Again, this app will work even if you’re in Airplane mode.
If you decide 2-step verification is too cumbersome, you can always modify the settings to turn it off.
However, to keep your Google account as secure as possible, consider using 2-step authentication and the Google Authenticator app. Your data will thank you for it.
What do you think? Is 2-step authentication the best way to keep your data from being hijacked? If not, let us know a better solution in the discussion thread below.
OpenDaylight is an open platform for network programmability to enable SDN and create a solid foundation for NFV for networks at any size and scale.
OpenDaylight is an open platform for network programmability to enable SDN and create a solid foundation for NFV for networks at any size and scale. Enterprises, service providers, equipment providers and academia can download Hydrogen today and begin to evaluate, commercialize and deploy SDN and NFV.
OpenDaylight software is a combination of components including a fully pluggable controller, interfaces, protocol plug-ins and applications. The Northbound (programmatic) and Southbound (implementation) interfaces are clearly defined and documented APIs. This combination allows vendors and customers alike the ability to utilize a standards-based and widely supported platform without compromising technical creativity and solution innovation. With this common platform both customers and vendors can innovate and collaborate in order to commercialize SDN- and NFV-based solutions.
Hydrogen is the first simultaneous release of OpenDaylight delivering three different editions to help a wide array of users get up and running as quickly as possible--Base Edition, Virtualization Edition and Service Provider Edition.
For Developers looking to get acquainted with the code currently in the repository, visit theDeveloper Wiki.
Clover is an extension of the Windows Explorer, to add multi-tab functionality similar to Google Chrome browser. After install Clover, you will be able to open multiple folders within the same window, and you can also add folder bookmarks.