Here are some notes I jotted down while installing and configuring Graphite, which isn't a trivial task, although the official documentation isn't too bad. The next step is to turn them into a Chef recipe. These instructions apply to Ubuntu 10.04 32-bit with Python 2.6.5 so YMMV.
Install pre-requisites
# apt-get install python-setuptools
# apt-get install python-memcache python-sqlite
# apt-get install apache2 libapache2-mod-python pkg-config
# easy_install-2.6 django
Install pixman, cairo and pycairo
# wget http://cairographics.org/releases/pixman-0.20.2.tar.gz
# tar xvfz pixman-0.20.2.tar.gz
# cd pixman-0.20.2
# ./configure; make; make install
# wget http://cairographics.org/releases/cairo-1.10.2.tar.gz
# tar xvfz cairo-1.10.2.tar.gz
# cd cairo-1.10.2
# ./configure; make; make install
BTW, the pycairo install was the funkiest I've seen so far for a Python package, and that says a lot:
# wget http://cairographics.org/releases/py2cairo-1.8.10.tar.gz
# tar xvfz py2cairo-1.8.10.tar.gz
# cd pycairo-1.8.10
# ./configure --prefix=/usr
# make; make install
# echo ‘/usr/local/lib’ > /etc/ld.so.conf.d/pycairo.conf
# ldconfig
Install graphite packages (carbon, whisper, graphite webapp)
# wget http://launchpad.net/graphite/0.9/0.9.8/+download/graphite-web-0.9.8.tar.gz
# wget http://launchpad.net/graphite/0.9/0.9.8/+download/carbon-0.9.8.tar.gz
# wget http://launchpad.net/graphite/0.9/0.9.8/+download/whisper-0.9.8.tar.gz
# tar xvfz whisper-0.9.8.tar.gz
# cd whisper-0.9.8
# python setup.py install
# tar xvfz carbon-0.9.8.tar.gz
# cd carbon-0.9.8
# python setup.py install
# cd /opt/graphite/conf
# cp carbon.conf.example carbon.conf
# cp storage-schemas.conf.example storage-schemas.conf
# tar xvfz graphite-web-0.9.8.tar.gz
# cd graphite-web-0.9.8
# python check-dependencies.py
# python setup.py install
Configure Apache virtual host for graphite webapp
Make sure mod_python is enabled:
# ls -la /etc/apache2/mods-enabled/python.load
Create Django database for graphite webapp
# cd /opt/graphite/webapp/graphite
# python manage.py syncdb
Apply permissions on storage directory
# chown -R www-data:www-data /opt/graphite/storage/
Restart Apache
# service apache2 restart
Start data collection server (carbon-cache)
# cd /opt/graphite/bin
# ./carbon-cache.py start
At this point, if you go to graphite.mysite.com, you should see the dashboard of the Graphite web app.
Test data collection
The Graphite source distribution comes with an example client written in Python that sends data to the Carbon collecting server every minute. You can find it in graphite-web-0.9.8/examples/example-client.py.
Sending data is very easy -- like we say in Devops, just open a socket!
Some observations about the above code snippet:
Install pre-requisites
# apt-get install python-setuptools
# apt-get install python-memcache python-sqlite
# apt-get install apache2 libapache2-mod-python pkg-config
# easy_install-2.6 django
Install pixman, cairo and pycairo
# wget http://cairographics.org/releases/pixman-0.20.2.tar.gz
# tar xvfz pixman-0.20.2.tar.gz
# cd pixman-0.20.2
# ./configure; make; make install
# wget http://cairographics.org/releases/cairo-1.10.2.tar.gz
# tar xvfz cairo-1.10.2.tar.gz
# cd cairo-1.10.2
# ./configure; make; make install
BTW, the pycairo install was the funkiest I've seen so far for a Python package, and that says a lot:
# wget http://cairographics.org/releases/py2cairo-1.8.10.tar.gz
# tar xvfz py2cairo-1.8.10.tar.gz
# cd pycairo-1.8.10
# ./configure --prefix=/usr
# make; make install
# echo ‘/usr/local/lib’ > /etc/ld.so.conf.d/pycairo.conf
# ldconfig
Install graphite packages (carbon, whisper, graphite webapp)
# wget http://launchpad.net/graphite/0.9/0.9.8/+download/graphite-web-0.9.8.tar.gz
# wget http://launchpad.net/graphite/0.9/0.9.8/+download/carbon-0.9.8.tar.gz
# wget http://launchpad.net/graphite/0.9/0.9.8/+download/whisper-0.9.8.tar.gz
# tar xvfz whisper-0.9.8.tar.gz
# cd whisper-0.9.8
# python setup.py install
# tar xvfz carbon-0.9.8.tar.gz
# cd carbon-0.9.8
# python setup.py install
# cd /opt/graphite/conf
# cp carbon.conf.example carbon.conf
# cp storage-schemas.conf.example storage-schemas.conf
# tar xvfz graphite-web-0.9.8.tar.gz
# cd graphite-web-0.9.8
# python check-dependencies.py
# python setup.py install
Configure Apache virtual host for graphite webapp
Although the Graphite source distribution comes with an example vhost configuration for Apache, it didn't quite work for me. Here's what ended up working -- many thanks to my colleague Marco Garcia for figuring this out.
# cd /etc/apache2/sites-available/
# cat graphite
# cd /etc/apache2/sites-enabled/
# ln -s ../sites-available/graphite 001-graphite
# cat graphite
ServerName graphite.mysite.com
DocumentRoot "/opt/graphite/webapp"
ErrorLog /opt/graphite/storage/log/webapp/error.log
CustomLog /opt/graphite/storage/log/webapp/access.log common

SetHandler python-program
PythonPath "['/opt/graphite/webapp'] + sys.path"
PythonHandler django.core.handlers.modpython
SetEnv DJANGO_SETTINGS_MODULE graphite.settings
PythonDebug Off
PythonAutoReload Off

SetHandler None

SetHandler None
Alias /media/ "/usr/local/lib/python2.6/dist-packages/Django-1.3-py2.6.egg/django/contrib/admin/media/"
# cd /etc/apache2/sites-enabled/
# ln -s ../sites-available/graphite 001-graphite
Make sure mod_python is enabled:
# ls -la /etc/apache2/mods-enabled/python.load
Create Django database for graphite webapp
# cd /opt/graphite/webapp/graphite
# python manage.py syncdb
Apply permissions on storage directory
# chown -R www-data:www-data /opt/graphite/storage/
Restart Apache
# service apache2 restart
Start data collection server (carbon-cache)
# cd /opt/graphite/bin
# ./carbon-cache.py start
Test data collection
The Graphite source distribution comes with an example client written in Python that sends data to the Carbon collecting server every minute. You can find it in graphite-web-0.9.8/examples/example-client.py.
Sending data is very easy -- like we say in Devops, just open a socket!
import sys
import time
import os
import platform
import subprocess
from socket import socket

CARBON_SERVER = '127.0.0.1'
CARBON_PORT = 2003
delay = 60
if len(sys.argv) > 1:
    delay = int( sys.argv[1] )

def get_loadavg():
    # For more details, "man proc" and "man uptime"
        if platform.system() == "Linux":
            return open('/proc/loadavg').read().strip().split()[:3]
        else:
            command = "uptime"
            process = subprocess.Popen(command, stdout=subprocess.PIPE, shell=True)
            os.waitpid(process.pid, 0)
            output = process.stdout.read().replace(',', ' ').strip().split()
            length = len(output)
            return output[length - 3:length]


sock = socket()
try:
    sock.connect((CARBON_SERVER,CARBON_PORT))
except:
    print "Couldn't connect to %(server)s on port %(port)d" % {'server':CARBON_SERVER, 'port':CARBON_PORT}
    sys.exit(1)

while True:
    now = int( time.time() )
    lines = []
    # We're gonna report all three loadavg values
    loadavg = get_loadavg()
    lines.append("system.loadavg_1min %s %d" % (loadavg[0],now))
    lines.append("system.loadavg_5min %s %d" % (loadavg[1],now))
    lines.append("system.loadavg_15min %s %d" % (loadavg[2],now))

    message = '\n'.join(lines) + '\n'
    #all lines must end in a newline
    print "sending message\n"
    print '-' * 80
    print message
    print
    sock.sendall(message)
    time.sleep(delay)
Some observations about the above code snippet:
- the format of a message to be sent to a Graphite/Carbon server is very simple: "metric_path value timestamp\n"
- metric_path is a completely arbitrary name -- it is a string containing substrings delimited by dots. Think of it as an SNMP OID, where the most general name is at the left and the most specific is at the right
- in the example above, the 3 metric_path strings are system.loadavg_1min, system.loadavg_5min and system.loadavg_15min
Establish retention policies
This is explained very well in the 'Getting your data into Graphite' portion of the docs. What you want to do is to specify a retention configuration for each set of metrics that you send to Graphite. This is accomplished by editing the /opt/graphite/storage/schemas file. For the example above which send the load average for 1, 5 and 15 min to Graphite every minute, we can specify the following retention policy:
[loadavg]
priority = 100
pattern = ^system\.loadavg*
retentions = 60:43200,900:350400
This tells graphite that all metric_paths starting with system.loadavg should be stored with a retention policy that keeps per minute (60 seconds) precision data for 30 days(43,200 seconds), and per-15 min (900 sec) precision data for 10 years (350,400 seconds).
Go wild with stats!
At this point, if you run the example client, you should be able to go to the Graphite dashboard and expand the Graphite->system path and see the 3 metrics being captured: loadavg_1min, loadavg_5min and loadavg_15min. Clicking on each one will populate the graph with the corresponding data line. If you're logged in into the dashboard, you can also save a given graph.
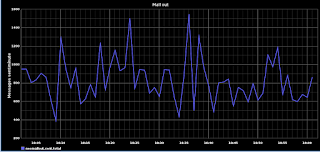
The sky is the limit at this point in terms of the data you can capture and visualize with Graphite. As an example, I parse a common maillog file that captures all email sent out through our system. I 'tail' the file every minute and I count how many message were sent out total, and per mail server in our mail cluster. I send this data to Graphite and I watch it in near-realtime (the retention policy in my case is similar to the loadavg one above).
Here's how the Graphite graph looks like:


")
