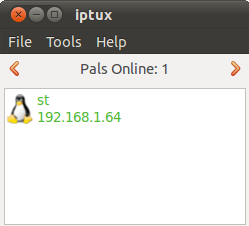
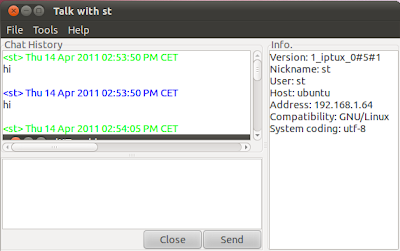
If your computer is connected to a local network (LAN) and want to chat with other connected users on Ubuntu, I recommend that you use Iptux which is an IP messenger client that runs under Linux.Iptux is configured to auto detect clients connected to your local network via a router. It also allows to send messages to other clients as well as sending and sharing files with them. Iptux only runs on LAN, not configured to work online.The advantage of using this software is that you have nothing to configure, everything works automatically. To install it on Ubuntu, launch the terminal and issue this command:sudo apt-get install iptuxTo start it, open Applications > Internet > iptux.Iptux will auto detect users connected to your local network. To chat with a user, double-click its IP address.
To send files on LAN, open File >> Attach File.
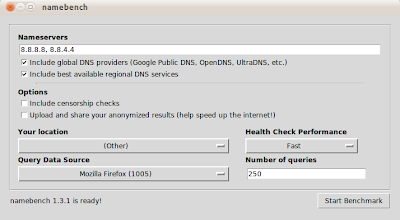
 After saerching the web for a tool for Ubuntu to test DNS servers, I have found Namebench. This tool allows via a graphical user interface to perform tests that will help you decide which DNS servers work best and fast for our Internet connection.Namebench is a cross-platform application that can be run under Mac OS X, Windows and GNU/Linux. In this tutorial, we will show you how to install Namebench on Ubuntu.Get Started1. Install first this dependency to be able to use a GUI for Namebench:sudo apt-get install python-tk2. Using the Terminal, run these commands to install Namebench (v1.3.1) on Ubuntu:wget http://namebench.googlecode.com/files/namebench-1.3.1-source.tgztar -zxvf namebench-1.3.1-source.tgzcd namebench-1.3.1sudo python setup.py install3. To start the application, run this command:./namebench.py----------------------[Update - 10/30/2011]Namebench is now added to the official repository of Ubuntu, you can now install it with this command:sudo apt-get install namebenchThen start it with this command:namebench----------------------4. In the window that pops up, submit name servers separated by a comma, then click Start Benchmark to start your test.
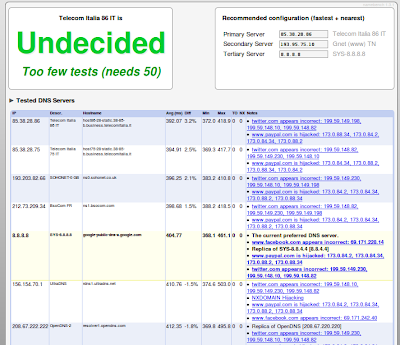
Wait for a few minutes until the test is finished in order to view results. The result page will open in Firefox:
After saerching the web for a tool for Ubuntu to test DNS servers, I have found Namebench. This tool allows via a graphical user interface to perform tests that will help you decide which DNS servers work best and fast for our Internet connection.Namebench is a cross-platform application that can be run under Mac OS X, Windows and GNU/Linux. In this tutorial, we will show you how to install Namebench on Ubuntu.Get Started1. Install first this dependency to be able to use a GUI for Namebench:sudo apt-get install python-tk2. Using the Terminal, run these commands to install Namebench (v1.3.1) on Ubuntu:wget http://namebench.googlecode.com/files/namebench-1.3.1-source.tgztar -zxvf namebench-1.3.1-source.tgzcd namebench-1.3.1sudo python setup.py install3. To start the application, run this command:./namebench.py----------------------[Update - 10/30/2011]Namebench is now added to the official repository of Ubuntu, you can now install it with this command:sudo apt-get install namebenchThen start it with this command:namebench----------------------4. In the window that pops up, submit name servers separated by a comma, then click Start Benchmark to start your test.
Wait for a few minutes until the test is finished in order to view results. The result page will open in Firefox:
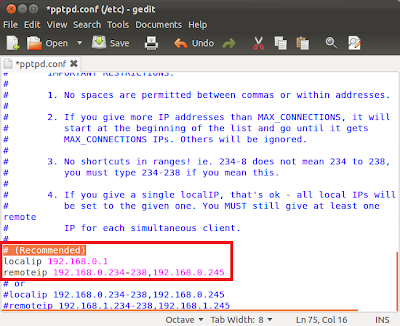
 A VPN network (Virtual Private Network) allows to send data between two computers either across a public or shared network, which is a perfect solution for establishing long-distance or secured network connections. In this tutorial we will see how to easily create a VPN network under a system running Ubuntu 11.10/11.04.Getting Started1. First you need to install the pptpd server (PPTP VPN server), which is supported by Microsoft and some other network vendors. Open the terminal and run this command:sudo apt-get install pptpd2. Now edit the /etc/pptpd.conf file with this command:sudo gedit /etc/pptpd.conf3. At the bottom of the file, you will find recommended settings for both localip and remoteip. Uncomment localip andremoteip, then configure your IP address range for remoteip if needed.localip is the IP address of your server adapterremoteip contains the IP address range allowed for users to use when connecting through VPN to your server.
When you finish your configuration, save the file and close it.4. Now we must set up some users we want to grant access to the VPN server. Via the terminal run this command to edit the /etc/ppp/chap-secrets file:sudo gedit /etc/ppp/chap-secrets5. Add now users you want to grant access to your VPN server using these examples:# Secrets for authentication using CHAP # client server secret IP addresses steve pptpd password 211.30.0.0/14 richard pptpd password 212.220.0.0/12
A VPN network (Virtual Private Network) allows to send data between two computers either across a public or shared network, which is a perfect solution for establishing long-distance or secured network connections. In this tutorial we will see how to easily create a VPN network under a system running Ubuntu 11.10/11.04.Getting Started1. First you need to install the pptpd server (PPTP VPN server), which is supported by Microsoft and some other network vendors. Open the terminal and run this command:sudo apt-get install pptpd2. Now edit the /etc/pptpd.conf file with this command:sudo gedit /etc/pptpd.conf3. At the bottom of the file, you will find recommended settings for both localip and remoteip. Uncomment localip andremoteip, then configure your IP address range for remoteip if needed.localip is the IP address of your server adapterremoteip contains the IP address range allowed for users to use when connecting through VPN to your server.
When you finish your configuration, save the file and close it.4. Now we must set up some users we want to grant access to the VPN server. Via the terminal run this command to edit the /etc/ppp/chap-secrets file:sudo gedit /etc/ppp/chap-secrets5. Add now users you want to grant access to your VPN server using these examples:# Secrets for authentication using CHAP # client server secret IP addresses steve pptpd password 211.30.0.0/14 richard pptpd password 212.220.0.0/12
Note: "password" is the password that the user will use to connect to the VPN network.To allow all IP addresses for a user, use this example:# Secrets for authentication using CHAP # client server secret IP addressessteve pptpd password *
6. Finally, after each modification, you have to restart the pptpd using this command:sudo /etc/init.d/pptpd restartThat's it!
 In this tutorial we will see how to use the terminal to quickly convert files having the .nrg extension to iso. The .nrg extension is derived from the Nero AG company and used by Nero Burning ROM to create and burn CD images.If you want a quick way to convert from NRG to ISO under Ubuntu, then you need first to installnrg2iso using this command: sudo apt-get install nrg2isoOnce nrg2iso is well installed, open the terminal and cd to the folder containing the .nrg file and run this command:nrg2iso image.nrg output.isoReplace "image.nrg" with the name of your file. "output.iso" is the name of the iso file that will be created in the current folder, you can rename it to whatever you want.That's it!